Posts Tagged ‘koch snowflake’
Playing with FreeDOS and GW-Basic
Introduction
Continuing with my series on ancient versions of the BASIC programming language, this week we’ll look at GW-Basic which was Microsoft’s BASIC for the original MS-DOS based computers. This predates QuickBasic, Visual Basic and VB.Net. The program is similar to last week’s Applesoft BASIC implementation since both were created by Microsoft. Applesoft was written in 6502 Assembly Language, and then ported to 8088 Assembly Language with minor tweaks. GW-Basic was replaced with QBasic in MS-DOS 5.0. On May 21, 2020, Microsoft open sourced GWBasic and you can browse the source code here.
Getting GWBasic
GWBasic isn’t included with Windows anymore, but since it’s been open sourced, you could build GWBasic from the source code, and several people have done this and made the executable available. I downloaded it from the Internet Archive. It is a single executable, so it only needs to be saved somewhere in your PATH to run. If you run it on Windows 11, you get:
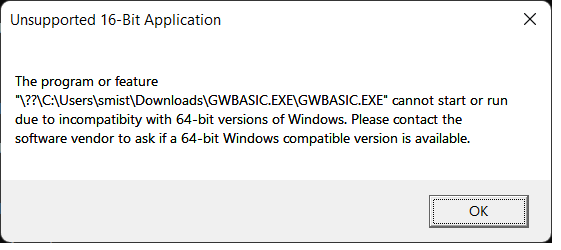
Since Windows doesn’t support running 16-bit programs anymore. You could run it from an MS-DOS emulator, in a manner similar to what we did for the Apple II last time, but instead let’s take a different approach.
Enter FreeDOS
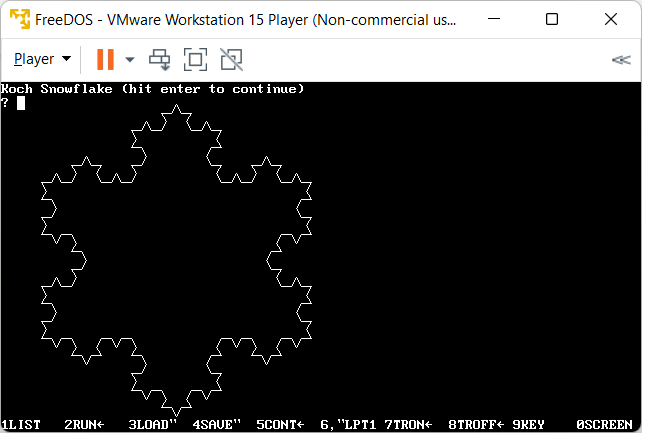
FreeDOS was started in 1994 after Microsoft announced they were no longer supporting MS-DOS and forcing everyone to Windows. It was created as a free open source alternative to allow everyone who loved MS-DOS to keep running free of Microsoft’s control. FreeDOS is a complete operating system and it runs GW-Basic perfectly. If you want to continue running MS-DOS programs like WordPerfect, Lotus 123 or any number of MS-DOS games, then FreeDOS is a great alternative.
Rather than install FreeDOS directly, I installed it in a VMWare image, where it runs great on my Windows 11 laptop. The installation is relatively pain free, using the LiveCD image from FreeDOS’s website. Once running, I needed to copy GWBASIC.EXE to that image. I did this by using AnyBurn to create an ISO image containing GWBASIC.EXE, which I could then mount as a CD-ROM drive from the VMWare player, and then copy GWBASIC.EXE over into a folder in the PATH on the FreeDOS harddrive. Then I typed in the AppleSoft program from last time, made a couple of minor tweaks to the graphics commands, initial screen location, and size and had a working program to again draw a Koch Snowflake.
The full program listing is at the end of this article. To extract the source code you need to save the GWBasic program with the A option so save will save the file in ASCII rather than a tokenized binary format. Then I used WinImage to create a floppy disk image which I could mount in the VMWare player and copy the file to. Note that VMWare loads CDRoms as read-only, so you can’t copy files to them, and I happen to be away from home and didn’t have a USB key which would also work.
Summary
Playing with GW-Basic is fun, and running under FreeDOS is just like running an old pre-Windows PC under MS-DOS. GWBasic has newer features I could have taken advantage of, but it is still of the line number required, fairly simple versions that people tend to be nostalgic for.
If you have any old MS-DOS 16-bit programs you want to run, this is a great way to do it. Kudos to Intel/AMD that you can still run these 16-bit programs, even if Microsoft doesn’t allow it anymore. FreeDOS itself is a 16-bit operating system.
10 REM Program to Draw a Koch Snowflake
20 DIM DIST(10)
30 DIM LEVEL(10)
40 ST = 1
50 SCREEN 9
55 CLS
60 PRINT "Koch Snowflake (hit enter to continue)"
70 SX = 40
80 SY = 100
90 SA = 0
100 ST = 1
110 DIST(1) = 270
120 LEVEL(1) = 4
130 PI = 3.14159
140 X = SX
150 Y = SY
160 A = SA
170 A = A + 60
180 ST = 1
190 GOSUB 300
200 A = A - 120
210 ST = 1
220 GOSUB 300
230 A = A - 120
240 ST = 1
250 GOSUB 300
255 INPUT T$
260 END
300 REM Snowflake Side Subroutine
310 BR = 0
320 ST = ST + 1
330 IF LEVEL(ST - 1) = 1 THEN BR = 1
340 IF BR = 1 THEN ST = ST - 1
350 IF BR = 1 THEN GOSUB 1000
360 IF BR = 1 THEN RETURN
370 LEVEL(ST) = LEVEL(ST - 1) - 1
380 DIST(ST) = DIST(ST-1) / 3
390 GOSUB 300
400 A = A + 60
410 GOSUB 300
420 A = A - 120
430 GOSUB 300
440 A = A + 60
450 GOSUB 300
460 ST = ST - 1
470 RETURN
1000 REM Tutle Move Routine
1010 OX = X
1020 OY = Y
1030 X = X + DIST(ST) * COS(A*PI/180)
1040 Y = Y + DIST(ST) * SIN(A*PI/180)
1050 LINE (OX,OY)-(X,Y)
1060 RETURN
Koch Snowflake in Applesoft Basic
Introduction
After learning to program in high school in BASIC on a PDP-11, I went to University where first year computer science was taught using WATFIV (Waterloo Fortran IV), where we had to write our programs by hand, type them into an IBM card punch machine and then submit our stack of punch cards to the data center to run. Later we would receive back our punch cards along with any printout from the program.

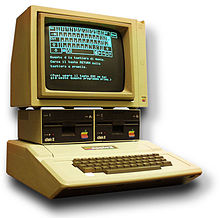
Definitely a step backwards from the interactive programming on the PDP-11. I joined the co-op program and after my first work term, used much of the money I made to buy an Apple II+ computer. This returned me to BASIC programming with Applesoft BASIC, which was created by Microsoft for Apple to replace their original Integer Basic.
Last time I produced a Koch Snowflake in QB64, a version of BASIC more advanced than the early BASICs like on the PDP-11 or Apple II. QB64 had functions, subroutines, structured programming and line numbers were optional. I wondered about producing the same program on a more original version of BASIC. Applesoft is a good candidate as it uses line numbers, has no structured programming, but it does have a handful of builtin graphics commands that allow us to write our Koch Snowflake program. The main challenge is what to do about the recursive function calls.
Apple II Emulators
Although I sold my Apple II+ many years ago, to buy an IBM AT clone, it turns out many people have put a lot of effort into writing Apple II emulators and that you can find an Apple II emulator on most systems, In this case I used the AppleWin emulator, which was easy to install and up and running in no time. Below is the Koch Snowflake on the Apple screen. This is in the Apple II’s high resolution graphics mode of 280×192 in 6 colors. Rather low res by today’s standards.
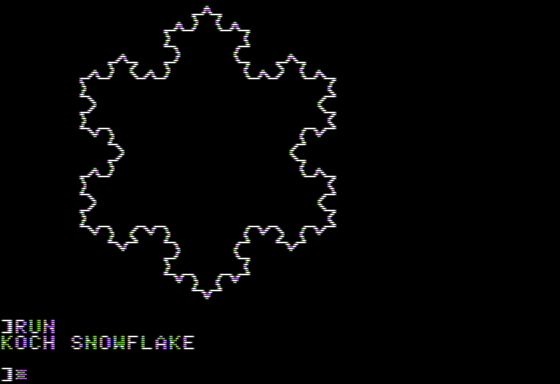
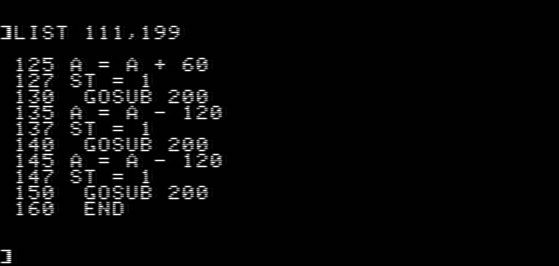
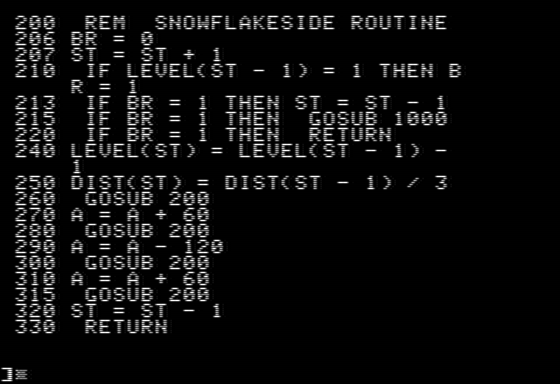
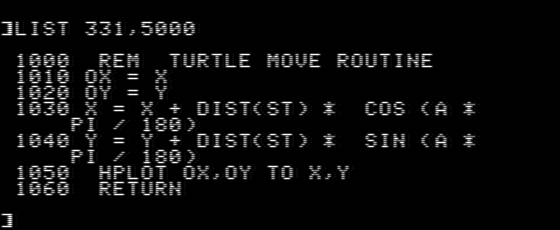
Applesoft BASIC programs aren’t stored on the disk as regular text files, they are stored in a tokenized format which helps the interpreter run them faster. This is a problem as you can’t easily transfer the files back and forth to a PC. Since the program is small, I just typed it into the Apple, but it means to show the listing you get the following screen shots rather than text in the article.
The big innovation of Applesoft BASIC is that variables are floating point by default rather than integer, so this works well for the couple of calculations we need to do. The other thing is that variable names can be longer, but only the first two characters are used for uniqueness, hence AB = ABC = ABCD. The program roughly follows the same logic as the program in the last article, except no functions and recursion is handled by a simple stack stored in a couple of arrays.
The Program
The first part of the program initializes the variables, defines the arrays that will be used to stack level and line length and sets the graphics mode and color (white = 3).
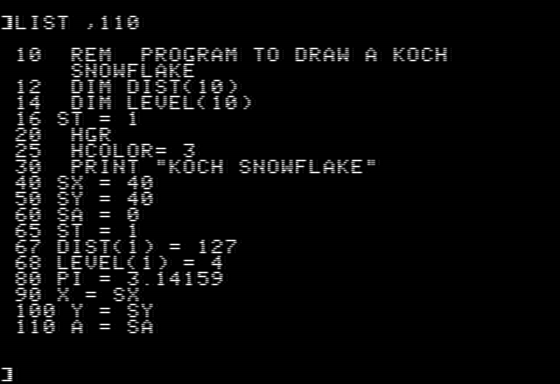
The next part corresponds to the KochSnowflake subroutine in the last article that draws the main three sides of the snowflake.
Lines 200 to 330 correspond to the SnowflakeSide subroutine, note the lack of structured programming forces us to have four IF statements.
Lines 1000 to 1060 are the turtle graphics routine. We don’t have a turn routine, as the angle is a global variable. Move is similar to the Move Subroutine in the last article.
All in all, still quite a simple program. Editing programs in Applesoft is quite old school, but the memory of how to do things returns fairly quickly. Still people who’ve only used graphics editors might find it baffling.
Summary
It’s great that people have put so much effort into creating such high quality emulators of historical computer systems. This was a nice journey back down memory lane of how I did most of my programming in University from second year onwards. The Apple emulators support Apple’s Pascal system and even the add-on Z80 CPM cards. Perhaps I wouldn’t want to produce modern commercial software this way, but I think there are lessons to be learned from learning some of the old ways.
Back to Basics
Introduction
I originally learned to program in grade 10, where my highschool had a DEC LA36 DECwriter terminal connected through a 300 baud modem to a local college’s DEC PDP-11 running the RSTS-11 operating system. We wrote programs in the built-in BASIC programming language. This was 1976 back before structured programming took off where programs had line numbers and you used GOTO statements all over the place. The advantage of BASIC is that it is simple to learn and the students at our high school picked it up pretty quickly. We wrote programs to perform scientific calculations and wrote all sorts of games. Programming back then was a lot of fun. I’ve blogged about quite a few programming languages, including Python, Fortran, Assembly Language, Erlang, Julia, Scratch, Processing, and C. I was just remembering BASIC and wondered about playing around with that. In my career I worked quite a bit with Microsoft’s Visual Basic, but wanted something more old school and open source. Similarly VB.Net is just C# without the semi-colons. After a bit of research, I found there are dozens of implementations of BASIC floating around. Some require line numbers, some contain structured programming, some are interpreters, some are compilers. I may survey some of these in a later blog, but as an example I thought I’d play with QB64 abit which is a compiler implementation of QBasic/QuickBasic. This implementation runs on Windows, Linux and MacOS, but as a compiler I think it only emits Intel/AMD assembly code. I ran this on Ubuntu Linux 22.04 on my laptop.
Koch Snowflake Yet Again
I use drawing the Koch Snowflake as a good example, as it’s a simple program, does something nice, but is long enough to demonstrate a few things of the language. QB64 has lots of built in graphics commands, so why not. The full listing is at the end of the article.
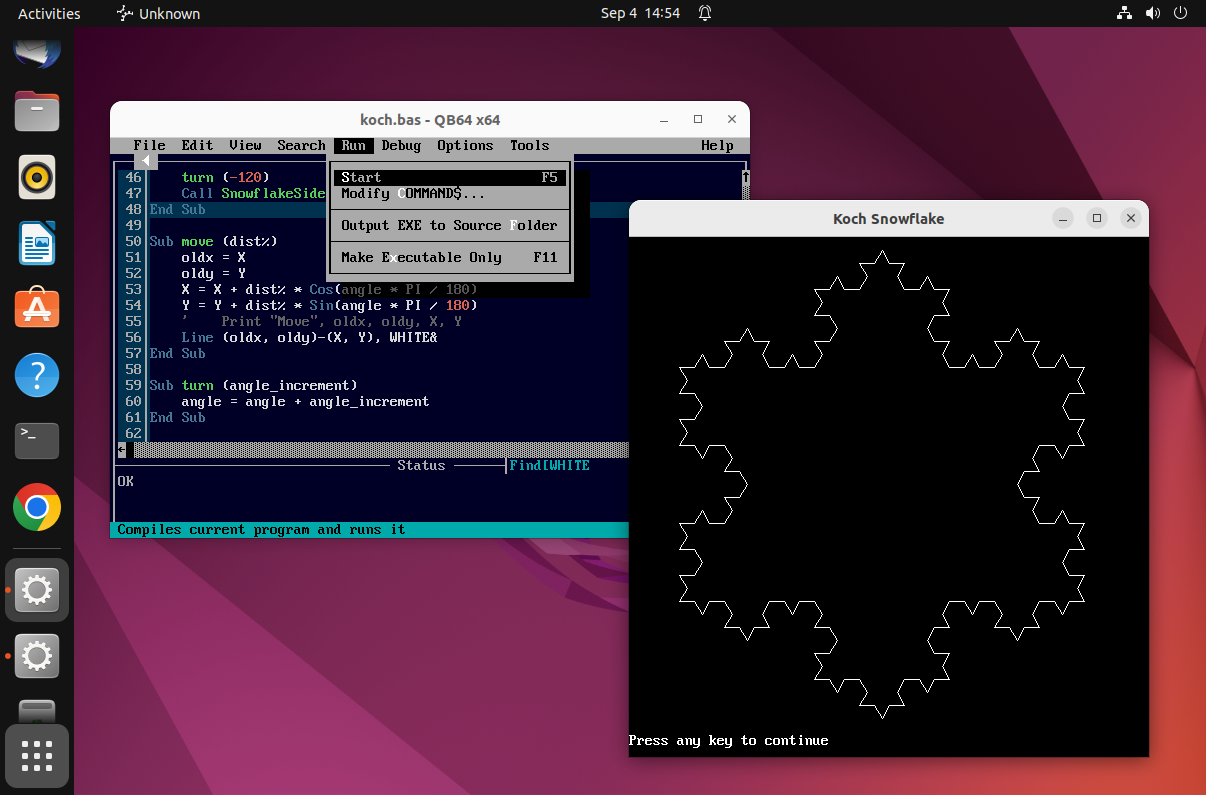
QB64 comes with a character based IDE which is good enough for basic development. Of course the source files are text files, so you can edit them in any editor you prefer. I was worried about the implementation, as I usually use recursion and wasn’t sure if this would be supported, but it turned out this wasn’t a problem. QB64 could easily handle the task and the program is actually fairly compact.
Notes on QB64
- Installation: I installed QB64 on Ubuntu Linux, the Linux version of QB64 has a shell script setup_lnx.sh which installs all the dependent packages along with the QB64 program. The script seems to know about quite a few flavors of Linux, but I can only attest to it running well on Debian based distributions.
- Global Variables: I was expecting any variables to be defined or used outside a sub or function to be global, however this isn’t the case you have to “DIM SHARED” any variables you want to be global.
- Variable Types: By default variables are single precision floating point. If you need them to be something else then you can use a “DIM” statement or there are a number of special characters that when placed on the end of a variable specify the type. Hence the & at the end of WHITE& tells QB64 this is a long integer. If you leave this off the program won’t work as the value produced by _RGB32(255, 255, 255) doesn’t fit in a floating point variable.
- Line Numbers: This is a newer flavor of Basic with structured programming and hence no line numbers. You can always add labels and GOTO statements if you want to.
- There is a JavaScript version of the compiler that emits JavaScript code, but it didn’t work on this program, generating JavaScript with a syntax error which I think was to do with the recursion. However, playing with QB in the JavaScript sandbox is fun.
Summary
QB64 is fun to play with. It’s not as old as the RSTS-11 Basic I learned in school and is a bit newer than the AppleSoft Basic I played with on my old Apple II+. If you worked with either QuickBasic or GWBasic on MS-DOS then this will be familiar, including the character based IDE.
In education, kids seem to start programming in Scratch and then progress to programming in Python. I wonder if there is room for Basic in-between as something more substantial than Scratch but without the complexity of the modern Python language. You can do a lot with Basic without the steep learning curve associated with more modern systems.
‘ Program to draw a Koch snowflake
_Title “Koch Snowflake”
STARTX = 50
STARTY = 130
STARTANGLE = 0
LEVEL% = 3
DECLARE SUB KochSnowflake(level%)
DECLARE SUB SnowflakeSide(level%, size%)
DECLARE SUB move(dist%)
Dim Shared X, Y, angle, PI, WHITE&
WHITE& = _RGB32(255, 255, 255)
PI = 3.14159
X = STARTX
Y = STARTY
angle = STARTANGLE
Screen _NewImage(520, 520, 32)
Cls
KochSnowFlake (LEVEL%)
Sub SnowflakeSide (level%, size%)
If level% = 0 Then
move (size%)
Else
Call SnowflakeSide(level% – 1, size% / 3)
turn (60)
Call SnowflakeSide(level% – 1, size% / 3)
turn (-120)
Call SnowflakeSide(level% – 1, size% / 3)
turn (60)
Call SnowflakeSide(level% – 1, size% / 3)
End If
End Sub
Sub KochSnowFlake (level%)
turn (60)
Call SnowflakeSide(level%, 400)
turn (-120)
Call SnowflakeSide(level%, 400)
turn (-120)
Call SnowflakeSide(level%, 400)
End Sub
Sub move (dist%)
oldx = X
oldy = Y
X = X + dist% * Cos(angle * PI / 180)
Y = Y + dist% * Sin(angle * PI / 180)
Line (oldx, oldy)-(X, Y), WHITE&
End Sub
Sub turn (angle_increment)
angle = angle + angle_increment
End Sub
Rust Never Sleeps
Introduction
Rust is a relatively new programming language that first appeared in 2010. The purpose of Rust is to provide a systems programming language with the performance of C/C++ but without all the memory/pointer/multithreading/security problems. Version 6 of the Linux kernel will be adding support for writing modules in Rust and many companies have been writing their backend web servers in Rust.
I thought I’d have a look at programming in Rust and had a go on both a regular Raspberry Pi as well as with embedded Rust on the Raspberry Pi Pico. In this article we’ll look at a simple program to generate a Koch snowflake, a relatively simple program that still shows some of the features of Rust. The program listing is at the end of the article.

How to Create Graphics?
Rust doesn’t include a giant do everything runtime like C# has in .Net or Java has in the JRE. Instead people outside of the core language group have developed wrapper libraries of various commonly used systems. For GUI and graphics, I chose to use the wrapper for GTK3 as this seems to have good support and the included Cairo 2D drawing library is fairly good.
This works, but you can’t write GUI type design patterns like MVC in Rust because their memory management schemes are inherently unsafe or require garbage collection. Rust enforces the lifetime of every object and ensures there are no hanging references, this makes the sea of objects model most GUIs use where each object has references to a bunch of other objects illegal. Rust recommends alternate design patterns, but if you are wrapping an existing legacy library then you will have to work around a few issues.
Installing Rust and Required Libraries
Rust is easy to install, but it only installs Rust components. Any wrapped components need to be installed separately, in our case GTK3’s development components:
sudo apt-get install libgtk-3-dev
Now we can install Rust, using rustup from their website: https://rustup.rs/. The current command to do this is:
curl --proto '=https' --tlsv1.2 -sSf https://sh.rustup.rs | sh
But best to copy the command from their website, in case it’s been updated. Then at the prompt select “1 – proceed with installation” to download and install Rust.
The installation adds a number of environment variables to the shell initialization scripts, to proceed you need to either restart a new terminal window or run:
source "$HOME/.cargo/env"
Now we can create our Rust project, first creating a folder for our Rust projects and then using Rust’s cargo utility to create a project.
    mkdir rust
    cd rust
    cargo new fractal1 --bin --vcs none
The “–vcs none” part is to start cargo creating a github repository as well. We now have a working Rust program, which if we run with:
cargo run
Will compile the simple program and print “Hello World”. The first time you run, the compilation takes a while since there are a number of system components that need to be compiled the first time.
To produce the Koch snowflake fractal, copy the Cargo.toml file at the bottom of this article over the one created by cargo and then copy the main.rs file over the created file in the src folder.
With these in place, type:
cargo run
Then after everything compiles, the program should run and produce a window with the Koch snowflake at level 3.
Notes on the rust.rs
The GTK3 wrapper is from https://gtk-rs.org/. I based the program on one of the examples in their Github repository. I found these examples to be the best source of information on the usage of this library as the documentation tends to be of a reference nature and doesn’t show how to put the parts together into a working program.
If you’ve seen any of my other blog articles where I created a Koch snowflake as an example, then you might wonder why I don’t store the Cairo drawing context in the TurtleGraphics struct rather than having it as a parameter to most method calls. The reason is Rust’s rules around avoiding dangling pointers, where you need to ensure the lifetime rules of every object. This means you can’t just store references in objects without guaranteeing their lifetime is less than the reference. In most practical cases this is difficult and the hoops to jump through are far worse than just passing it as a parameter. Not as object oriented perhaps, but on the other hand, no dangling pointers and no garbage collection.
Summary
Rust wants to replace C as a system programming language for projects such as the Linux kernel, web servers and even video games. Rust isn’t a simple language, it is large and some of its parts are quite complex. The safety rules to ensure that pointers are correct place a lot of limitations on what you can do as a programmer. The Rust parts of your program are safer than corresponding C programs, but with the state of things today, your Rust program will wrap a lot of components written in C/C++ that could be doing all sorts of bad things with pointers. The other limitation is that you can’t easily call Rust objects from other languages, limiting some interoperability scenarios.
I’m going to continue learning and playing with Rust. It has a number of appealing features, but I’m not sure if its complexity and strict enforcement of lifetime and ownership rules are too constraining.
Source Code Listings
The Cargo.toml file:
[package]
name = “fractal1”
version = “0.1.0”
edition = “2021”
# See more keys and their definitions at https://doc.rust-lang.org/cargo/reference/manifest.html
[dependencies]
gtk = “*”
gio = “*”
gdk = “*”
cairo = “*”
The main.rs follows:
use std::f64::consts::PI;
use gtk::prelude::*;
use gtk::DrawingArea;
use gtk::cairo::{Context};
const STARTX:f64 = 50.0;
const STARTY:f64 = 130.0;
const STARTANGLE:f64 = 0.0;
const LEVEL:i64 = 3;
fn build_ui(application: >k::Application) {
drawable(application, 500, 500, |_, cr| {
cr.set_source_rgb(0.0, 0.0, 0.0);
cr.set_line_width(1.0);
cr.move_to(STARTX, STARTY);
let tg = TurtleGraphics{x:STARTX, y:STARTY, angle:STARTANGLE};
let mut kf = KochFlake{tg: tg};
kf.koch_snowflake(cr, LEVEL);
cr.stroke().expect(“Invalid cairo surface state”);
Inhibit(false)
});
}
fn main() {
let application = gtk::Application::new(
Some(“com.github.gtk-rs.examples.cairotest”),
Default::default(),
);
application.connect_activate(build_ui);
application.run();
}
pub fn drawable<F>(application: >k::Application, width: i32, height: i32, draw_fn: F)
where
F: Fn(&DrawingArea, &Context) -> Inhibit + ‘static,
{
let window = gtk::ApplicationWindow::new(application);
let drawing_area = Box::new(DrawingArea::new)();
drawing_area.connect_draw(draw_fn);
window.set_title(“Koch Snowflake”);
window.set_default_size(width, height);
window.add(&drawing_area);
window.show_all();
}
struct KochFlake
{
tg: TurtleGraphics
}
impl KochFlake
{
pub fn koch_snowflake(&mut self, cr:&Context, level:i64)
{
self.tg.turn( 60 );
self.koch_snowflake_side(cr, level , 400);
self.tg.turn( -120 );
self.koch_snowflake_side(cr, level, 400);
self.tg.turn( -120 );
self.koch_snowflake_side(cr, level, 400);
}
pub fn koch_snowflake_side(&mut self, cr:&Context, level:i64, size:i64)
{
if level == 0
{
self.tg.move_dist( cr, size );
}
else
{
self.koch_snowflake_side( cr, level – 1, size / 3 );
self.tg.turn( 60 );
self.koch_snowflake_side( cr, level-1, size / 3);
self.tg.turn( -120 );
self.koch_snowflake_side( cr, level-1, size / 3);
self.tg.turn(60);
self.koch_snowflake_side( cr, level-1, size / 3);
}
}
}
struct TurtleGraphics
{
x:f64,
y:f64,
angle:f64
}
impl TurtleGraphics
{
pub fn move_dist(&mut self, cr:&Context, dist:i64)
{
self.x = self.x + dist as f64 * f64::cos( self.angle * PI / 180.0);
self.y = self.y + dist as f64 * f64::sin( self.angle * PI / 180.0);
cr.line_to(self.x, self.y);
}
pub fn turn(&mut self, angle_increment:i64)
{
self.angle = self.angle + angle_increment as f64;
}
}
Drawing in Code by Processing
Introduction
Last time, we started to explore Arduino programming. I noted that the Arduino IDE and language is largely based on Processing. In this article we’ll look at the Processing language and environment. Processing was designed to be a simple language to allow people in the Graphical Arts world to learn programming. Hence the language is oriented around drawing and animation.
There are quite a few education oriented programming systems such as Scratch which I talked about here. Processing is nice because it is really a subset of Java, so as you learn and become proficient at Processing, you are also learning a lot of Java. The drawing library in Processing is popular and has been ported to many other languages such as Python. The drawing library draws from PostScript and OpenGL and is quite powerful, in spite of its simplicity. Khan Academy uses a JavaScript version of Processing, namely ProcessingJS to teach programming for kids.
The Processing IDE and the subset of Java it uses are intended to be simple. The goal is to eliminate as much overhead as possible so you just write your program as sketches where you iteratively develop the end result. The feeling was that program design and object oriented design add too much of a barrier for non-technical people to learn programming. For artists, it is much more natural to learn by experimenting and playing rather than trying to design something before starting to program.
Drawing a Koch Snowflake
We drew a simple Koch Snowflake fractal back in my article introducing writing iOS Apps in Swift. The complete Processing code for this is at the end of the article. Notice how much simpler it is to do this in Processing than in Swift. This is part of why Processing is such a good language to learn programming with.
You enter the code into the Processing IDE:
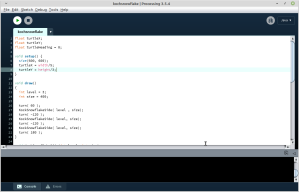
And then hit the green play button to run the program and the following window pops up:
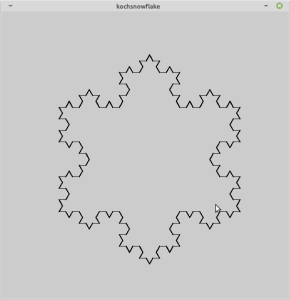
Feel free to play with the program (called a sketch) to do things like change the size, level or anything else.
Every Processing sketch has two routines:
- setup: run once when the program starts before anything else.
- draw: run repeatedly at the configured frame rate.
In our sketch below, the routine that does the actual drawing is the line() function. The first line in setup() is size() which configures the size of the drawing window.
All in all this is a fairly simple program to create something as complex as this fractal. This is why Processing and the Processing graphics library is so popular.
Gallery
Processing is an open source language and environment, but further the folks at Processing.org encourage the sharing of work. It is interesting to browse the work that other artists have done. Here are a couple of links:
Exhibition: a curated exhibition of projects.
OpenProcessing: Gallery of submitted projects.
Hour of Code: Gallery of submitted projects.
Gallery: Place to share and discuss projects.
Summary
If you are interested in learning how to code and you have an artistic temperament then Processing is a good place to start. If you’re interested in learning Java, then Processing is a good way to go. If you are a programmer and interested in learning graphics or animation then Processing is a really good place as well.
Processing source code for the Koch Snowflake fractal:
float turtleX;
float turtleY;
float turtleHeading = 0;

void setup() {
  size(600, 600);
  turtleX = width/5;
  turtleY = height/3;
}

void draw()
{
  int level = 3;
  int size = 400;

  turn( 60 );
  KockSnowflakeSide( level , size);
  turn( -120 );
  KockSnowflakeSide( level, size);
  turn( -120 );
  KockSnowflakeSide( level, size);
  turn( 180 );
}

void KockSnowflakeSide(int level, int size)
{
  if (level == 0)
  {
      forward( size );
  }
  else
  {
      KockSnowflakeSide( level - 1, size / 3 );
      turn( 60 );
      KockSnowflakeSide( level-1, size / 3);
      turn( -120 );
      KockSnowflakeSide( level-1, size / 3);
      turn(60);
      KockSnowflakeSide( level-1, size / 3);
  }
}

void forward(float amount) {

  float newX = turtleX + cos(radians(turtleHeading)) * amount;
  float newY = turtleY + sin(radians(turtleHeading)) * amount;

  line(turtleX, turtleY, newX, newY);
  fill(0);

  turtleX = newX;
  turtleY = newY;
}

void turn(float degrees) {
  turtleHeading += degrees;
}
My First Swift Application
Introduction
Back in 2013 I purchased a MacBook Air, installed XCode and wrote a small Objective-C program to draw a simple fractal on an iPad. Which I then blogged on here. Now we are a few years later and I thought I would give Apple’s new programming language Swift a try and see how iOS/OSX development has evolved as a result. For more details on Koch snowflakes and what I the program does, check out my original article.
The Evolution from Objective-C to Swift
Objective-C was one of the first object oriented extensions to the C Programming language. Its first main usage was by Steve Jobs and NeXT Computer as the primary programming language of the NeXTStep operating system which later became OS/X and iOS. Objective-C had a lot of innovative ideas behind it like treating everything as sending messages between objects (rather than directly calling methods). But then C++ came along and became the main standard for an object oriented extension to C.
One of the complaints against C is that it puts a lot of burden on programmers since they are dealing with memory and the computer architecture at a very low level. You are manipulating memory pointers directly, allocating memory buffers, etc. This is all very powerful and produces very fast, compact and efficient programs. But there is a lot of room for error, since making a mistake here will lead to buffer overruns, program crashes and such. In the days of standalone computers this was annoying but not fatal. Now with the internet, these sorts of problems lead to security vulnerabilities and server crashes. All that being said, if you have skilled programmers, C, Objective C and C++ are very powerful and you can produce great reliable programs with them.
To address these problems, Sun Microsystems invented Java. Java was essentially an object oriented extension of C, but with all the pointers and low level memory access removed. Java then included a large standard class library to give an alternate way of doing all the low level things you did in C. Java compiled to P-Code which ran on a Java Virtual Machine. This could then be sandboxed to allow greater security. To some degree this was to try to reach a compromise between scripting languages like JavaScript or VBScript and true fully compiled languages like C++. I.e. to make it easier to program with less gotchas, but still maintain the compiler checks for correctness and modules features required to program large systems.
Microsoft saw the potential and growing success of Java and came up with their own competing system namely C#. C# was initially very similar to Java with a very similar class library. Microsoft actually originally had their own implementation of Java, but it really sucked and it was easier to move true Java programs to C# than it was to Microsoft Java. Similar to the Java VM, C# runs on Microsoft’s .Net framework which isolates you from the underlying operating system.
Java got off to a great start, but as Sun workstations went into decline, Sun couldn’t put the necessary R&D resources into supporting Java and forward progress slowed. Oracle bought Sun and took over Java, but Oracle doesn’t seem to be putting much effort into Java, besides suing the various users of it like Google.
Microsoft has been doing a lot of good work developing C# and has been putting a lot of work to evolving the language and evolving the .Net framework. Certainly modern C# has come a long way and contains a lot of powerful modern object oriented features that weren’t present initially and aren’t present in Java.
A couple of years ago Apple finally noticed this trend and produced their own modern object oriented language namely Swift. Swift isn’t a true object oriented extension to C, the core language has a lot of differences to C. Some things are quite similar like building expressions, but other things are quite different, like how you define variables. Swift has all the modern object oriented features like closures, extensions, generics, etc. which you would expect. Further since a lot of the language was re-imagined over C, it has a lot of nice built in features like ranges. If you look at just the core language, its quite clean, powerful and modern.
There are quite a few blog posts comparing these various languages such as these two articles on C# vs Swift: C# vs Swift and C# vs Swift. If you Google, there are a lot of discussions on the various points of these languages. Often the discussions also consider Go and Python.
Frameworks
The ugliness in all these safe modern languages comes in with how they interact with the underlying operating system. Neither Apple nor Microsoft re-wrote their operating systems to be safe and natively support these. At some point you have the transition from the nice safe, clean object oriented world into the old pointer based C world. Microsoft with the underlying Windows DLLs and Apple with the Objective-C based application frameworks and then to the underlying Unix based operating system kernel.
Sun took the highest approach making its own frameworks for everything and then leaving it to the JVM implementation on each system to translate native to this, so to a Java programmer everything looks the same. This sounds great, but doesn’t work well in practice since it doesn’t give you access to all the operating system features and makes your program less competitive. This resulted in the development of JNI and Java programs natively calling through to the ugly world outside the JVM.
Microsoft built the .Net framework on top of Windows, which provides most things you need and has been filling in more and more. But you still often need to call native DLLs directly (which makes you application unsafe).
Apple decided to use the current iOS/OSX frameworks directly and allowed Swift to interact bi-directionally with Objective-C libraries. This then allowed Swift programmers to directly leverage their knowledge of UIKit for instance to write programs. The downside of this is that it puts a lot of ugly code directly in your nice clean Swift program to deal with these older frameworks.
Koch Snowflakes Revisited
I ported my Objective-C Koch Snowflake program from 2013 over to Swift. This turned out to be pretty straight forward. I think the program source code is much cleaner once moved over to Swift and I definitely prefer Swift to Objective-C for programming. Since I’ve been doing mostly C# programming the past few years, it fells much more natural to me than Objective-C.
Although most of the code is cleaner, you can see a bit of ugliness around the interactions with the UIKit framework. I especially don’t like using the types their rather than the native Swift data types.
Other Development Notes
For the UI, I used the standard storyboard screen designer which is shared by both Objective-C and Swift. Like most systems that edit your code, you just need to be careful not to edit the code inserted by the UI designer or they get out of sync and produce weird errors. I changed a variable name generated by the UI designer and it was a bit of a head scratcher tracing back from the error message to what was wrong.
I created the project as a standard single page application and set it to run on both an iPhone and iPad. There are now 12 standard devices of various iPad and iPhone models directly supported, I tried a couple of them, but certainly didn’t test with each one.
Generally, when you make a project you can create any new class in either Swift or Objective-C and have them interoperate. So you can bring in older code rather than porting it.
The debugger is quite nice, its easy to step through your code and see what is going on. Generally, XCode is a very powerful development platform and has a lot of great tools to support you in your programming. I haven’t added any unit tests yet, but I plan to have a look at the testing framework next and perhaps that will be the topic of a future blog.

Summary
I think Swift is a huge improvement for programming iOS and OS/X over Objective-C. Although Swift is open source and can be run on Linux, the Apple UI frameworks like UIKit are not open source. So I don’t think Swift will be any help in developing cross platform programs (unless they are very simple command line utilities). Swift is quite a modern language and its object oriented implementation is quite nice. Apple seems to be putting quite a bit of effort into Swift with version 3 of the language soon to be released. There is certainly a large community of iOS developers out there who should be putting it to good use.
This was a fun little project and I think I will be spending a bit more time dabbling is iOS development using Swift.
Source Code Listings
//
//  ViewController.swift
//  KochSnowFlake
//
//  Created by Stephen Smith on 2016-05-13.
//  Copyright © 2016 Stephen Smith. All rights reserved.
//

import UIKit

class ViewController: UIViewController {

    // MARK: Properties
    @IBOutlet weak var fractalLevelTextField: UITextField!
    @IBOutlet weak var fracView: FractalView!

    override func viewDidLoad() {
        super.viewDidLoad()
        // Do any additional setup after loading the view, typically from a nib.
        //

        fractalLevelTextField.text = "2";
        fracView.level = 2;

        NSNotificationCenter.defaultCenter().addObserver(self,
               selector: #selector(textChangeNot),
               name: UITextFieldTextDidChangeNotification, object: fractalLevelTextField);
    }

    func textChangeNot( object: AnyObject )
    {
        if let enteredLevel = NSNumberFormatter().numberFromString(fractalLevelTextField.text!)
        {
            fracView.level = Int(enteredLevel);
            fracView.setNeedsDisplay();
        }
    }

    override func didReceiveMemoryWarning() {
        super.didReceiveMemoryWarning()
        // Dispose of any resources that can be recreated.
    }
}

//
//  FractalView.swift
//  KochSnowFlake
//
//  Created by Stephen Smith on 2016-05-13.
//  Copyright © 2016 Stephen Smith. All rights reserved.
//

import UIKit
class FractalView: UIView {
    var level = 1;

    // Only override drawRect: if you perform custom drawing.
    // An empty implementation adversely affects performance during animation.
    override func drawRect(rect: CGRect) {
        var frac: KochFlake;

        // Drawing code

        let currentColor = UIColor.blackColor();
        let context = UIGraphicsGetCurrentContext()
        frac = KochFlake(inContext: context!);

        //Set the width of the "pen" that will be used for drawing
        CGContextSetLineWidth(context,1);

        //Set the color of the pen to be used
        CGContextSetStrokeColorWithColor(context, currentColor.CGColor);

        frac.KockSnowflake(level);

        //Apply our stroke settings to the line.
        CGContextStrokePath(context);

    }
}

//
//  KochFlake.swift
//  KochSnowFlake
//
//  Created by Stephen Smith on 2016-05-13.
//  Copyright © 2016 Stephen Smith. All rights reserved.
//

import UIKit

class KochFlake
{
    var tg:TurtleGraphics;
    var context:CGContextRef;

    init(inContext: CGContextRef)
    {
        context = inContext;
        tg = TurtleGraphics(inContext: context);
    }

    func KockSnowflake(level:Int)
    {
        tg.turn( 60 );
        KockSnowflakeSide( level , size:400);
        tg.turn( -120 );
        KockSnowflakeSide( level, size: 400);
        tg.turn( -120 );
        KockSnowflakeSide( level, size: 400);
    }

    func KockSnowflakeSide(level:Int, size:Int)
    {
        if (level == 0)
        {
            tg.move( size );
        }
        else
        {
            KockSnowflakeSide( level - 1, size: size / 3 );
            tg.turn( 60 );
            KockSnowflakeSide( level-1, size: size / 3);
            tg.turn( -120 );
            KockSnowflakeSide( level-1, size: size / 3);
            tg.turn(60);
            KockSnowflakeSide( level-1, size: size / 3);
        }
    }
}

//
//  TurtleGraphics.swift
//  KochSnowFlake
//
//  Created by Stephen Smith on 2016-05-13.
//  Copyright © 2016 Stephen Smith. All rights reserved.
//

import UIKit
let pi:CGFloat = 3.14159;

class TurtleGraphics
{
    var x, y: CGFloat;
    var angle: CGFloat;
    var context: CGContextRef;

    init(inContext: CGContextRef)
    {
        context = inContext;
        x = 50.0;
        y = 150.0;
        CGContextMoveToPoint(context, x, y);
        angle = 0.0;
    }

    func move( dist: Int )
    {
        x = x + CGFloat(dist) * cos( angle * pi / 180.0);
        y = y + CGFloat(dist) * sin( angle * pi / 180.0);

        CGContextAddLineToPoint(context, x, y);
    }

    func turn( angleIncrement: Int)
    {
        angle = angle + CGFloat(angleIncrement);
    }
}
My First Experience Writing an iPad App
Introduction
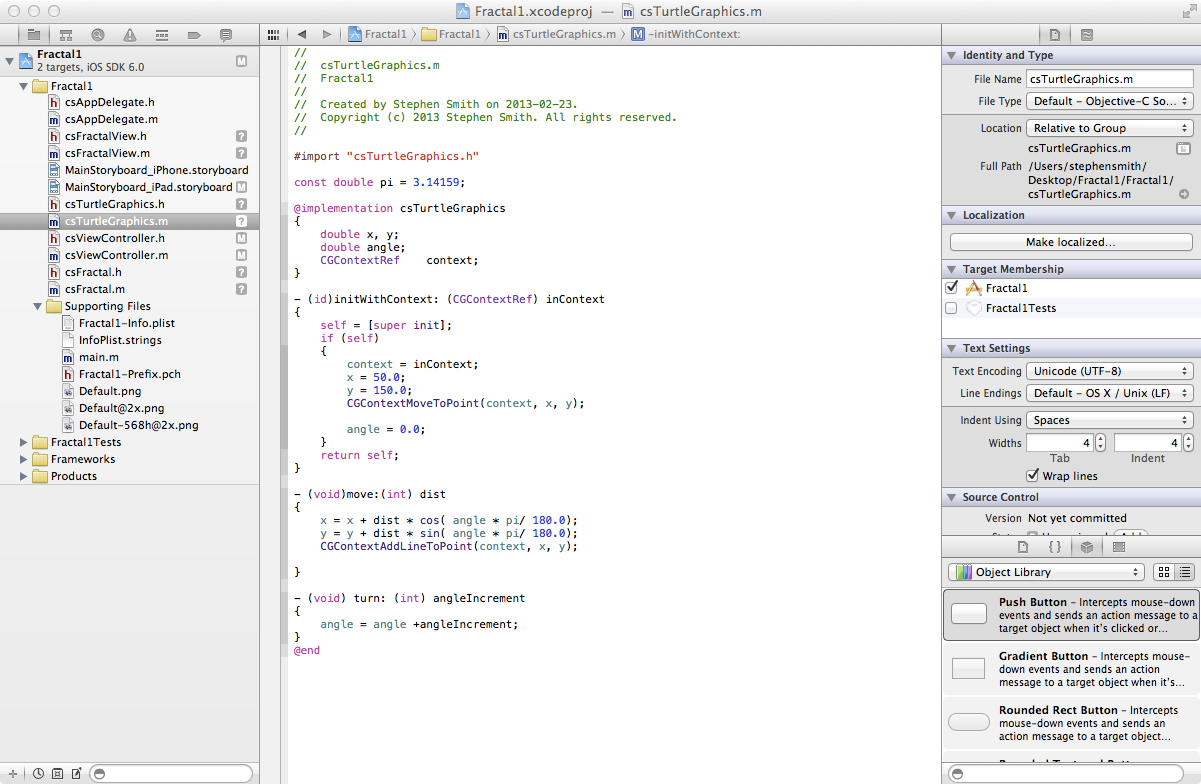
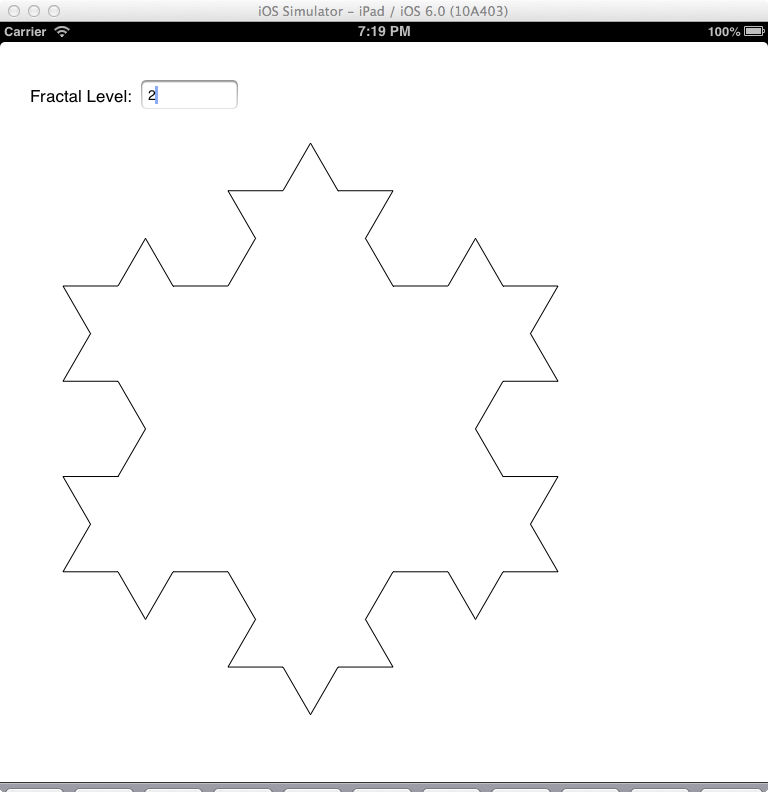
To get a feel for iOS programming I thought I would create a simple iOS application to display a Koch snowflake. There would be a simple edit box where you enter the fractal level and then it will draw the snowflake. I thought this would be a good example to get a feel for the XCode development environment, simple user interaction with controls and a flavor for some graphics programming.
Two jobs before I started with Computer Associates to work on CA-Accpac/2000, I worked for a company that created stock market software. They were working on a new workstation version for the NeXT computer. So with that company (over 20 years ago), I gathered good experience in this environment. We programmed in Objective-C and used the innovative NeXTStep development environment which had many neat features like using DisplayPostScript for rending on-screen graphics.
Now so many years later, here I am programming iOS and relearning Objective C. Although Apple has had many battles with Adobe over the years resulting in display postscript never being mentioned, I still see it there in how you do things. Since I’m newly relearning all this stuff and there have been many changes in the past 25 years, don’t take everything I say as the best way to do things, they are the way I first figured out how to do things for this simple project. Especially if you can do something visually in XCode versus writing code, I probably wrote code because that’s what I’m most comfortable with.
XCode
XCode is Apple’s IDE for doing both native Mac OS and IOs development. XCode is a very rich development environment with many built in tools for things like unit testing, debugging, screen designing and such. It has built in support for the Git source code control system, which is used by default for all projects. There is much built in documentation and help, as well as emulators to test and debug your iPad and iPhone applications. The main requirement of XCode is that it runs on MacOS. Hence I have to run it on my trusty MacBook Air.
XCode has a great many productivity helpers like auto-complete and many way to graphically create your programs rather than coding them. The thing that gave me the most trouble was the graphical part, I’m fine with writing code, but graphically connecting things wasn’t as intuitive to me as I would have expected.
Koch Snowflakes
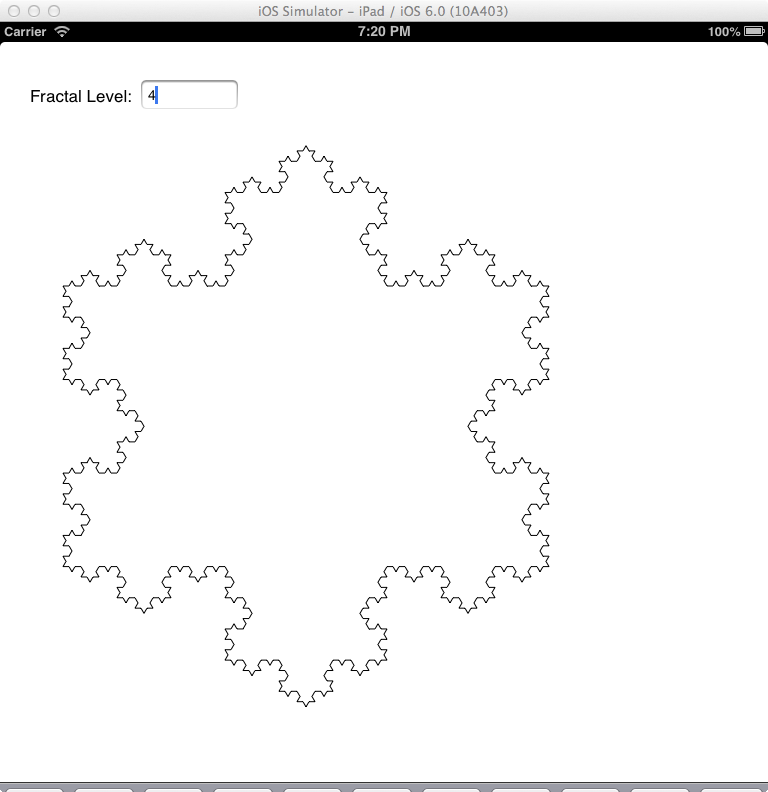
Koch snowflakes are simple fractals that are a good way to give an idea of how fractals can build complexity out of simplicity. Basically you start with a base shape, in this case a triangle, then you replace each line segment with a new shape, in this case the two lines with a “v” in the middle. Then you do this recursively to get more and more complicated shapes. Below is the progression from level 0, the base shape to level 1, with the base shape lines replaced by the fractal generator and then so on as the level increases.
This is a fractal because in the limit as the level goes to infinity, the shape has a fractal dimension, in that it is somewhere between 1 dimensional and 2 dimensional in a defined mathematical sense.
Turtle Graphics
To me the easiest way to draw fractals is with a turtle graphics library. This is a simple drawing library where you tell a turtle to either turn or move forwards. As he moves he leaves a trail. Hence the base shape for the Koch snowflake is forward 1, turn 60, forward 1, turn -120, forward 1, turn 60 forward 1. This is then really easy to apply recursively to draw fractals.
Objective C
Objective-C was one of the first object oriented extensions to C. It was implemented as a pre-processor that generated C code which was then compiled using regular C development tools. This greatly simplified implementation, but the syntax reflects that it was designed to be easily processed by a preprocessor. It’s certainly evolved since its early days, but is perhaps considered a bit clunky as a result. Objective-C has all the object oriented features like inheritance and classes, but lacks a lot of the complexity of C++. The object oriented features are more similar to Java, but unlike Java, Objective-C still has all of C under it, meaning all the pointers and pointer related features that Java removed; hence you can easily crash your iOS app if you make pointer mistakes like in a C program.
Both Java and C++ overloaded the pointer syntax to call methods and such making them behave like function pointers in a structure. Objective C tried for a syntax to reflect message passing using their square bracket syntax of [object method] to send a message to an object. See the source code listings below for some examples. Recently Objective C has adopted the pointer type syntax as an option but considers it good coding practice to only use this for accessing class properties.
My iPad App
When you create a new project in XCode you get a complete working program and then only have to fill in your own code for your functionality. I edited the iPad storyboard to have a single page consisting of a label and text field for the fractal level and then a view to draw the image on. I created a couple of classes, one for turtle graphics, another to draw the fractal and then one to act as the interface to the UI form. All in all, not a lot of code and it seems to run fairly well. I placed the source code listings at the end so as not to clutter up this article. Beware that WordPress often changes characters for typographic reason, things like regular double quotes to 66 or 99 type quotes, this tends to introduce syntax errors if you cut and paste the code, so beware.
Storyboards are a relatively new feature to XCode, they allow you to define many screens within a single file and to connect them all together, so a button on one screen can trigger a transition to another screen, all setup graphically with no code. This is a great tool for quickly prototyping applications, but since for this app, I only have one screen it isn’t really used.
To connect the controls in the storyboard to the code, you create matching variables in the generated interface file and then drag an arrow from a small o in the margin to the matching control in the storyboard file (a process I find a bit cumbersome). Then you can ask for notifications and set properties for the various controls. You can see a couple of examples in the interface file below.
With any object oriented framework like Cocoa Touch there is quite a steep learning curve. Not only do you need to find the properties and methods to call to do things for you, but you also need to learn when you have to extend one of the system base classes. In the case of drawing the fractal, it’s a matter of putting a view control on the page, but then you need to extend the default class to override its drawRect method that is called whenever the view need redrawing. This is similar to handling a WM_PAINT message in Windows. Again you can have a look at the code down below.
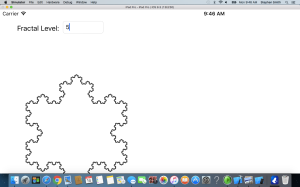
Below are a couple of screen grabs of running this iPad app in the iPad emulator on my MacBook Air:
Summary
Sadly you can’t just post and distribute iPad apps, but have to go through the Apple iTunes store. I’m not going to bother posting this app, so you can’t play with it. I do like being able to post source and app to let people just run it, but Apple doesn’t allow this.
Creating this app was fun. XCode is quite a good development environment and they make it easy to write code quickly. iOS is a very full featured operating system with many built in services and a great deal of power. This are tons of books and internet articles on iOS development along with all the Apple documentations. Now to dig in a bit deeper to what you can do.
Source Code Listings
//
//  csFractal.m

//  Fractal1
//
//  Created by Stephen Smith on 2013-03-05.
//  Copyright (c) 2013 Stephen Smith. All rights reserved.
//

#import "csFractal.h"
#import "csTurtleGraphics.h"

@implementation csFractal
{
    csTurtleGraphics *tg;
    CGContextRef context;
}

- (id)initWithContext: (CGContextRef) inContext
{
    self = [super init];
    if (self)
    {
        context = inContext;
        tg = [[csTurtleGraphics alloc] initWithContext:context];
    }
    return self;
}

- (void) KockSnowflake:(int)level
{
    [tg turn: 60];
    [self KockSnowflakeSide: level size: 500];
    [tg turn: -120];
    [self KockSnowflakeSide: level size: 500];
    [tg turn: -120];
    [self KockSnowflakeSide: level size: 500];
}

- (void) KockSnowflakeSide: (int)level size:(double) size
{
    if (level == 0)
    {
        [tg move: size];
    }
    else
    {
        [self KockSnowflakeSide: level-1 size: size/3];
        [tg turn: 60];
        [self KockSnowflakeSide: level-1 size: size/3];
        [tg turn: -120];
        [self KockSnowflakeSide: level-1 size: size/3];
        [tg turn:60];
        [self KockSnowflakeSide: level-1 size: size/3];
    }
}

@end

//
//  csTurtleGraphics.m
//  Fractal1
//
//  Created by Stephen Smith on 2013-02-23.
//  Copyright (c) 2013 Stephen Smith. All rights reserved.
//

#import "csTurtleGraphics.h"

const double pi = 3.14159;

@implementation csTurtleGraphics
{
    double x, y;
    double angle;
    CGContextRef    context;
}

- (id)initWithContext: (CGContextRef) inContext
{
    self = [super init];
    if (self)
    {
        context = inContext;
        x = 50.0;
        y = 150.0;
        CGContextMoveToPoint(context, x, y);

        angle = 0.0;
    }
    return self;
}

- (void)move:(int) dist
{
    x = x + dist * cos( angle * pi/ 180.0);
    y = y + dist * sin( angle * pi/ 180.0);
    CGContextAddLineToPoint(context, x, y);

}

- (void) turn: (int) angleIncrement
{
    angle = angle +angleIncrement;
}
@end

//
//  csViewController.m
//  Fractal1
//
//  Created by Stephen Smith on 2013-02-10.
//  Copyright (c) 2013 Stephen Smith. All rights reserved.
//

#import "csViewController.h"

@implementation csViewController

@synthesize textField;
@synthesize fracView;

- (void)viewDidLoad
{
    [super viewDidLoad];
                // Do any additional setup after loading the view, typically from a nib.
    textField.text = @"2";
    [fracView setLevel: 2];

    [[NSNotificationCenter defaultCenter]
        addObserver:self
        selector:@selector(textChangeNot:)
        name:UITextFieldTextDidChangeNotification
        object:textField];

}

- (void) textChangeNot: (id) object
{
    [fracView setLevel: textField.text.intValue];
    [fracView setNeedsDisplay];
}

- (void)didReceiveMemoryWarning
{
    [super didReceiveMemoryWarning];
    // Dispose of any resources that can be recreated.
}

@end

//
//  csFractalView.m
//  Fractal1
//
//  Created by Stephen Smith on 2013-02-17.
//  Copyright (c) 2013 Stephen Smith. All rights reserved.
//

#import "csFractalView.h"
#import "csFractal.h"

@implementation csFractalView
{
    csFractal *frac;
    int level;
}
- (id)initWithFrame:(CGRect)frame
{
    self = [super initWithFrame:frame];
    if (self) {
        // Initialization code
        level = 1;
    }
    return self;
}

- (void) setLevel: (int)lev
{
    level = lev;
}

// Only override drawRect: if you perform custom drawing.
// An empty implementation adversely affects performance during animation.
- (void)drawRect:(CGRect)rect
{
    // Drawing code

    UIColor* currentColor = [UIColor blackColor];
    CGContextRef    context = UIGraphicsGetCurrentContext();

    //Set the width of the "pen" that will be used for drawing
    CGContextSetLineWidth(context,1);
    //Set the color of the pen to be used
    CGContextSetStrokeColorWithColor(context, currentColor.CGColor);

    frac = [[csFractal alloc] initWithContext: context];
    [frac KockSnowflake: level];

    //Apply our stroke settings to the line.
    CGContextStrokePath(context);
}

@end
