Archive for the ‘Hardware Architecture’ Category
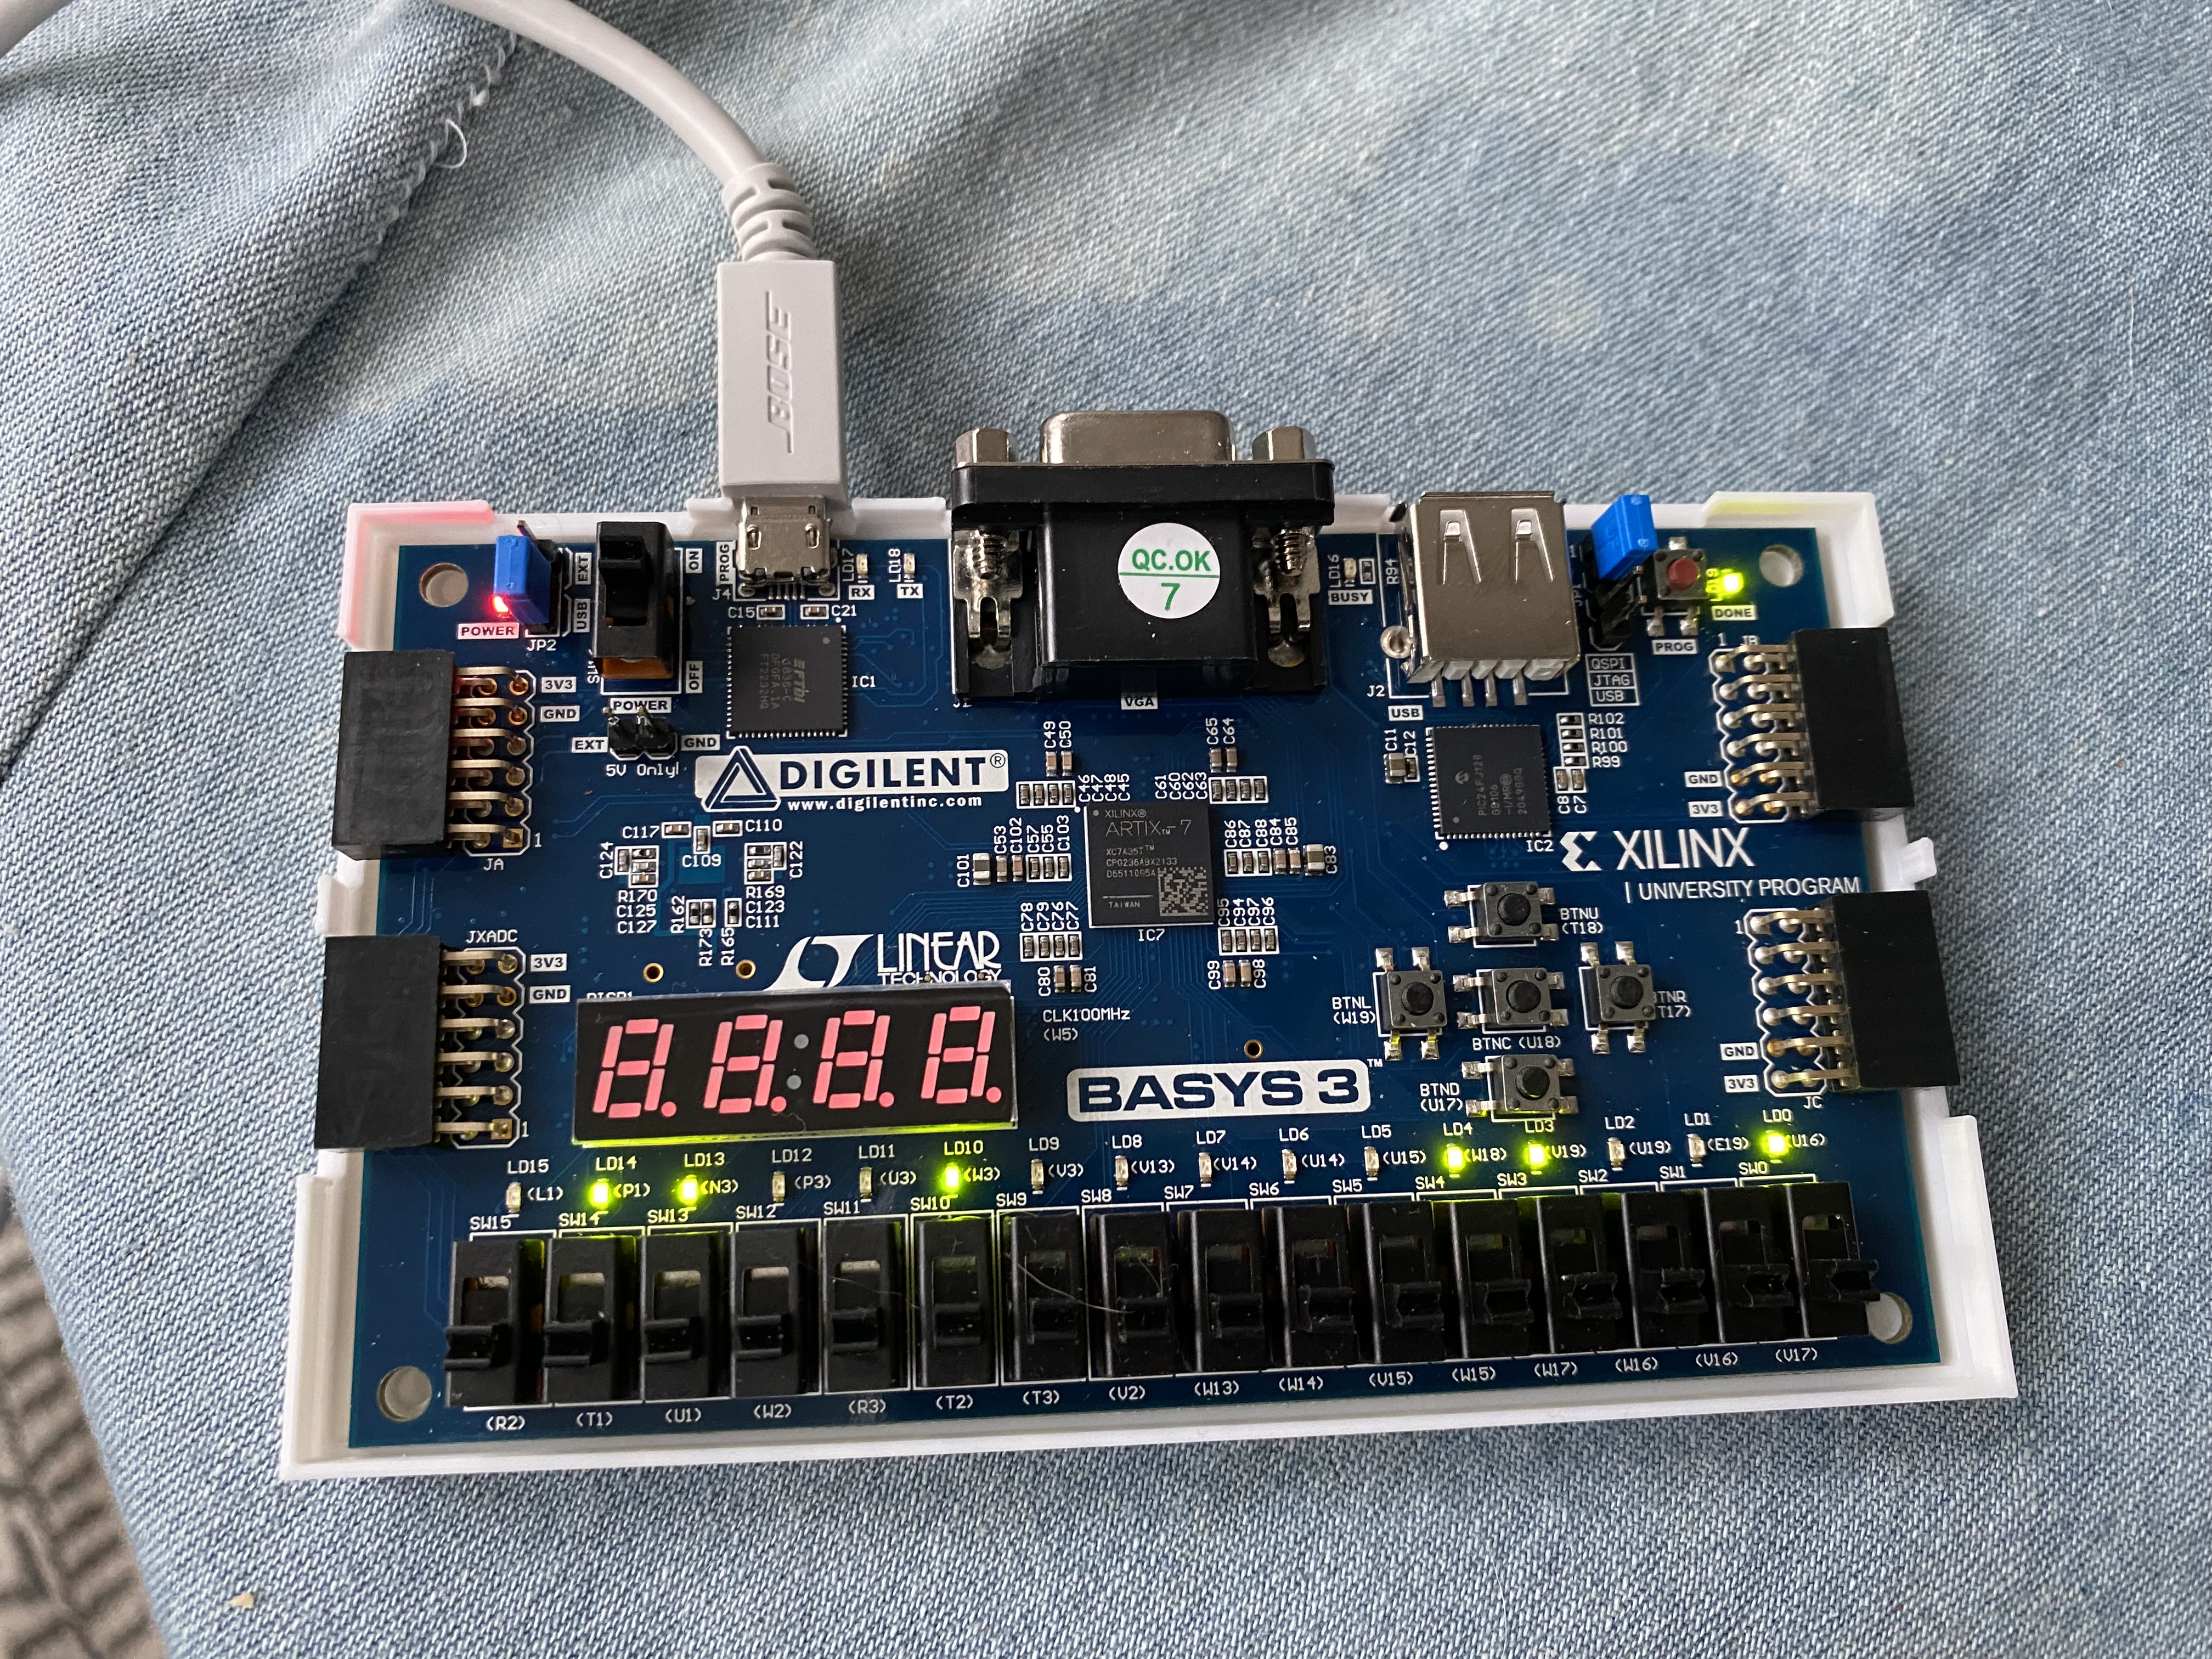
RISC-V on a Basys 3 FPGA Development Board
Introduction
I’ve been working on learning how to program/configure FPGAs. I got off to a rocky start due to US export regulations, but after that I’ve been making good progress. Two good books I found are:
- “Digital Design and Computer Architecture: RISC-V Edition” by Sarah L. Harris and David Harris.
- “FPGA Programming for Beginners” by Frank Bruno.
The Harris’s RISC-V book is an excellent source on how to create a RISC-V CPU core in a Hardware Definition Language (HDL) giving examples in both System Verilog and VHDL. The Bruno book is great for how to implement simple hardware projects on Digilent FPGA boards based on the Artix-7 FPGA architecture.
This blog post looks at taking a RISC-V core from the Harris’s book and implementing it on a Digilent Basys3 FPGA development board using the information from Bruno’s book.
Getting RISC-V Up and Running
The Harris’s book has a lot of information on designing a RISC-V CPU. This implementation executes one instruction per clock cycle and implements the RISC-V instructions:
- lw, sw – load/save a word from/to memory
- add, sub, and, or, slt, addi, andi, ori, slti – arithmetic/logic ALU instructions
- beq – conditional branch
- jal – jump and link.
These are enough instructions to execute simple programs and really emphasizes the R in RISC (really reduced instruction set).
First, I took the source code from the Harris’s book and along with the testbench and input it into Vivado. There were a couple of typos in the text and some of the code was left as an exercise, however the online book resources contained the complete correct code. With this in hand I was able to run the testbench in the Vivado simulator and have it pass the single automated test.
I was pretty happy at this, I could execute RISC-V instructions and examine the circuit schematic produced.

I then went to run it on the Basys3 board. This didn’t compile, complaining there weren’t enough I/O ports on the board. The reason for this is that the RISC-V core takes as input both the instruction and data memories as input parameters. These were instantiated as part of the testbench, and any input parameters that aren’t created in the circuit are expected to be connected to external ports.
Creating a SoC
My next step was to create a System on a Chip (SoC) module that would instantiate some memory, instantiate the RISC-V core and provide connections to the Digilent board’s I/O ports.
First I added the instruction and data memory to the SoC module and when I got it to compile, I got an error that nothing was produced. This turned out to be because I didn’t have any outputs, the optimizer was able to remove every component resulting in an empty implementation. The easiest way past this was to connect a couple of things to the LEDs on the board, this way I could see the same results as the test in the testbench program, namely that the program ends with DataAdr == 100 and WriteData == 25.
This causes Vivado to actually generate some circuits, however it then complains it can’t find a layout that works at 100MHz. The solution is given in Bruno’s book to include a clock module from the IP section of Vivado. This clock module is free, easily downloaded and incorporated into your project. With this you can configure the clock to a slower speed to allow more to happen in one clock cycle. Configuring the clock to 50MHz allowed Vivado to produce a layout and then generate a bitstream that I could download to the Basys board. This then lit up the LEDs as expected. The source code for the SoC module is at the end of this article.
Where to Next
There is still a long way to go to create a general purpose computer. The Assembly Language program is hard coded into the circuitry of the FPGA. There is very little I/O with only using a switch for reset and then the LEDs to give a limited view of the address bus.
Further the Vivado optimizer can remove a lot of circuitry because not all 32-bits are used in this example and it can execute the program in the optimizer and hard code the result. To start to make this useful it would be nice to:
- Add memory mapped I/O for more devices on the Basys board. Such as outputting numbers to the four seven-segment displays.
- Add more instructions from the RISC-V instruction set.
- Provide a way to download the machine code Assembly Language to the processor as it’s running. I.e. hard code a boot loader rather than the actual program.
- Add support for a VGA monitor, as the Basys does have a VGA video port. Similarly figure out a way to connect a keyboard.
The Basys 3 has rather limited memory, since it only has its distributed memory spread over various LUTs. More expensive boards from Digilent include banks of RAM that could be used to hold more extensive programs. I suspect if I wanted to port a BASIC interpreter, I would need the next Digilent board up in the line. But I have a lot of work to do before getting to that point.
Summary
Creating a small CPU on an FPGA is certainly fun, but it shows the amount of work required to create a CPU and its ecosystem. This is a simple CPU with a few instructions, no pipeline and no caches. But at least it is 32-bit. Implementing some of the RISC-V instruction set, which means I can use the GCC Assembler running on a Raspberry Pi to create the machine code. It is a long way from having what is required to run the Linux Kernel. But for those interested in minimalistic computing this is another alternative to creating custom CPUs that is a bit easier than constructing one out of discrete TTL logic components.
`timescale 1ns/10ps
module soc(
    input wire                         clk,
    input wire                         reset,
    output logic [15:0]    led
);
    logic [31:0] WriteData, DataAdr;
    logic MemWrite;
    logic [31:0] PC, Instr, ReadData;
logic clk_50;
generate
   sys_pll u_sys_pll
    (
     .clk_in1  (clk),
     .clk_out1 (clk_50)
     );
endgenerate
// instantiate processor and memories
    riscvsingle rvsingle( clk_50, reset, PC, Instr, MemWrite,
        DataAdr, WriteData, ReadData);
    socimem imem(PC, Instr);
    socdmem dmem(clk_50, MemWrite, DataAdr, WriteData, ReadData);
   always @(negedge clk)
    begin
        if(MemWrite) begin
            led[7:0] = WriteData[7:0];
            led[15:8] = DataAdr[7:0];
        end
    end
endmodule
module socimem(input logic [31:0] a,
    output logic [31:0] rd);
    logic [31:0] RAM[63:0];
    initial
    begin
    RAM[0]  = 32'h00500113;
    RAM[1]  = 32'h00C00193;
    RAM[2]  = 32'hFF718393;
    RAM[3]  = 32'h0023E233;
    RAM[4]  = 32'h0041F2B3;
    RAM[5]  = 32'h004282B3
    RAM[6]  = 32'h02728863;
    RAM[7]  = 32'h0041A233;
    RAM[8]  = 32'h00020463;
    RAM[9]  = 32'h00000293;
    RAM[10]  = 32'h0023A233;
    RAM[11]  = 32'h005203B3;
    RAM[12]  = 32'h402383B3;
    RAM[13]  = 32'h0471AA23;
    RAM[14]  = 32'h06002103;
    RAM[15]  = 32'h005104B3;
    RAM[16]  = 32'h008001EF;
    RAM[17]  = 32'h00100113;
    RAM[18]  = 32'h00910133;
    RAM[19]  = 32'h0221A023;
    RAM[20]  = 32'h00210063;
    end
    assign rd = RAM[a[31:2]]; // word aligned
endmodule
module socdmem(input logic clk, we,
    input logic [31:0] a, wd,
    output logic [31:0] rd);
    logic [31:0] RAM[63:0];
    assign rd = RAM[a[31:2]]; // word aligned
    always_ff @(posedge clk)
        if (we) RAM[a[31:2]] <= wd;
endmodule
Introduction to FPGAs
Introduction
Field Programmable Gate Arrays (FPGAs) are a form of programmable hardware that has become inexpensive and accessible recently. I recently purchased a Digilent Basys 3 FPGA development board for $200 based on a Xilinx Artix-7 FPGA. Xilinx makes their development software available free for non-commercial use on these lower end chips. If you’ve ever been interested in how chips are designed and developed, then FPGAs are a great way to get started. You program FPGAs using the same hardware design software that is used to design custom integrated circuit chips (ASICs). In this post, we’ll start to look at what an FPGA is and how it works.

Logic Gates and Truth Tables
Anyone that has taken a basic logic course will have encountered truth tables for the basic logic operations. Below are the basic logic building blocks including their symbol and truth table.

You can then build complicated logic circuits out of these building blocks. If you want to build an I/C, then you use a design pattern of the transistors for each logic gate. For instance a possible AND gate made out of transistors and resistors is below.

To build a CPU, you need a few more elements than basic logic gates, namely memory and a way to synchronize everything to a clock, but this is a good starting point.
FPGAs
The basic idea behind an FPGA is to provide an array of circuit elements that can execute any truth table, or lookup table in FPGA parlance. You program the FPGA by downloading all the truth tables to it and then execute them. A Xilinx Artix-7 FPGA contains thousands of configurable logic blocks (CLBs), each of which can be configured to execute a single 6-input lookup table (LUT) or two 5-input LUTs.
When you start building arithmetic operations from basic logic elements, you need a carry output as well. The CLBs support carry out operations so you can implement circuits like full adders. Further some of the CLBs contain memory and shift registers that you can use.
Extras
As chip densities and transistor counts increase, FPGA can have quite a large number of CLBs on a single chip. Further other elements are added to optimize common operations. For instance performing multiplication using the tools described is possible, but quite slow. Most FPGAs now contain custom multipliers that can be configured in or even a DSP. Similarly most FPGAs have custom components for external interfaces such as USB or I2C.
Programming
FPGAs are programmed using hardware description languages such as SystemVerilog or VHDL. Both of these compile to what is required for your development board. The cool thing is that this same HDL could be used to generate the layout/masking for a custom application specific I/C (ASIC). The Xilinix development environment is Vivado which supports writing and compiling your HDL along with creating testbenches and running simulations. It also has limited debug support for running on your development board. Here is the source code view:

Here is the generated circuit diagram:

Here we run a simulation and can study the timing diagram:

The thing to remember is that HDL describes hardware and even though it looks like a programming language, it only superficially behaves like a programming language.
Why FPGAs?
FPGAs typically run at 300MHz or so. This is well below the speed of typical ARM, Intel or AMD CPUs. The big advantage of FPGAs is getting something up and running quickly using an iterative development/debug cycle. If you are creating ASICs then you need to do the design, send them out for test manufacturing and then test what you get back, a slow and expensive process.
For instance, a lot of the first RISC-V CPUs on the market were implemented on FPGAs. This is why they usually have fewer CPU cores and run at around 300MHz. This brought them to market quickly to let people start writing RISC-V code, such as adding basic support for RISC-V in the GCC compiler and the Linux kernel.
Another advantage of FPGAs is that if there is a bug, you can reprogram them. FPGAs are commonly used in automobiles and this allows the manufacturers to change the hardware via software updates rather than executing a costly recall and having to replace ASICs or circuit boards.
The other thing to note when implementing in hardware, like with FPGAs, is that you have a much greater freedom to run things in parallel. In fact everything runs at once by default, and you have to do some work to synchronize or serialize operations. This allows you to develop highly parallel processes, like for GPUs or TPUs. This level of parallelism gives FPGA development a huge advantage over CPUs and traditional programming, for certain application areas.
Summary
If you are interested in how I/Cs or CPUs are designed and implemented then inexpensive FPGA boards from companies like Digilent are a great starting point. The cost of entry is minimal and even if the hardware is lower end by today’s standards, it still gives you a long runway for learning. A great diversion for DIY electronics hobbyists.
More Linux for Apple Silicon
Introduction
Last week, I covered Asahi Linux and their drive to port Linux to Apple’s new ARM based Macintoshes. This week, there was a new contender where Corellium, a virtualization and security company, have successfully gotten Ubuntu Linux running on Apple M1 ARM based systems. Corellium created a system to allow security researchers to run iOS in virtual machines to allow more rapid testing of Apps for security problems. No one had heard of Corellium until Apple sued them for copyright infringement for doing this. The lawsuit has mostly been thrown out and Corellium was able to use the knowledge they learned virtualizing iOS to produce Linux device drivers for the new Apple M1 chips.
Corellium Linux

Corellium starts with the Raspberry Pi version of Ubuntu Linux. This is a full complete 64-bit version of Linux that runs on the Raspberry Pi’s ARM processor and has all the development tools and applications bundled. They then add their Apple M1 Linux drivers to the kernel, rebuild it and replace the Raspberry Pi kernel. Viola, Ubuntu Linux on the new Apple Silicon Macs. All the source code is available in Github and the install instructions are available here.
To virtualize iOS, Corellium had to figure out all the hardware register accesses made by iOS, intercept them and translate them into matching calls in the operating system hosting the virtualized iOS. Accomplishing this was an impressive feat. We are lucky that the M1 SoC used in the new Macs is really just the next generation of the processor chips Apple has been using for all their iPhones and iPads (even AppleTV and iWatches). As a consequence, all the directly integrated devices like USB support are all the same. Corellium could then use all this hard fought knowledge to modify various Linux device drivers to work properly with Apple devices. It is still impressive that they were able to accomplish this in such a short time.
This version of Ubuntu Linux is fully GUI, but the graphics aren’t accelerated and no use of the M1’s fancy GPU cores are used. Basically they figured out how to get an area of memory that represents the screen and then use Linux’s builtin ability to deal with this simple sort of graphics (almost like going back to the days of VGA).
Corellium recommends creating your Linux image on an USB storage device and then gives instructions on how to get your Mac to boot from this. Then you are running Linux. We’re probably still a distance away from dual booting Linux or MacOS and you probably don’t want to replace MacOS entirely from your new Mac.
This is a great starting point to getting Linux fully supported on the new Macs, it seems progress is moving really fast. Asahi Linux is making good progress in understanding and using the M1’s GPU. With such a full featured working system, progress is accelerating.
What Next?
When new hardware appears, Linux support starts in local specialty source code repositories, that is the case now with Corellium and Asahi. The source code is all new, rough and needs cleaning up. Once this is done it is submitted to upstream source code repositories where it is reviewed and eventually accepted. Eventually, this will all make it into the main Linux kernel source code repository. When this happens, all the myriad Linux distributions will get it for free as they incorporate a newer kernel into their downstream repos. This may sound like a long process, but typically it happens quite quickly. Then we can look forward to Apple Silicon versions of all our favorite Linux distributions.
Summary
Apple Silicon Macs have only been in people’s hands for a very short time. It’s amazing that we already have a working version of Ubuntu Linux for these devices. We have the Raspberry Pi to thank for taking ARM based Linux mainstream so quickly and groups like Corelium and Asahi to thank for figuring out the hardware nitty-gritty details of these new Macs. All this just makes the new products from Apple more exciting and a nice alternative to the Intel/AMD world.
All of this requires a good knowledge of ARM 64-bit Assembly Language, so consider my book as a great way to learn all the details on how it works. I even have a chapter on reverse engineering which is hopefully helpful.

Porting Linux to Apple Silicon
Introduction
When Apple announced they were switching from Intel to ARM CPUs, there was a worry that Apple would lock out installing non-Apple operating systems such as Linux. There is a new security processor that people worried would only allow MacOS to boot on these new chips. Fortunately, this proved to be false and the new ARM based Macintoshes fully support booting homebrew operating systems either from the SSD or from USB storage. However, the new Apple M1 chips present a number of problems that we’ll discuss in this article as well as why so many people are so interested in doing this.
Linus Torvalds, the father of Linux, recently said that he wished the new MacBooks ran Linux and that he would consider this the ultimate laptop and really want one. Linus said he saw porting Linux as possible, but personally he didn’t have the time to commit.
Last week’s article on an Assembly Language “Hello World” program hit number 1 on Hacker News and based on the comments, the interest was largely generated by the challenge of porting Linux to these new Apple systems. As we’ll see, doing this is going to require both reverse engineering and then writing ARM 64-bit Assembly Language code.
Asahi Linux
Last week we saw the announcement of the Asahi Linux project. Asahi means “rising sun” in Japanese and “asahi ringo” is Japanese for Macintosh Apple. The goal of this project is to develop a version of Linux that fully supports all the new hardware features of the Apple M1 chip including the GPU and USB-C ports. This won’t be easy because even though Apple doesn’t block you from doing this, they don’t help and they don’t provide any documentation on how the hardware works. People already have character based Linux booting and running on the Apple M1 Macs, and you can run the regular ARM version of Linux under virtualization on these new Macs, but the real goal is to understand the new hardware and have a version of Linux talking directly to the hardware that uses all the capabilities, like the GPU, to run as well as or better than MacOS.
GPUs and Linux
GPUs have always been a sore point with the Linux community. None of the GPU vendors properly document their hardware APIs to their products and believe the best way to support various operating systems is to provide precompiled binaries with no source code. Obviously this roils the open source community. GPUs are complicated and change a lot with each hardware generation. Newer Intel and AMD CPUs all have integrated graphics that have good open source drivers that at least will work, but at the disadvantage of not using all the fancy hardware you paid for in your expensive gaming PC. Even the Raspberry Pi versions of Linux use a binary Broadcom drive for the integrated GPU, rather than something open source.
Over the years, intrepid Linux developers have reverse engineered how all these GPUs work, so there are open source drivers for most nVidia and AMD GPUs. In fact, since neither nVidia or AMD support their hardware for all that long, if you have a more than 10 year old graphics card and run Linux, then you are pretty much forced to use the open source driver or switch to Intel integrated graphics (if available) or just stop upgrading the operating system and drivers.
The good news is that the open source community has a lot of experience figuring out how GPUs work, including those from nVidia, AMD, ARM and Broadcom. The bad news is that it takes time to first work out a disassembler of the GPU instructions to go from the binary form and work out what each bit means to produce a mnemonic Assembly Language source form. Then once this is known, write an Assembler for this and then use the tool to create the graphics driver. The Apple GPU isn’t entirely new, originally it was based on Imagination Technologies GPU design and then went through several iterations in iPads and iPhones before the current newest version ending up in the M1. Hopefully this history will be some help in developing the new Linux drivers.
Leveraging Existing Drivers
All the CPU vendors including ARM Holdings are motivated to contribute to the Linux kernel to ensure it runs well on their hardware. Linux is big enough that it greatly benefits vendors adoption to have a solid Linux offering. There is already really good ARM support in the Linux kernel and its tool chain such as GNU GCC. This is a solid first step in producing a working version of Linux for Apple Silicon.
Further, Apple doesn’t do everything themselves. There is hope that even if components are integrated into the M1 SoC that they still used standard designs. After all, Apple didn’t want to write all new drivers for MacOS. Hopefully a lot of the hardware drivers for the Intel Macs will just need to be recompiled for ARM and just work (or require very little work).
I haven’t mentioned the Apple integrated AI processor, but the hope here is that once the GPU is understood, that the AI processor is fairly similar, just missing the graphics specific parts and containing the same core vector processor.
There are quite a few other components in the SoC including sound processing and video decoding, hopefully these are known entities and not entirely new.
Why Do All This Work?
It’s hard enough writing device drivers when you have complete hardware documentation and can call a vendor’s support line. Having to reverse engineer how everything works first is a monumental task, so why are all these open source developers flocking to this task? Quite a few people like the challenge, if Apple provided lots of good documentation, then it would just be too easy. There is an attraction to having to connect hardware diagnostic equipment to your computer and iteratively write Assembly Language to figure out how to control things. None of this work is paid, besides the odd bit of gofundme money, these are mostly volunteers doing this in their spare time separate from their day jobs.
Humans are very curious creatures. Apple, by not providing any details, has piqued everyone’s curiosity. We don’t like being told no, you’re not allowed to know something. This just irritates us and perhaps we think there is something good being withheld from us.
There is also some fame to be had in hacker circles, as the people who solve the big problems are going to become legends in the Linux world.
Whatever the reason, we will all benefit from their hard work and determination. A well running Linux on Apple Silicon will be a great way to get full control of your hardware and escape App store restrictions and Apple’s policies on what you can and cannot do with your computer. It might even be a first step to producing Linux for iPhones and iPads which would be cool.
Summary
Apple has set a mythic challenge to hackers everywhere. By not providing any hardware documentation, Apple has created an epic contest for hackers to crack this nut and figure out how all the nitty gritty details of Apple Silicon work. This is a fun and difficult problem to work on. The kind of thing hackers love. I bet we are going to see prototype drivers and hardware details much faster than we think.
All of this requires a good knowledge of ARM 64-bit Assembly Language, so consider my book as a great way to learn all the details on how it works. I even have a chapter on reverse engineering which is hopefully helpful.
Apple M1 as a Development Workstation
Introduction
I’ve been playing with my new M1 based Apple MacBook Air for a few weeks now, so I thought I’d blog about how it is as a development machine. These are now the best way to develop iOS Apps for iPhones and iPads. These systems are really new so there are a few missing pieces, but these are filling in fast. You can run most MacOS Intel based programs using Rosetta 2, but I’m interested in what runs in natively compiled ARM code that ideally uses the builtin M1 functionality where appropriate.
XCode
XCode is Apple’s IDE for development. The whole XCode system is a combination of Apple created software along with a number of open source development tools. As long as you don’t compile or debug for Intel, you don’t need Rosetta installed to run all these. That means besides XCode and Swift, you also get natively compiled versions of LLVM, Python and a number of other tools. After installing XCode (which is huge), you can run command line tools to compile C code and Assembly language code. There is a version of make installed and you can do this all from a command shell without using the XCode IDE at all. All these tools are very fast and seem to work perfectly in the native ARM environment. This shouldn’t be too much of a surprise as these have all been working fine on the ARM based Raspberry Pi for quite a few years now.
If you develop iOS or MacOS applications using Cocoa then this is the platform for you. On older Intel based Macs, to test the application the computer had to emulate the ARM processor and the iOS simulators were quite slow and clunky. Now that everything is using the same processor, suddenly the iPhone and iOS simulators are fast and much more productive. In fact currently the M1 processor is faster than any existing iPhone or iPads, so iOS apps actually run fastest on the new Macs.

What’s Missing?
Apple has fully embraced the LLVM open source toolchain and helped have that project fully support the new Macs. Sadly they didn’t provide the same level of help to the GNU GCC open source toolchain. There are now test builds of the GNU toolchain, or you can build it yourself, but not a released one yet. This then slowed down the development of any applications that depend on the GNU toolchain. The most notable case is anything written in Fortran was stalled because GNU has the good Fortran compiler.
Now you might ask, so what? Who uses Fortran these days anyway? The thing is nearly all scientific libraries were written in the 60s and 70s in Fortran and have all been made open source. These libraries are highly reliable and work great. Now you might ask, so what? Not many people do scientific computing? The thing is that all modern machine learning and AI applications make extensive use of these libraries especially for things like linear algebra. This means that even though Python itself is available natively for the Apple M1, all the scientific libraries, most notably numpy are not as they contain Fortran components. Again there are test builds available, but it could be a few months before these are all generally available.
Another problem is the Apple M1 GPU and machine learning accelerator components. Even once these all compile and are available for the M1, which should be soon, it may be considerably longer before versions are available that can make use of the GPU or TPU for vector acceleration. Most of these libraries have support for nVidia and AMD GPUs, however now that Apple has gone their own way, it may be a bit of a wait for Apple versions. Apple has allocated engineers to help with these projects so hopefully it is sooner than later, and any project that previously supported acceleration on an iPhone or iPad will be good to go.
Meanwhile if you use some other programming language or system, like say ERLang, you will have to check their website for native availability, compile them yourself or use Rosetta 2.
The new XCode is great for Apple mobile development, but what about Android? Android Studio is currently being ported to the M1 and there are test builds available, but with lots of missing pieces. Once complete, this will be the best way to develop Android applications since again, you can run the apps natively and don’t require an ARM emulator for testing and debugging.
Summary
Whenever a new generation of hardware is released, there is always a delay as software catches up. If you do a lot of development for iOS then you need one of these new Macs as these are now the best environment for mobile development. Once Android Studio finishes their M1 version, the new Apple M1’s will be by far the best platform for mobile development. Apple has done a really good job of having so much work at release for their new generation of Macintosh computers; but, as is always the case at the bleeding edge, there are a few holes to be filled in. Of course most of these projects are open source so if you need them, you can always contribute to help them move a little faster. As more and more M1 based Macs ship and get into people’s hands these problems will start to be knocked off and more things will move into the “it just works” category.
What’s Next for the Apple M2 ARM CPU
Introduction
Last week, Apple started shipping their new ARM M1 based Macintosh computers. I ordered a new MacBook Air and maybe I’ll get it before XMas. The demand for these new ARM based computers is high and they are selling like mad. The big attraction is that they have the computing power of top end Intel chips, but use a tenth of the power, leading to a new class of powerful laptops with battery life now measured in days rather than hours. With all the hype around the M1, people are starting to ask where Apple will go next? When will there be an M2 chip and what will it contain? Apple is a secretive company so all this speculation is mostly rumours. This article will look at my wish list and where I think things will go.
First, there will be more M1 base Macs early next year. Expect higher end MacBook Pros, these won’t have a completely new M2, more like an M1X which will have either more CPU or CPU cores and higher memory options. I expect the real M2 will come out towards next XMas as Apple prepares all their new products for the next holiday shopping season.

The Chip Manufacturing Process
The current M1 CPU is manufactured using TSMC’s 5nm process. TSMC recently completed their 3nm fabrication facility (at least the building). The expectation is that the next generation of Apple’s iPhone, iPad and Mac chips will be created using this process. With this size reduction, Apple will be able to fit 1.67 times as many transistors on the chip using the same form factor and power. Compare this to Intel which has been having trouble making the transition from 14nm to 10nm over the last few years. Of course AMD also uses TSMC to manufacture their chips, so there could be competitive AMD chips, but reaching the same power utilization as an ARM CPU is extremely difficult.
Samsung manufactures most of its chips using 8nm technology and is investing heavily trying to catch up to TSMC, hoping to get some of Apple and AMD’s business back. I don’t think Samsung will catch up in 2021 but beyond 2021, the competition could heat up and we’ll see even faster progress.
More Cores
The most obvious place to make use of all these extra transistors is in placing more CPU, GPU or AIPU cores on the chip. The M1 has 8 CPU cores, 8 GPU cores and 16 AI Processor cores. Apple could add to any of these. If they want a more powerful gaming computer, then adding GPU cores is the obvious place. I suspect 8 CPU cores is sufficient for most laptop workloads, but with more GPU cores, they could start being competitive with top of the line nVidia and AMD GPUs. The AI processing cores are interesting and are being used more and more,
Apple is continually profiling how their processor components are used by applications and will be monitoring which parts of the system are maxed out and which remain mostly idle. Using this information they can allocate more processing cores to the areas that need it most.
More Memory
The current M1 chips come with either 8 or 16 GB of RAM. I suspect this is only a limitation of trying to get some systems shipping in 2020 and that there will be higher memory M1 chips sooner than later. For the M2 chip, I don’t think we really need an 8GB model anymore and if there are two sizes it should be 16 or 32 GB. Further, with high end graphics using a lot of memory, a good case for 64 GB can be made even for a laptop.
More and Faster Ports
The first few Mac computers have 2 USB 4 ports and one video port. There has been a lot of complaining about this, but it is a bit misleading because you can add hubs to these ports. It has been demonstrated that you can actually connect 6 monitors to the video out using a hub. Similarly you can connect a hub and have any number of ports. I’m not sure if Apple will add more ports back and either way I’m not too worried about it.
The good thing is that USB 4 is fast and it makes connecting an external drive (whether SSD or mechanical) more practical for general use. Of course making the ports even faster next time around would be great.
General Optimizations
Each year, ARM improves their CPU cores and Apple incorporates these improvements. The optimizations could be to the pipeline processing, improved algorithms for longer running operations, better out of order execution, security improvements, etc. There are also newer instructions and functionality incorporated. Apple takes all these and adds their own improvements as well. We’ve seen this year over year as the performance of the ARM processors have improved so much in the iPhones and iPads. This will continue and this alone will yield a 30% or so performance improvement.
More Co-processors
The M1 chip is more than a multi-core ARM CPU. It includes all sorts of co-processors like the GPU cores and AI processing. It includes the main RAM, memory controller, a security processor and support for specialty things like video decoding. We don’t know what Apple is working on, but they could easily use some fraction of their transistor budget to add new specialty co-processors. Hopefully whatever they do add is open for programmers to take advantage of and not proprietary and only used by the operating system.
Summary
The Apple M1 Silicon is a significant first milestone. Everyone is excited to see where Apple will go with this. Apple has huge resources to develop these chips going forwards. The R&D Apple puts into Apple Silicon benefits all their businesses from the Apple Watch to the iPad, so they are fully committed to this. I’m excited to see what the next generation chips will be able to do, though I’m hoping to use my M1 based MacBook for 8 years, like I did with my last MacBook.
If you are interested in the M1 ARM processor and want to learn more about how it works internally, then consider my book: Programming with 64-Bit ARM Assembly Language.
Apple M1 Unified Memory
Introduction
I recently upgraded three 2008 MacBook Pros from 1Gig to 4Gig of RAM. It was super-easy, you remove the battery (accessible via a coin), remove a small cover over the RAM and hard-drive, then pop the RAM and push in the new ones. Upgrading the hard drive or RAM on these old laptops is straightforward and anyone can do it. Newer MacBooks require partial disassembly which makes the process harder. For the newest ARM based MacBooks, upgrading is impossible. So, do we gain anything for this lack of upgradeability?
This article looks at Apple’s new unified memory architecture that they claim gives large performance gains. Apple hasn’t released a lot of in depth technical details on the M1 chip, but from what they have released, and now that people have received these units and performed real benchmarks we can see that Apple really does have something here.
Why Would We Want To Upgrade?
In the case of the 2008 MacBook Pro, when it was new, 4Gig was expensive. Now 4Gig of DDR2 memory is $10. It makes total sense to upgrade to maximum memory. Similarly, the MacBook came with a mechanical hard drive which is quite small and slow by modern standards. It was easy to upgrade these to larger faster SSD drives for around $40 each.Often this is the case that the maximum configuration is too expensive at the time of the original purchase, but becomes much cheaper a few years later. Performing these upgrades then lets you get quite a few years more service out of your computer. The 2008 MacBook Pros upgraded to maximum configuration are still quite usable computers (of course you have to run Linux on them, since Apple software no longer supports them).
Enter the New Apple ARM Based Macintoshes
The newly released MacBooks based on ARM System on a Chips (SoCs) have their RAM integrated into their CPU chips. This means that unless you can replace the entire CPU, you can’t upgrade the RAM. Apple claims integrating the memory into the CPU gives them a number of performance gains, since the memory is high speed, very close to all the devices and shared by all the devices. A major bottleneck in modern computer systems is moving data between memory and the CPU or copying data from the CPU’s memory to the GPU’s memory.
AMD and nVidia graphics cards contain their own memory separate from the memory used by the CPU. So a modern gaming computer might have 16Gig RAM for the CPU and then 8Gig or RAM for the GPU. If you want the GPU to perform a matrix multiplication you need to transfer the matrices to the GPU, tell it to multiply them and then transfer the resulting matrix back to the CPU’s memory. nVidia and AMD claim this is necessary since they incorporate newer faster memory in their GPUs than is typically installed on the CPU motherboard. Most CPUs currently use DDR4 memory whereas GPUs typically incorporate faster DDR6 memory. There are GPUs (like the Raspberry Pi’s) that share CPU memory, however these tend to be lower end (cheaper since they don’t have their own memory) and slower since there is more contention for the CPU memory.
The Apple M1 tries to address these problems by incorporating the fastest memory and then providing a much wider bandwidth between the memory and the various processors on the M1 chip. For the M1 there isn’t just the GPU, but also a Neural Engine for AI processing (which is similar to a GPU) as well as other units for specialized functions like data encryption and video decoding. Most newer computers have a 64-bit memory controller that can move 64-bits of data between the CPU and RAM at the speed of the RAM, sometimes the RAM is as fast as the CPU, sometimes it’s a bit slower. Newer CPUs have large caches to try to save on some of this transfer, but the caches are in MegaBytes whereas main memory is in GigaBytes. Separate GPU memory helps by having a completely separate memory controller, expensive servers help by having multiple memory controllers. Apple’s block diagrams seem to indicate they have two 64-bit memory controllers or parallel pathways to main memory, but this is a bit hypothetical. As people are benchmarking these new computers, it does appear that Apple has made some significant performance improvements.

Summary
If Apple has greatly reduced the memory bottleneck and having the GPU, Neural Engine and CPU all accessing the same memory doesn’t cause too much contention, then saving the copying of data between the processing units will be a big advantage. On the downside, you should overbuy on the memory now, since you can’t upgrade it later.
If you are interested in the M1 ARM processor and want to learn more about how it works internally, then consider my book: Programming with 64-Bit ARM Assembly Language.
