Posts Tagged ‘3d printer’
Playing with a Raspberry Pi IR Camera
Introduction
There was a Raspberry Pi IR camera on sale in the last Prime Day sale, so I thought I’d get one and see what it can do. This is an inexpensive 5MP camera that works night or day and cost me $22. Basically this is a chance to get into Raspberry Pi camera support, play with an infrared camera and play with my 3D printer. You can shoot videos, but I haven’t played with this yet. This blog is the start of that journey.
The Camera
The camera arrived in a static envelope with no instructions and in three parts that required bolting together. The bolts are very small and hard to fit in the holes and tighten. For me, it would have been nice if it had come assembled. I suppose some people might like to mount the lights separate from the central camera, perhaps in a specialized case; however, if you do this you will need to solder wires to the circuit boards to make the electrical connections.

Once assembled and connected to my Raspberry Pi, I followed the instructions in the Raspberry Pi Camera guide to access it, but these didn’t work. After a bit of Googling, it turned out this is a legacy camera and the instructions to enable it are a bit different. If there were instructions, it might have been nice to mention this.
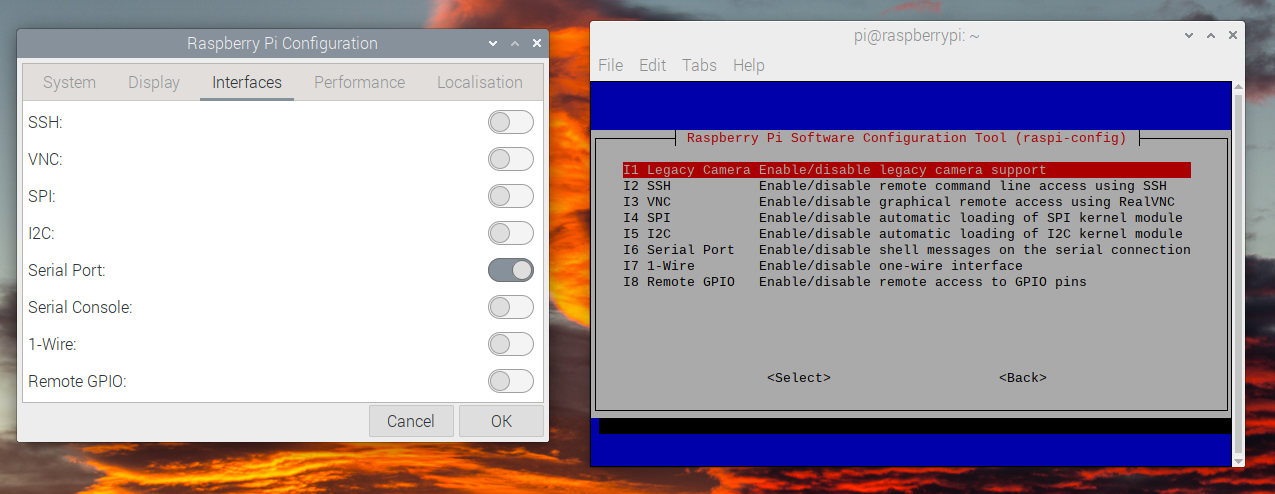
In the above screenshot, notice that the camera doesn’t appear in the newer Raspberry Pi Config GUI, and that you have to use the older character based raspi-config program. The legacy camera appears under “Interfaces”.
Once this was sorted out, the camera works fine.

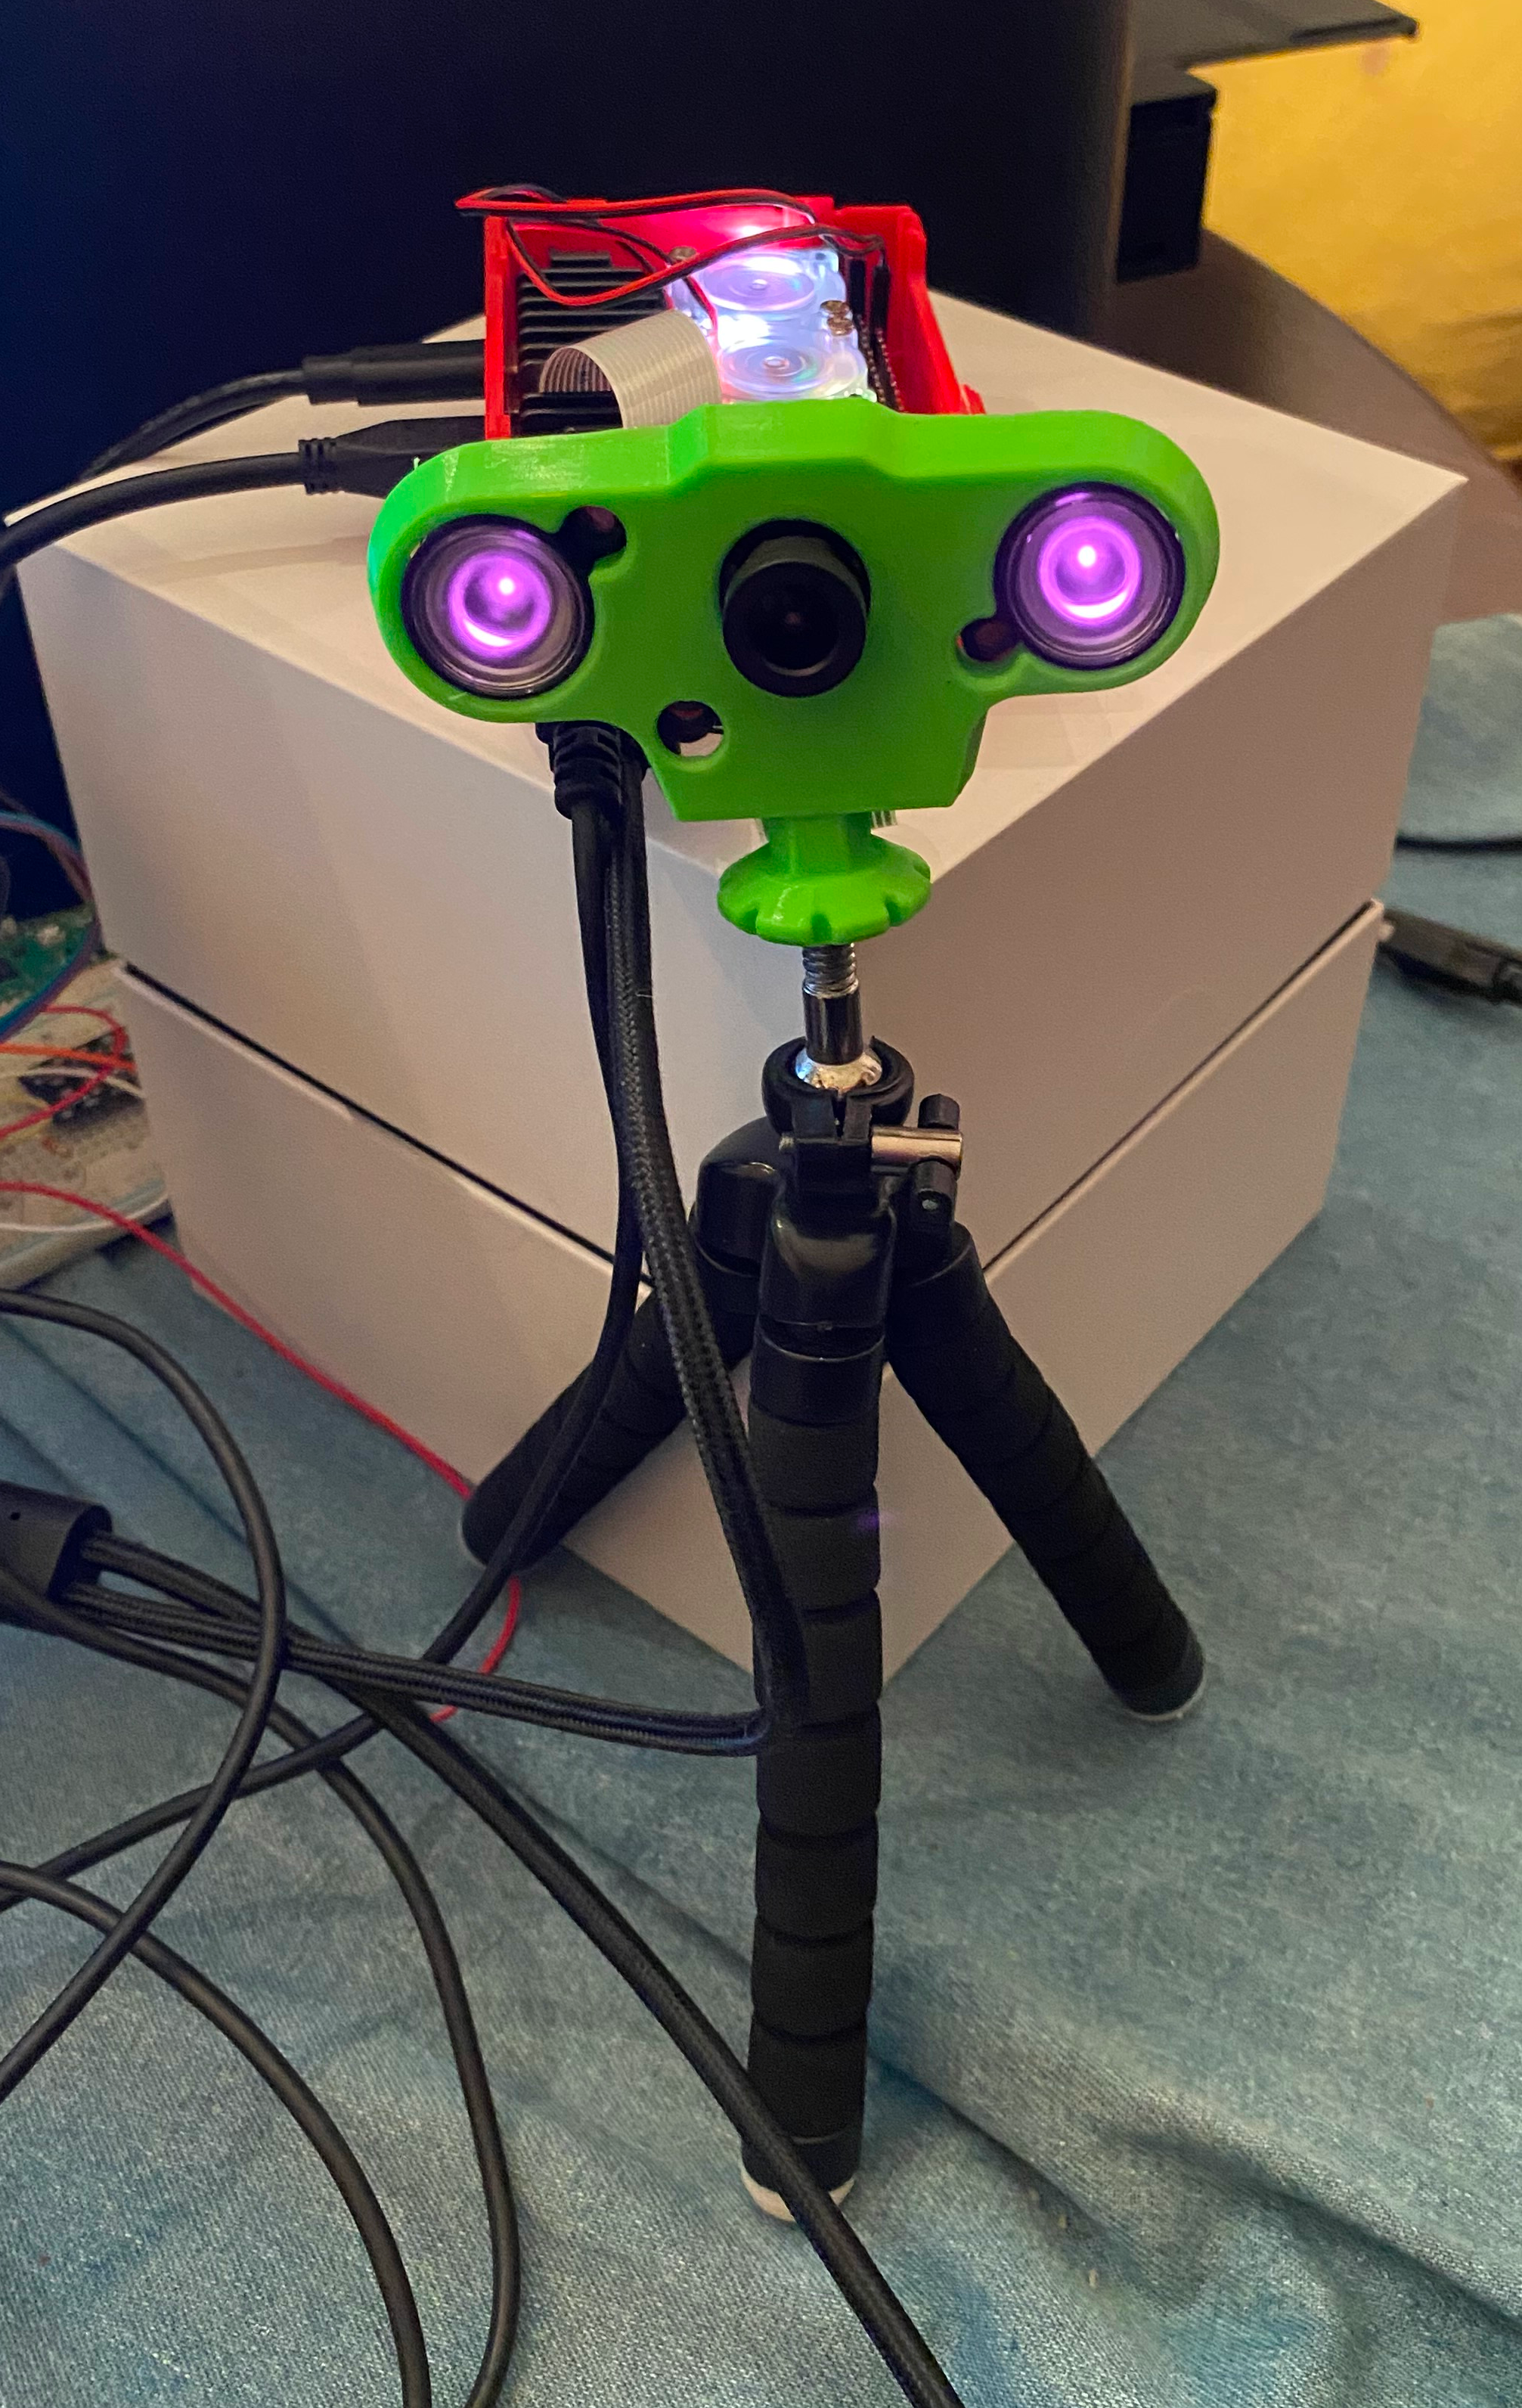
The camera has light sensors, so if you are in daylight it operates as a regular camera. If it is dark, then it switches to IR mode and that resulted in the picture above. Generally it gives quite good results in the house, but I haven’t tried it outdoors to see what its range is.
3D Printing a Case
I found a case to print fairly easily on Thingiverse. When it started printing, I worried that I should have turned it upside down due to all the filling support material being printed. However, once done I understood the reason, which was to do with leaving room for the tripod mount.

Then when the support stuff was removed.
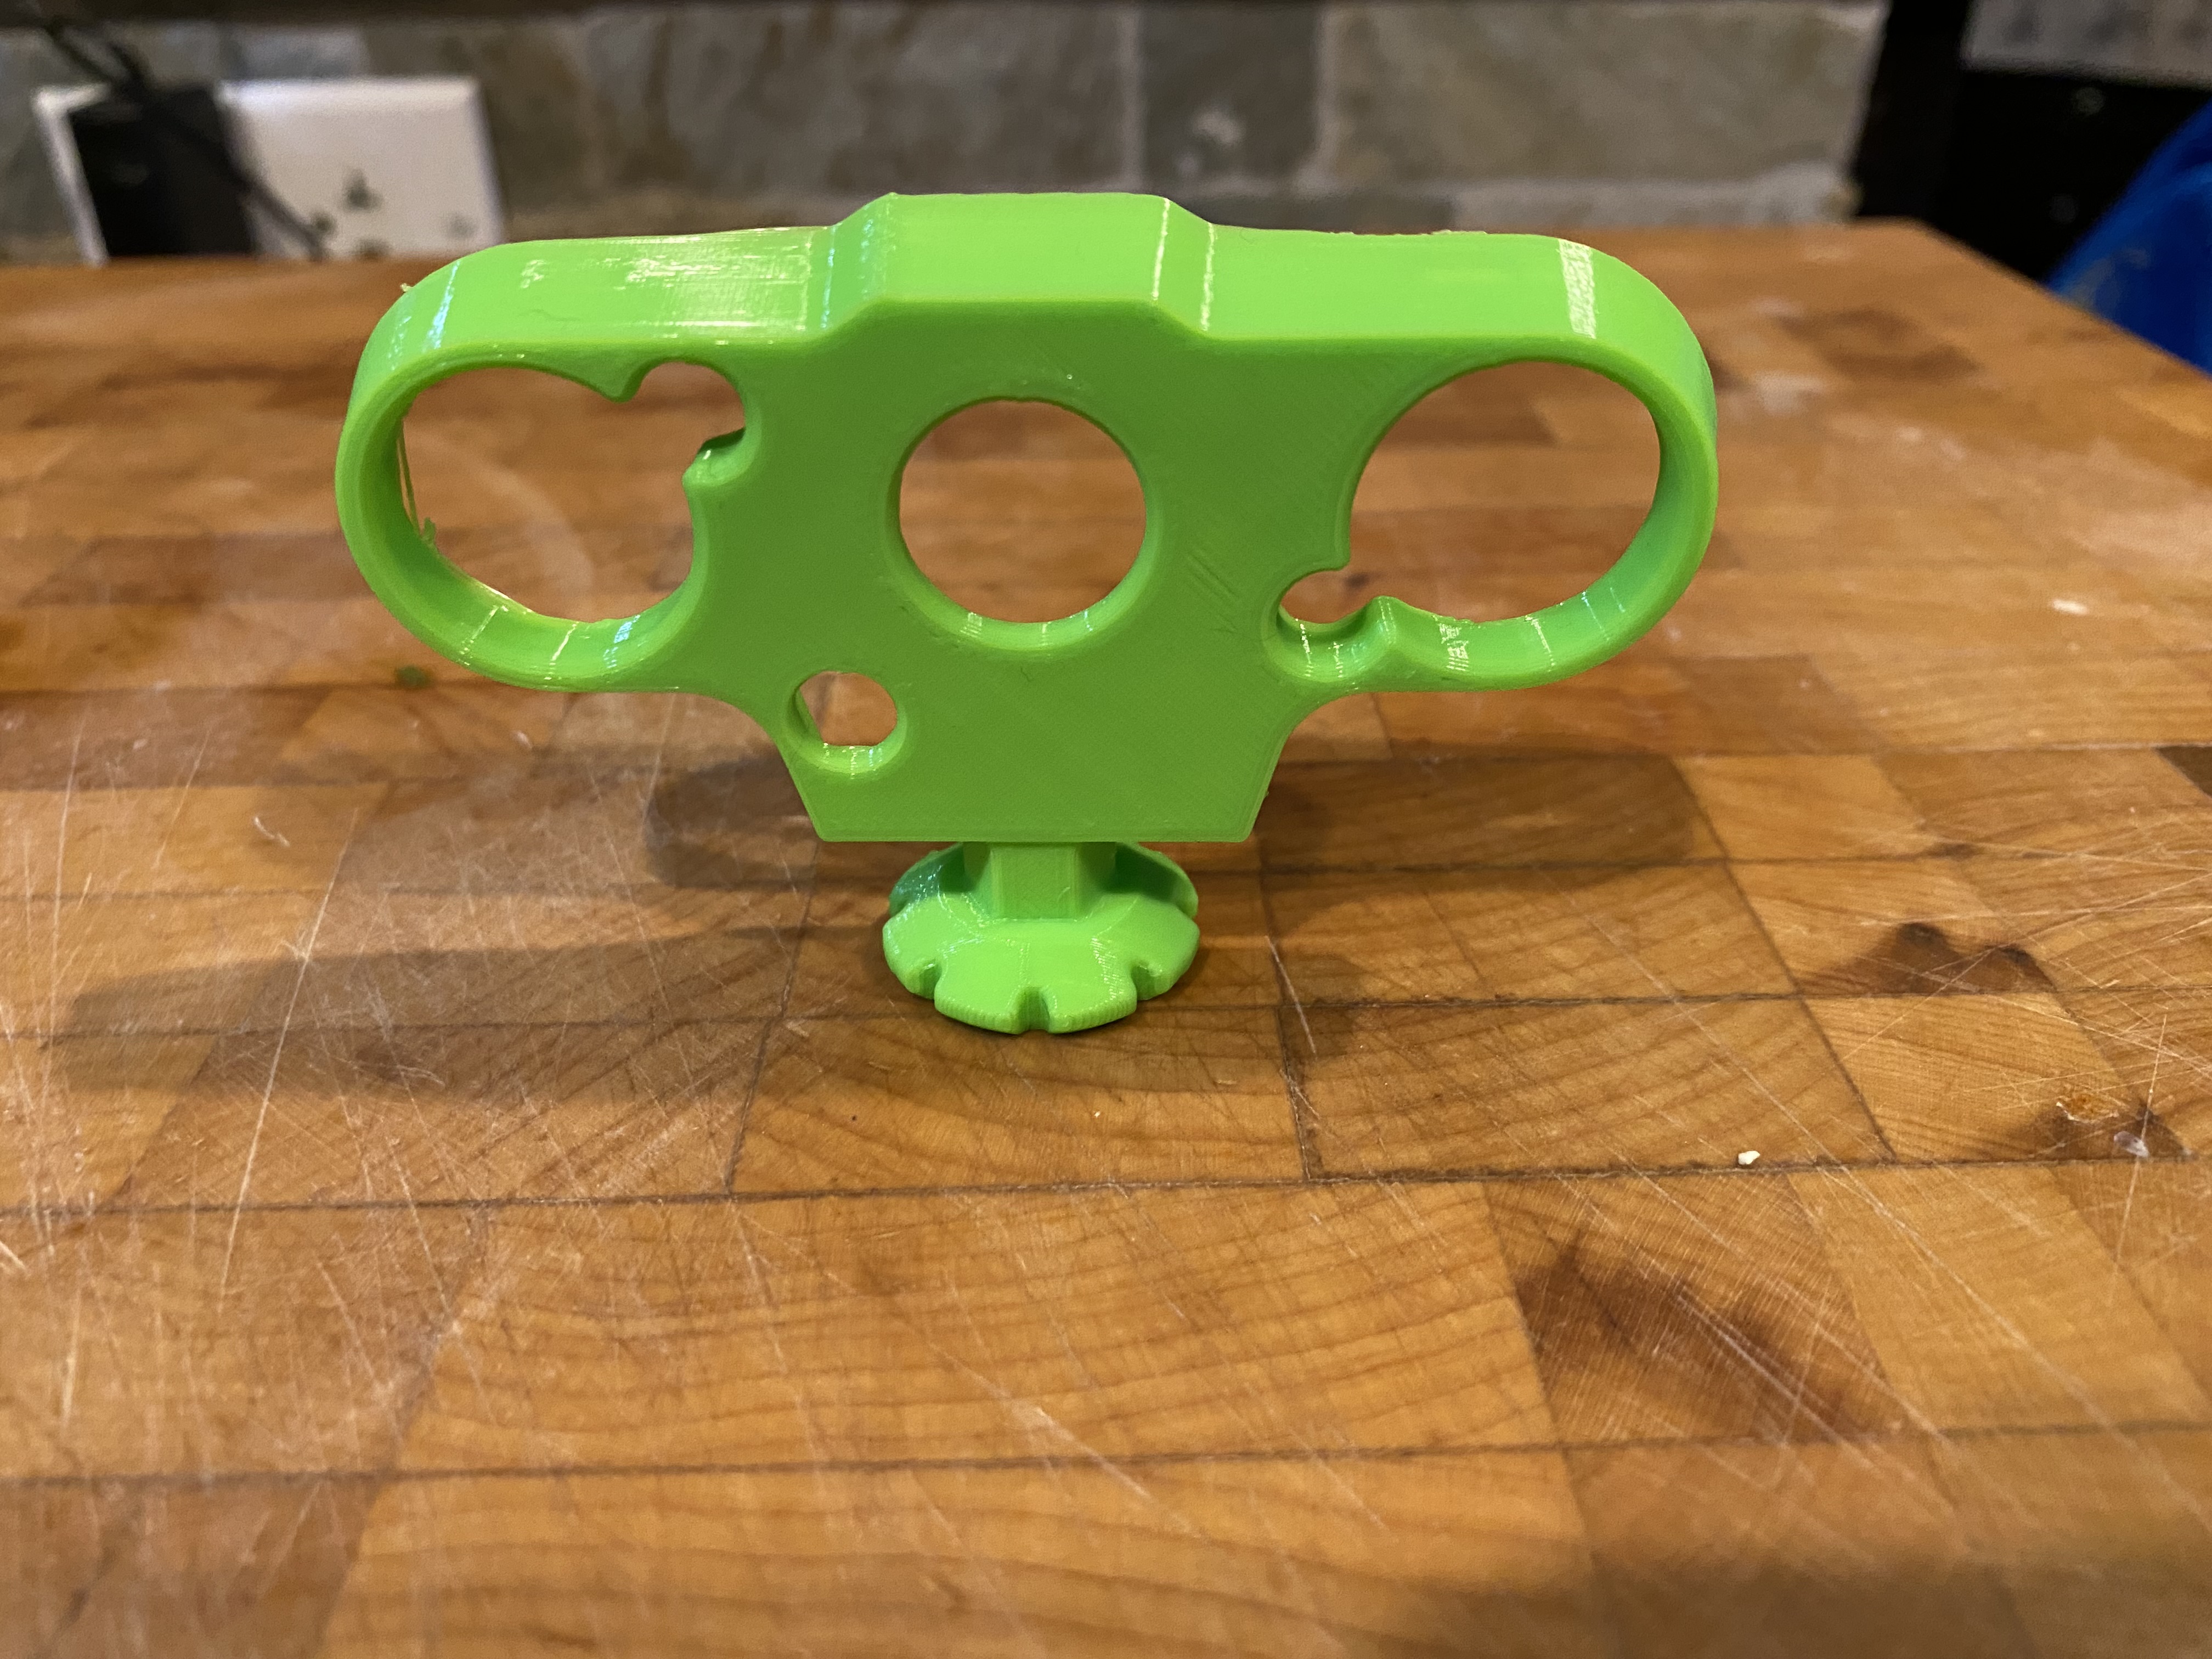
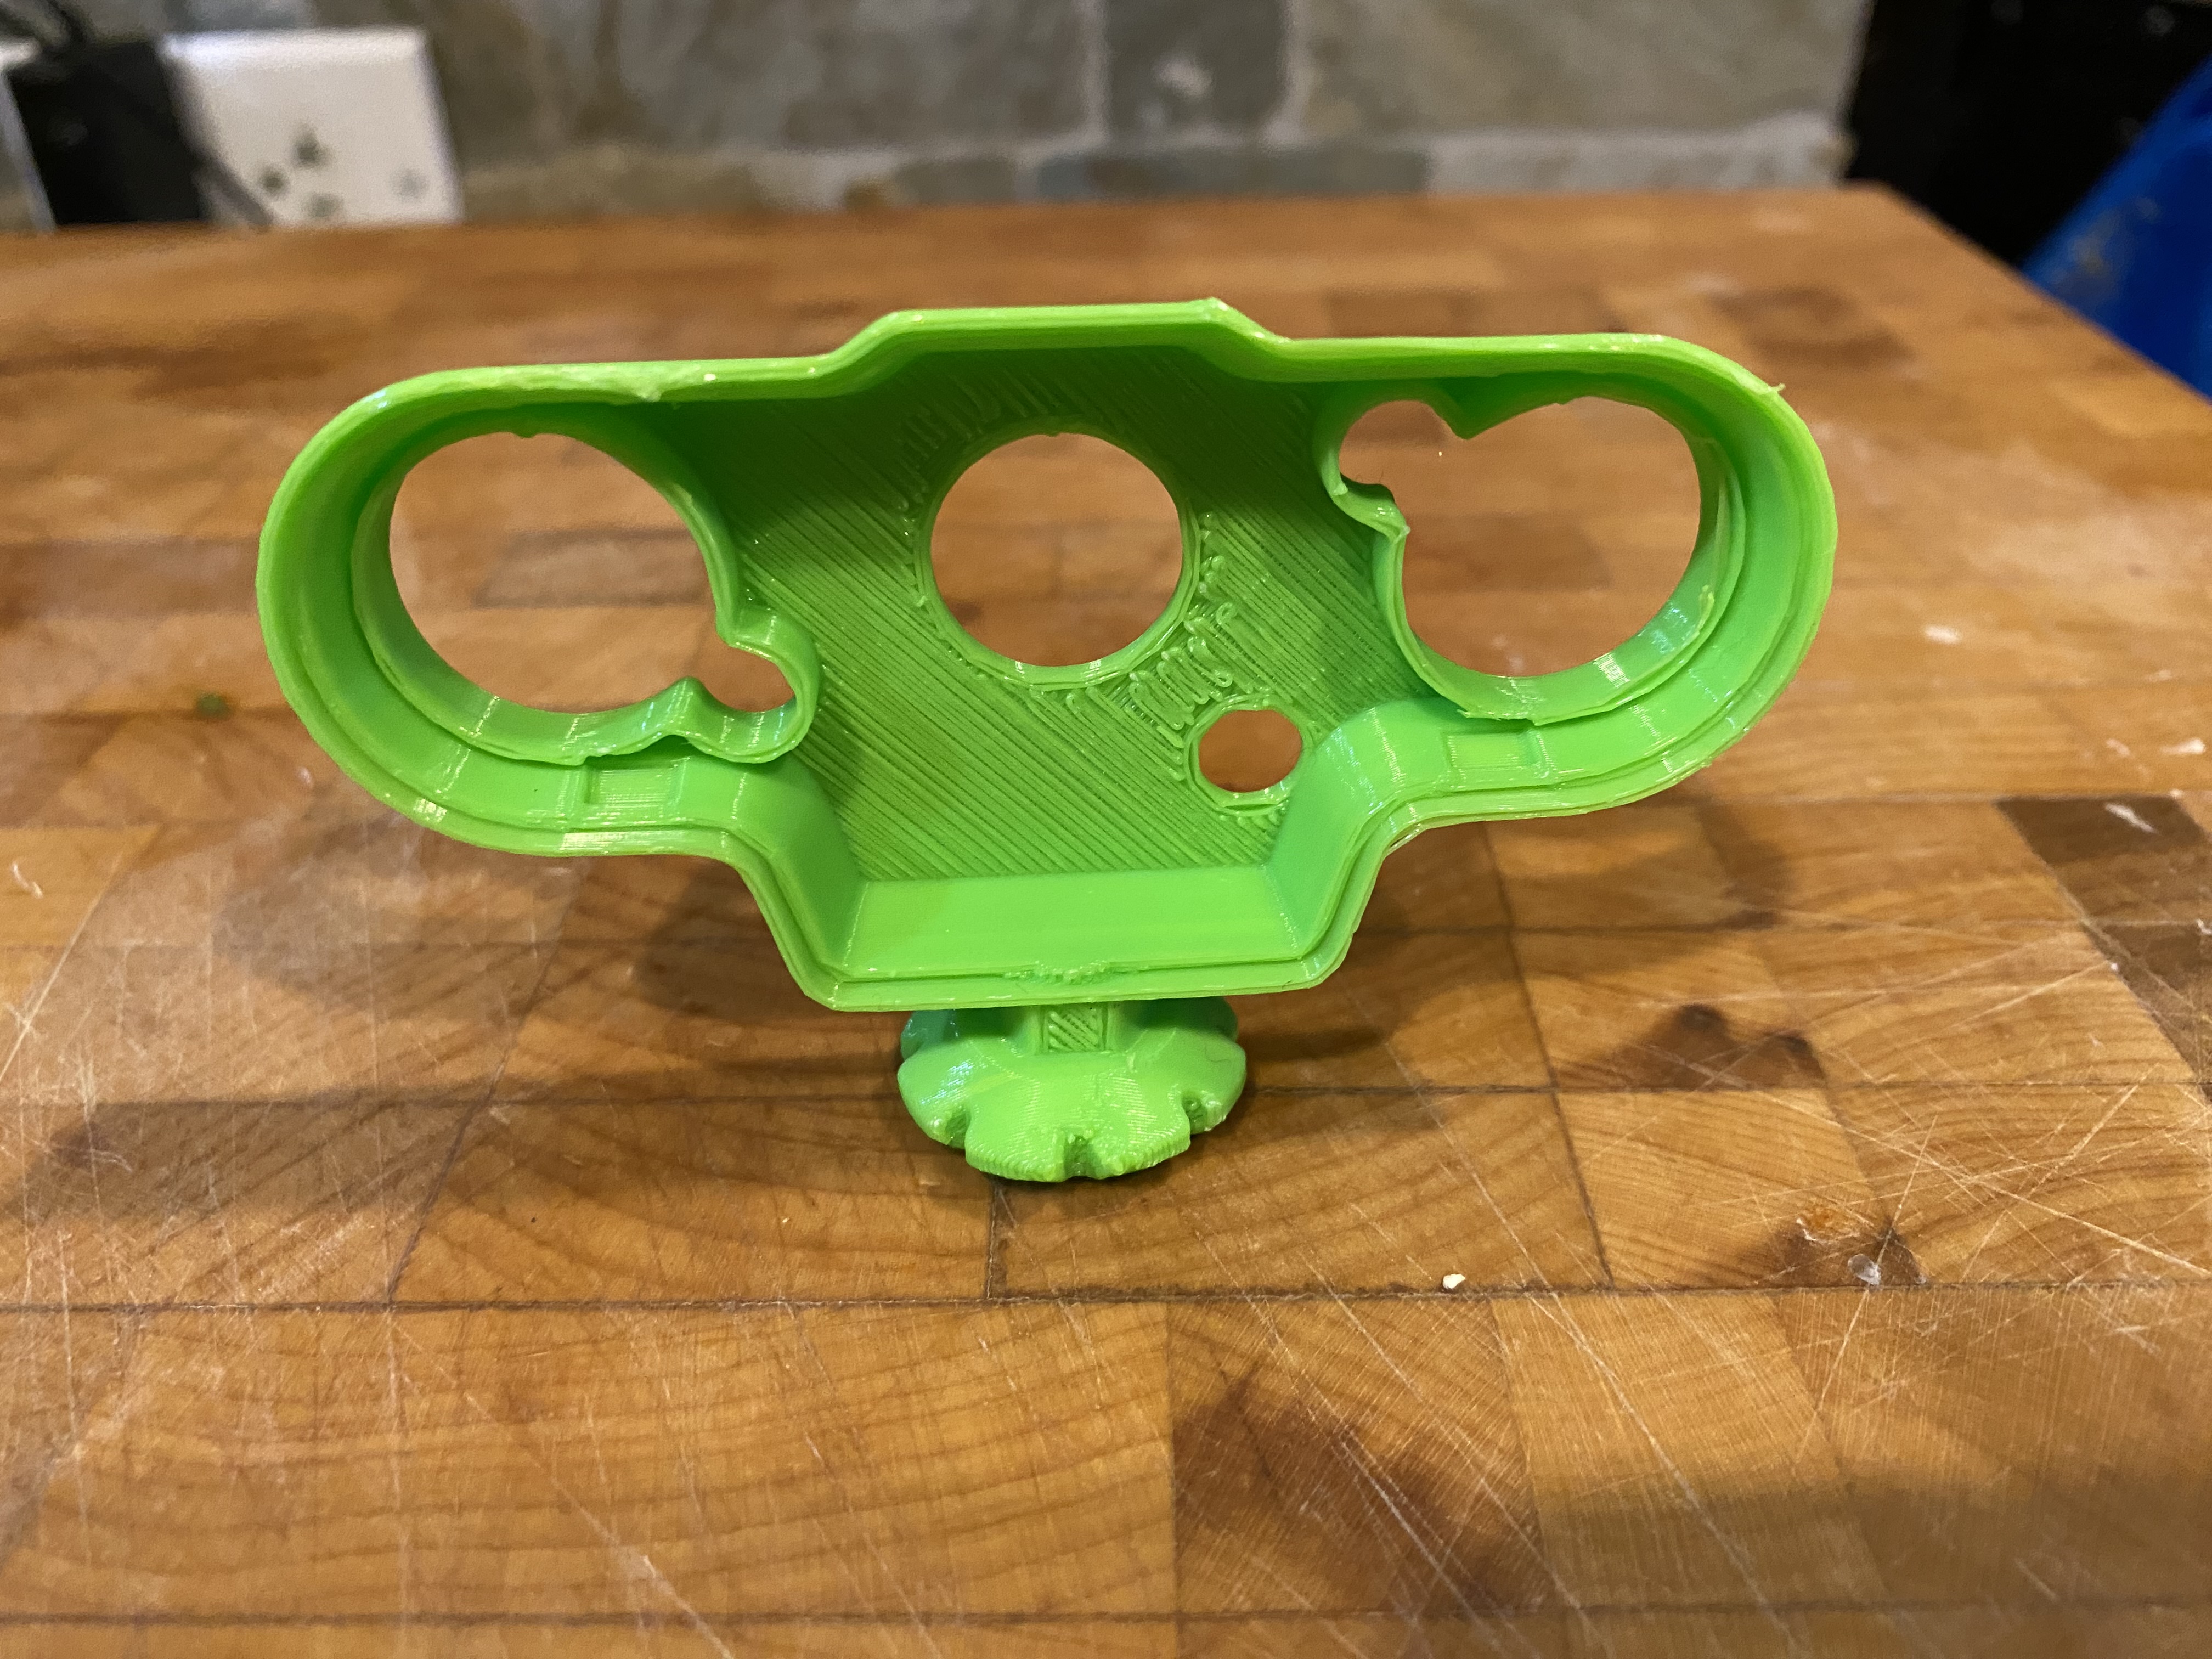
I didn’t bother sanding the inside, since once the camera is inserted, you can’t see the rough parts. If I had turned the model upside down then the support material would have been on the front and it would have taken a lot of sanding to smooth out. Below is the support material that was removed.

Then the assembled final result:
PiCamera
You can take pictures using the Raspberry Pi’s raspistill command such as:
raspistill -o test.jpg
Another way is to write a Python program to control the camera using the PiCamera Python module. Below is the simplest Python program to show a preview window of what the camera is viewing.
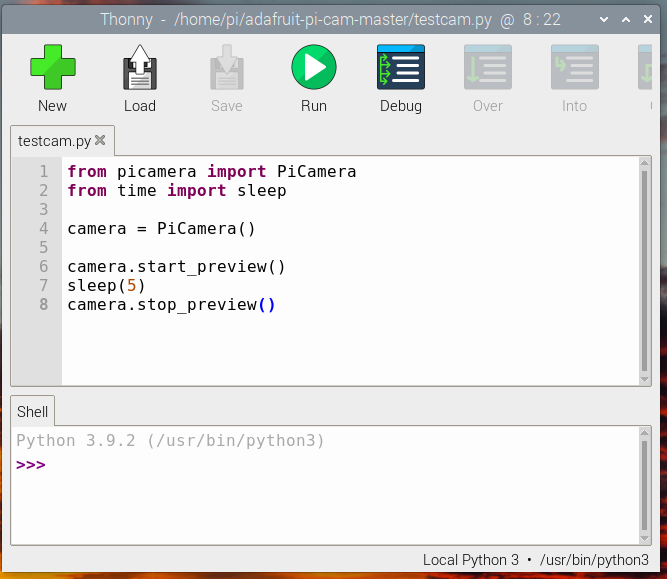
Both raspistill and the PiCamera Python module have tons of options to control the camera and these are all well documented in the Raspberry Pi Camera Guide. This is a rabbit hole for another day.
Summary
The Raspberry Pi camera modules are fun to play with, but not always practical. The camera cable is extremely short making it hard to aim the camera. In many ways a stand alone camera that records to either an SD-card or Wifi is much more practical. That being said, people have built standalone cameras this way, including a TFT display, battery pack and button to take the picture. Then bundling it all up in a 3D printed case. This is a great way to learn how a DSLR or point and shoot camera is actually put together. As the Pi camera accessories improve, perhaps one day these DIY cameras can match those from Canon or Nikon.
What I Learned About 3D Printing Last Week
Introduction
I blogged my initial impressions of my new Creality 3D printer last time. This time we’ll look at some things I learned about 3D printing since, printing a slightly more complicated object, namely a yarn bowl. The yarn bowl is larger than last week’s cat and is based on a model from Thingiverse, namely this one.
First Try
So I downloaded the 3D model, which came as an STL file. This is a Standard Tessellation Language file, which is a standard way for CAD and 3D printing software to share 3D models. This isn’t a file the 3D printer can read, so you need to feed this through what is called “slicing” software to produce the GCODE file that the 3D printer understands. GCODE is a standard numerical control language used to control all sorts of automated machinery including lathes, milling machines and 3D printers. GCODE files are text files and you can open one in Notepad to have a look. To control the 3D printer the GCODE basically contains the list of all the movements for all the layers that need to be printed.
I used the slicing software that came with the printer, namely Creality’s modified version of Cura, generated the GCODE file, put the memory card in the printer and let it rip. It all got running and initially looked good. The print time was projected as 19 hours.
Unfortunately, when it got to the top of the spiral part, it started to mess up, where the filament had nothing to support it and it sprayed all over the place. I could see things weren’t working properly, but I thought I’d let it run and see how it came out anyway.
Lights Out
That night was quite windy and at midnight we had a power failure. The power came back on after a couple of minutes, but the 3D print job was interrupted. I went over to the printer and saw a prompt saying a 3D print job was interrupted and would I like to continue. This looked promising, so I hit “yes”. The printer started going, but then immediately complained that the nozzle temperature was too low and stopped. There didn’t seem to be any way to clear this error short of turning the printer off. It appears the continue function is quite literal and it doesn’t go through the normal process of heating all the elements before starting. To me this is a pretty serious bug that makes continuing useless if more than a minute has elapsed. Certainly not able to continue after a power failure.
In this case it doesn’t matter too much as the spiral pattern wasn’t working. I still got a partial bowl out of the process.
Second Try
I googled about what to do, and the answer was that in the slicing software you need to set the option to add supports to the model. So I loaded up the slicing software and it offered to upgrade it to a new version, which I accepted. Rather than upgrade to a new version of the Creality software it upgraded to the full newest version of Utilimaker Cura. I’m not sure why they don’t just bundle this in the first place, but regardless, this upgrade is well worth it and adds a lot of functionality.

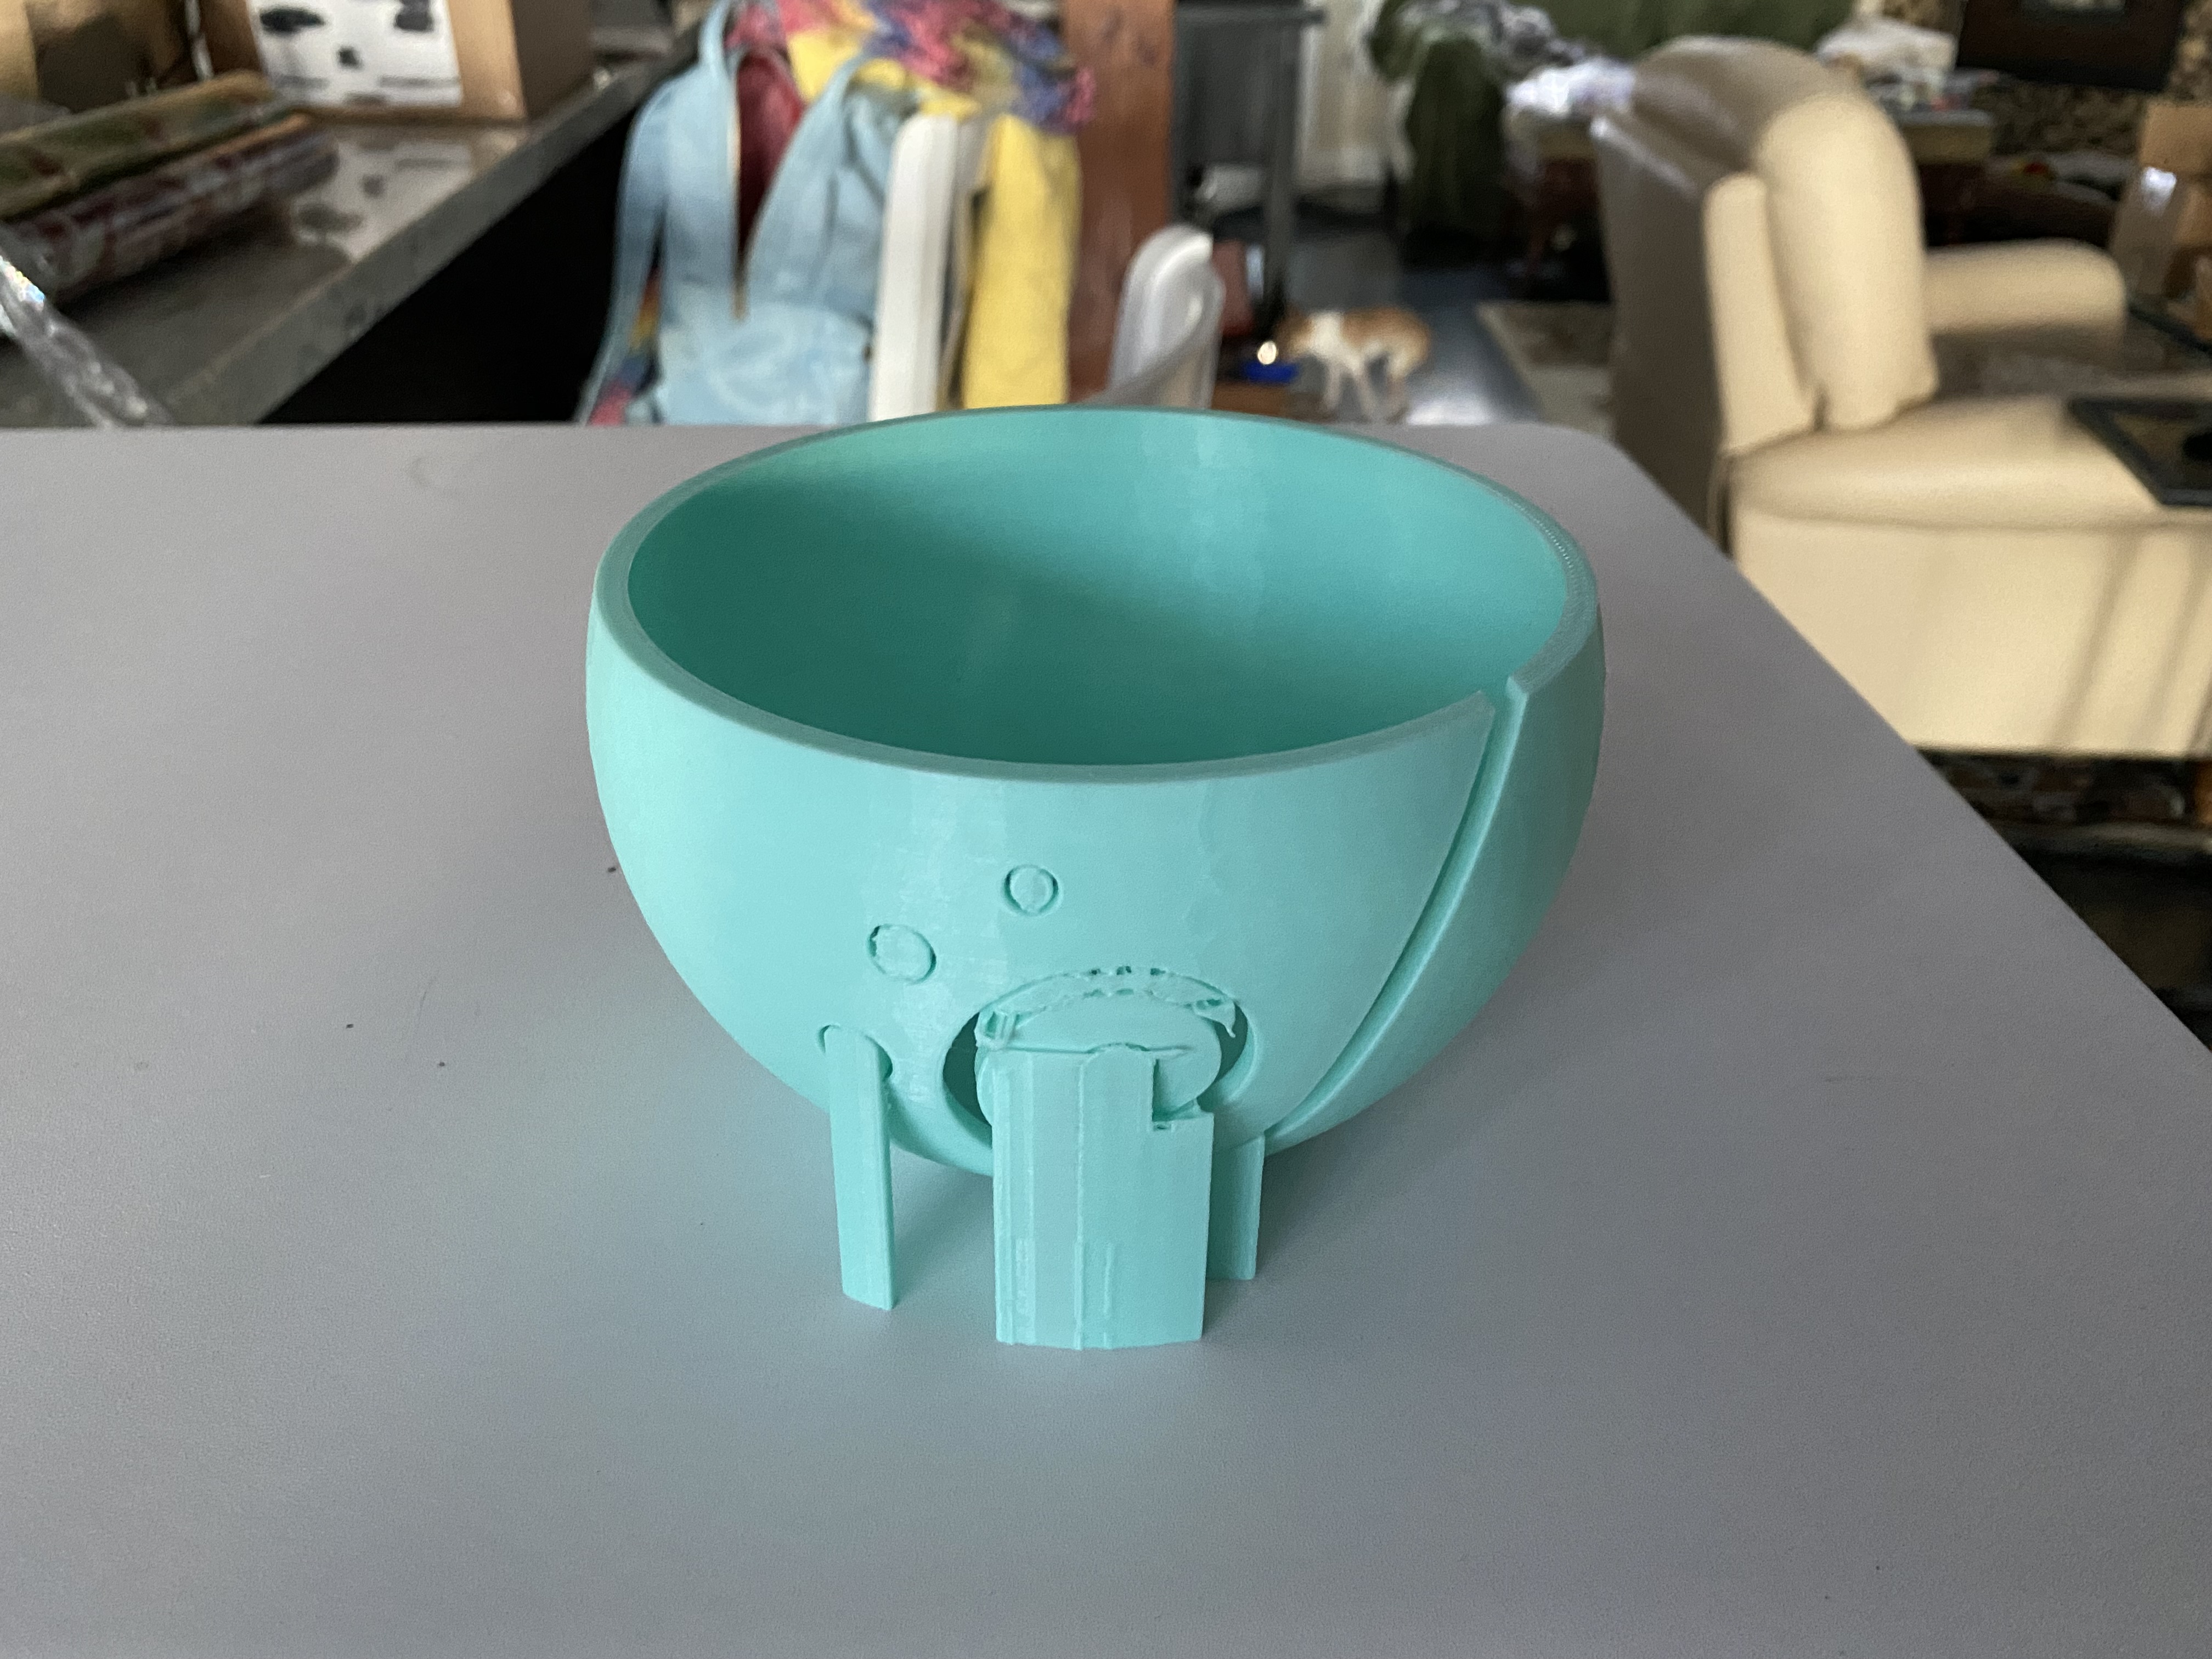
Then checking the box to add support structures was easy to find. I don’t know why this isn’t turned on by default. I then sliced the model to produce the GCODE file required by the printer and let it rip. Printing the support structures takes more material and time and I could see the printer printing much more to start with.
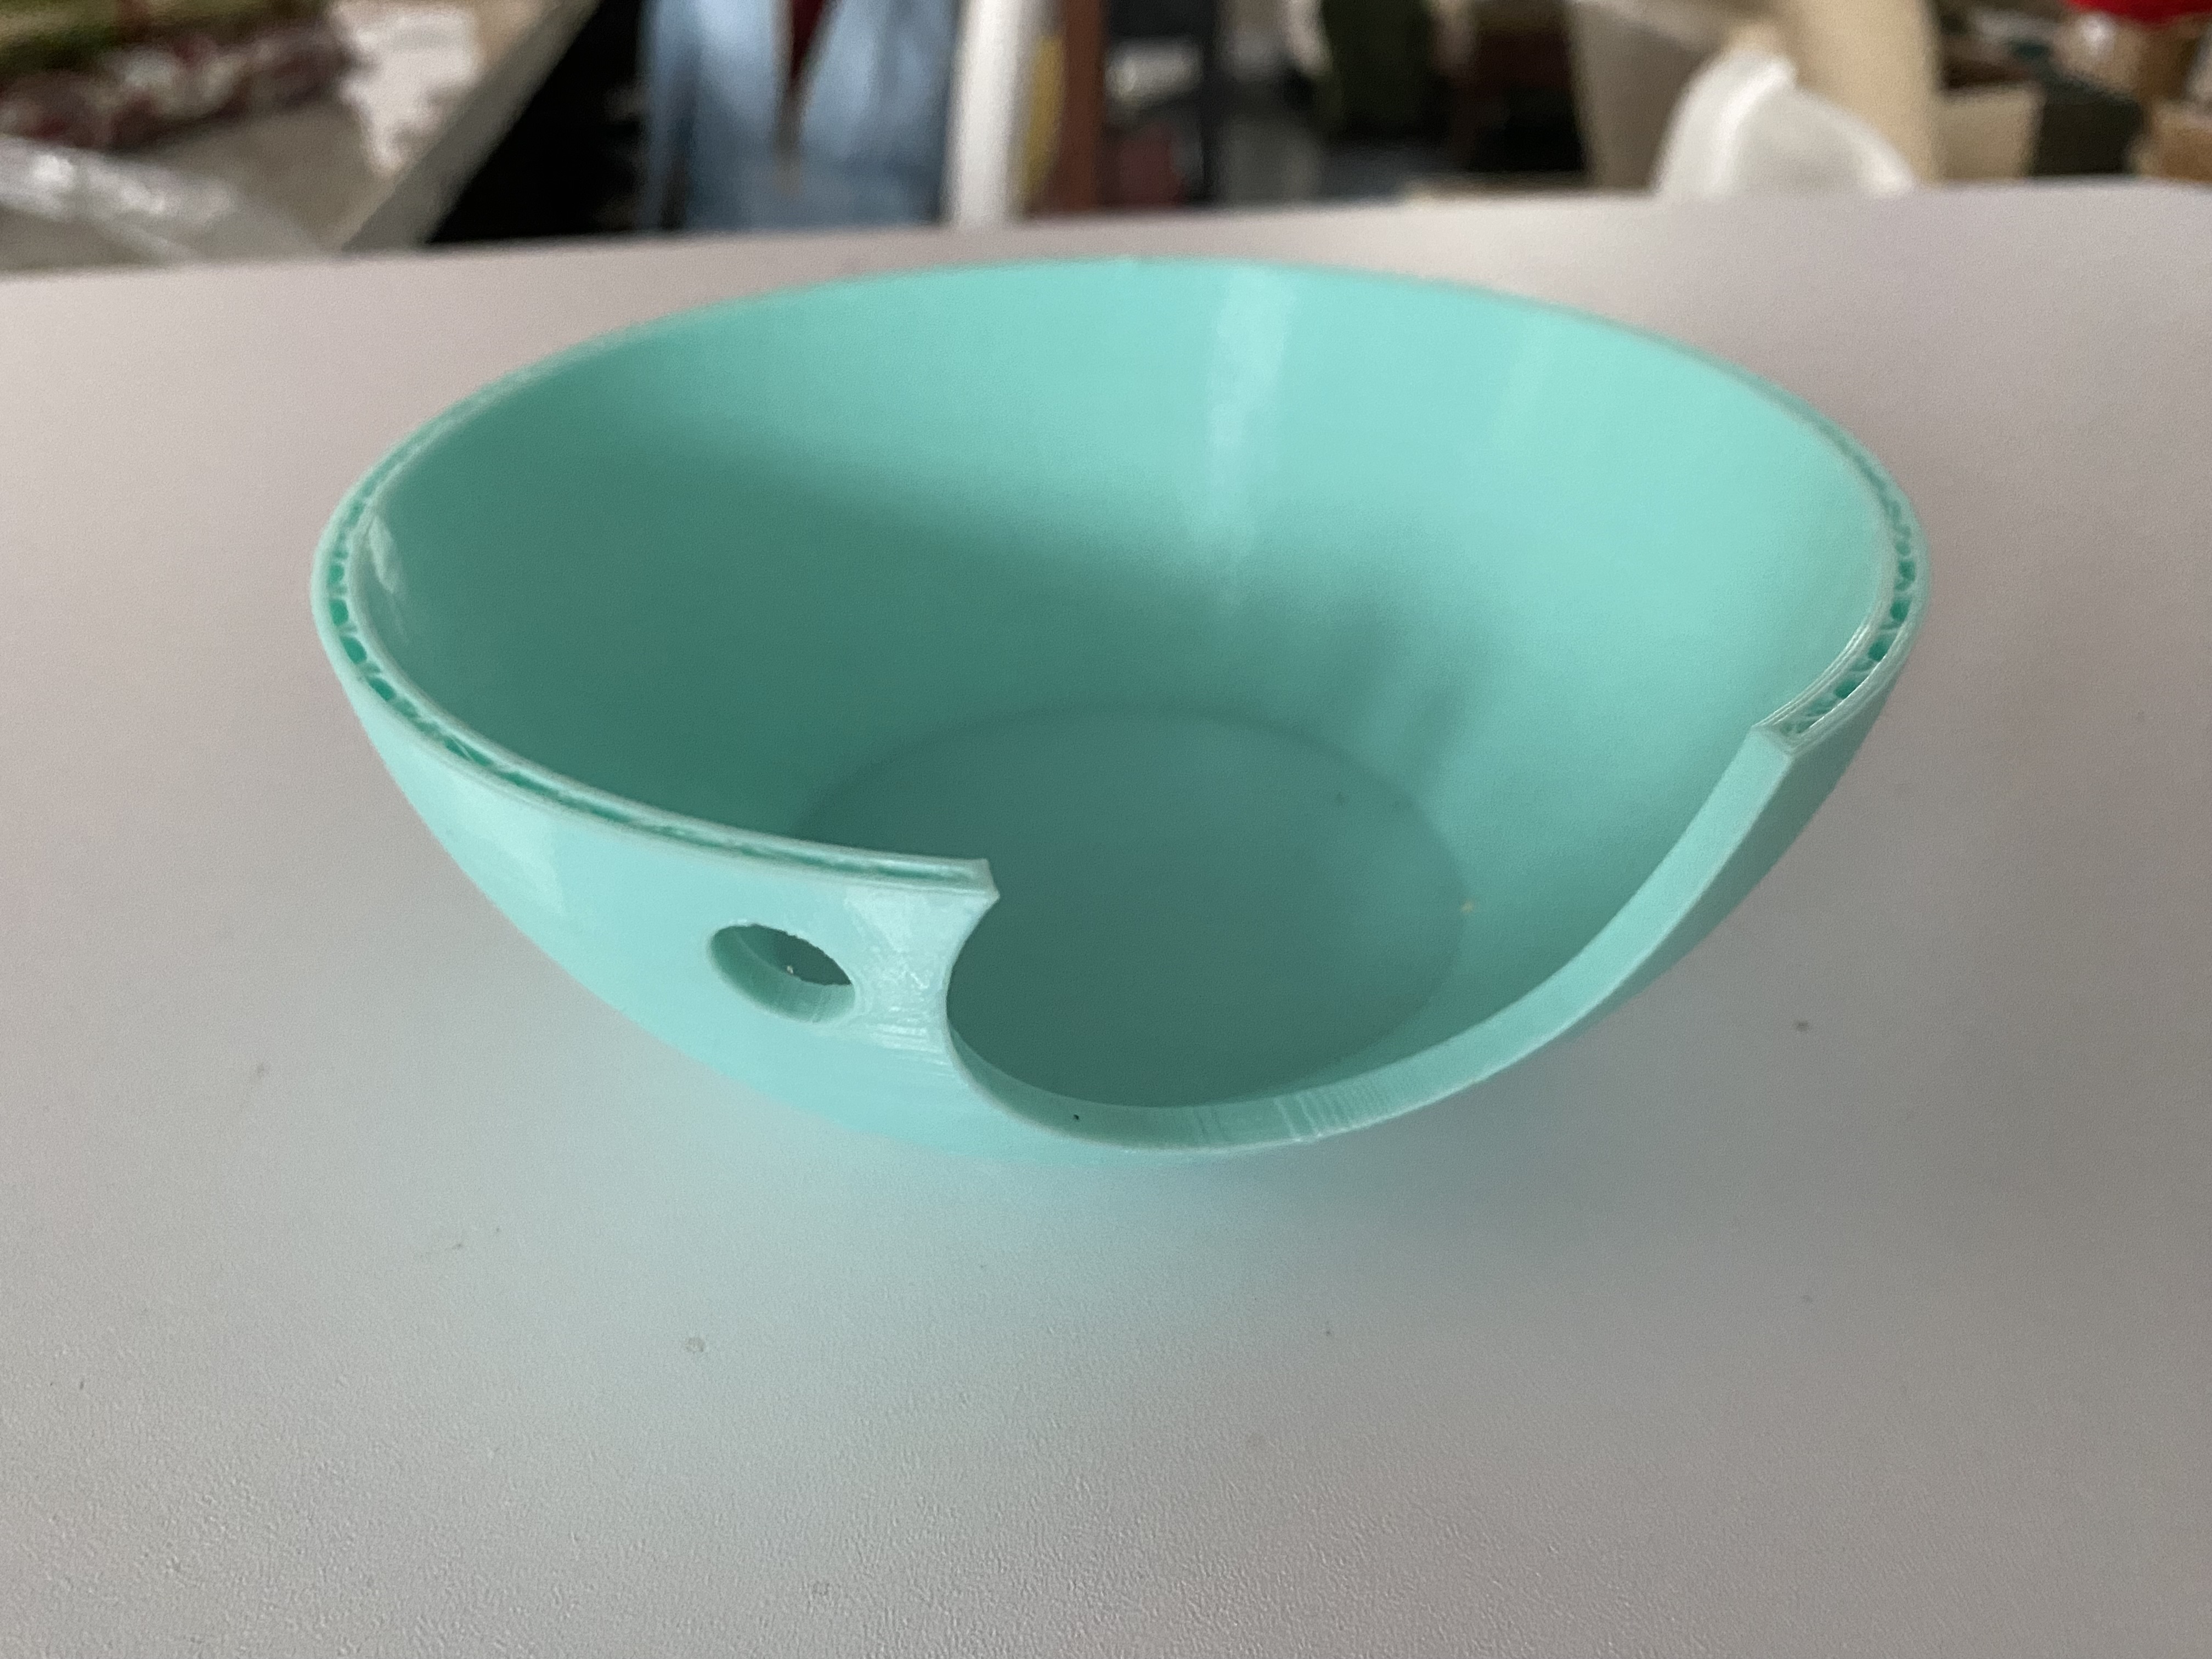
Anyway, 17 hours later, I had the bowl with all the support structures in place.
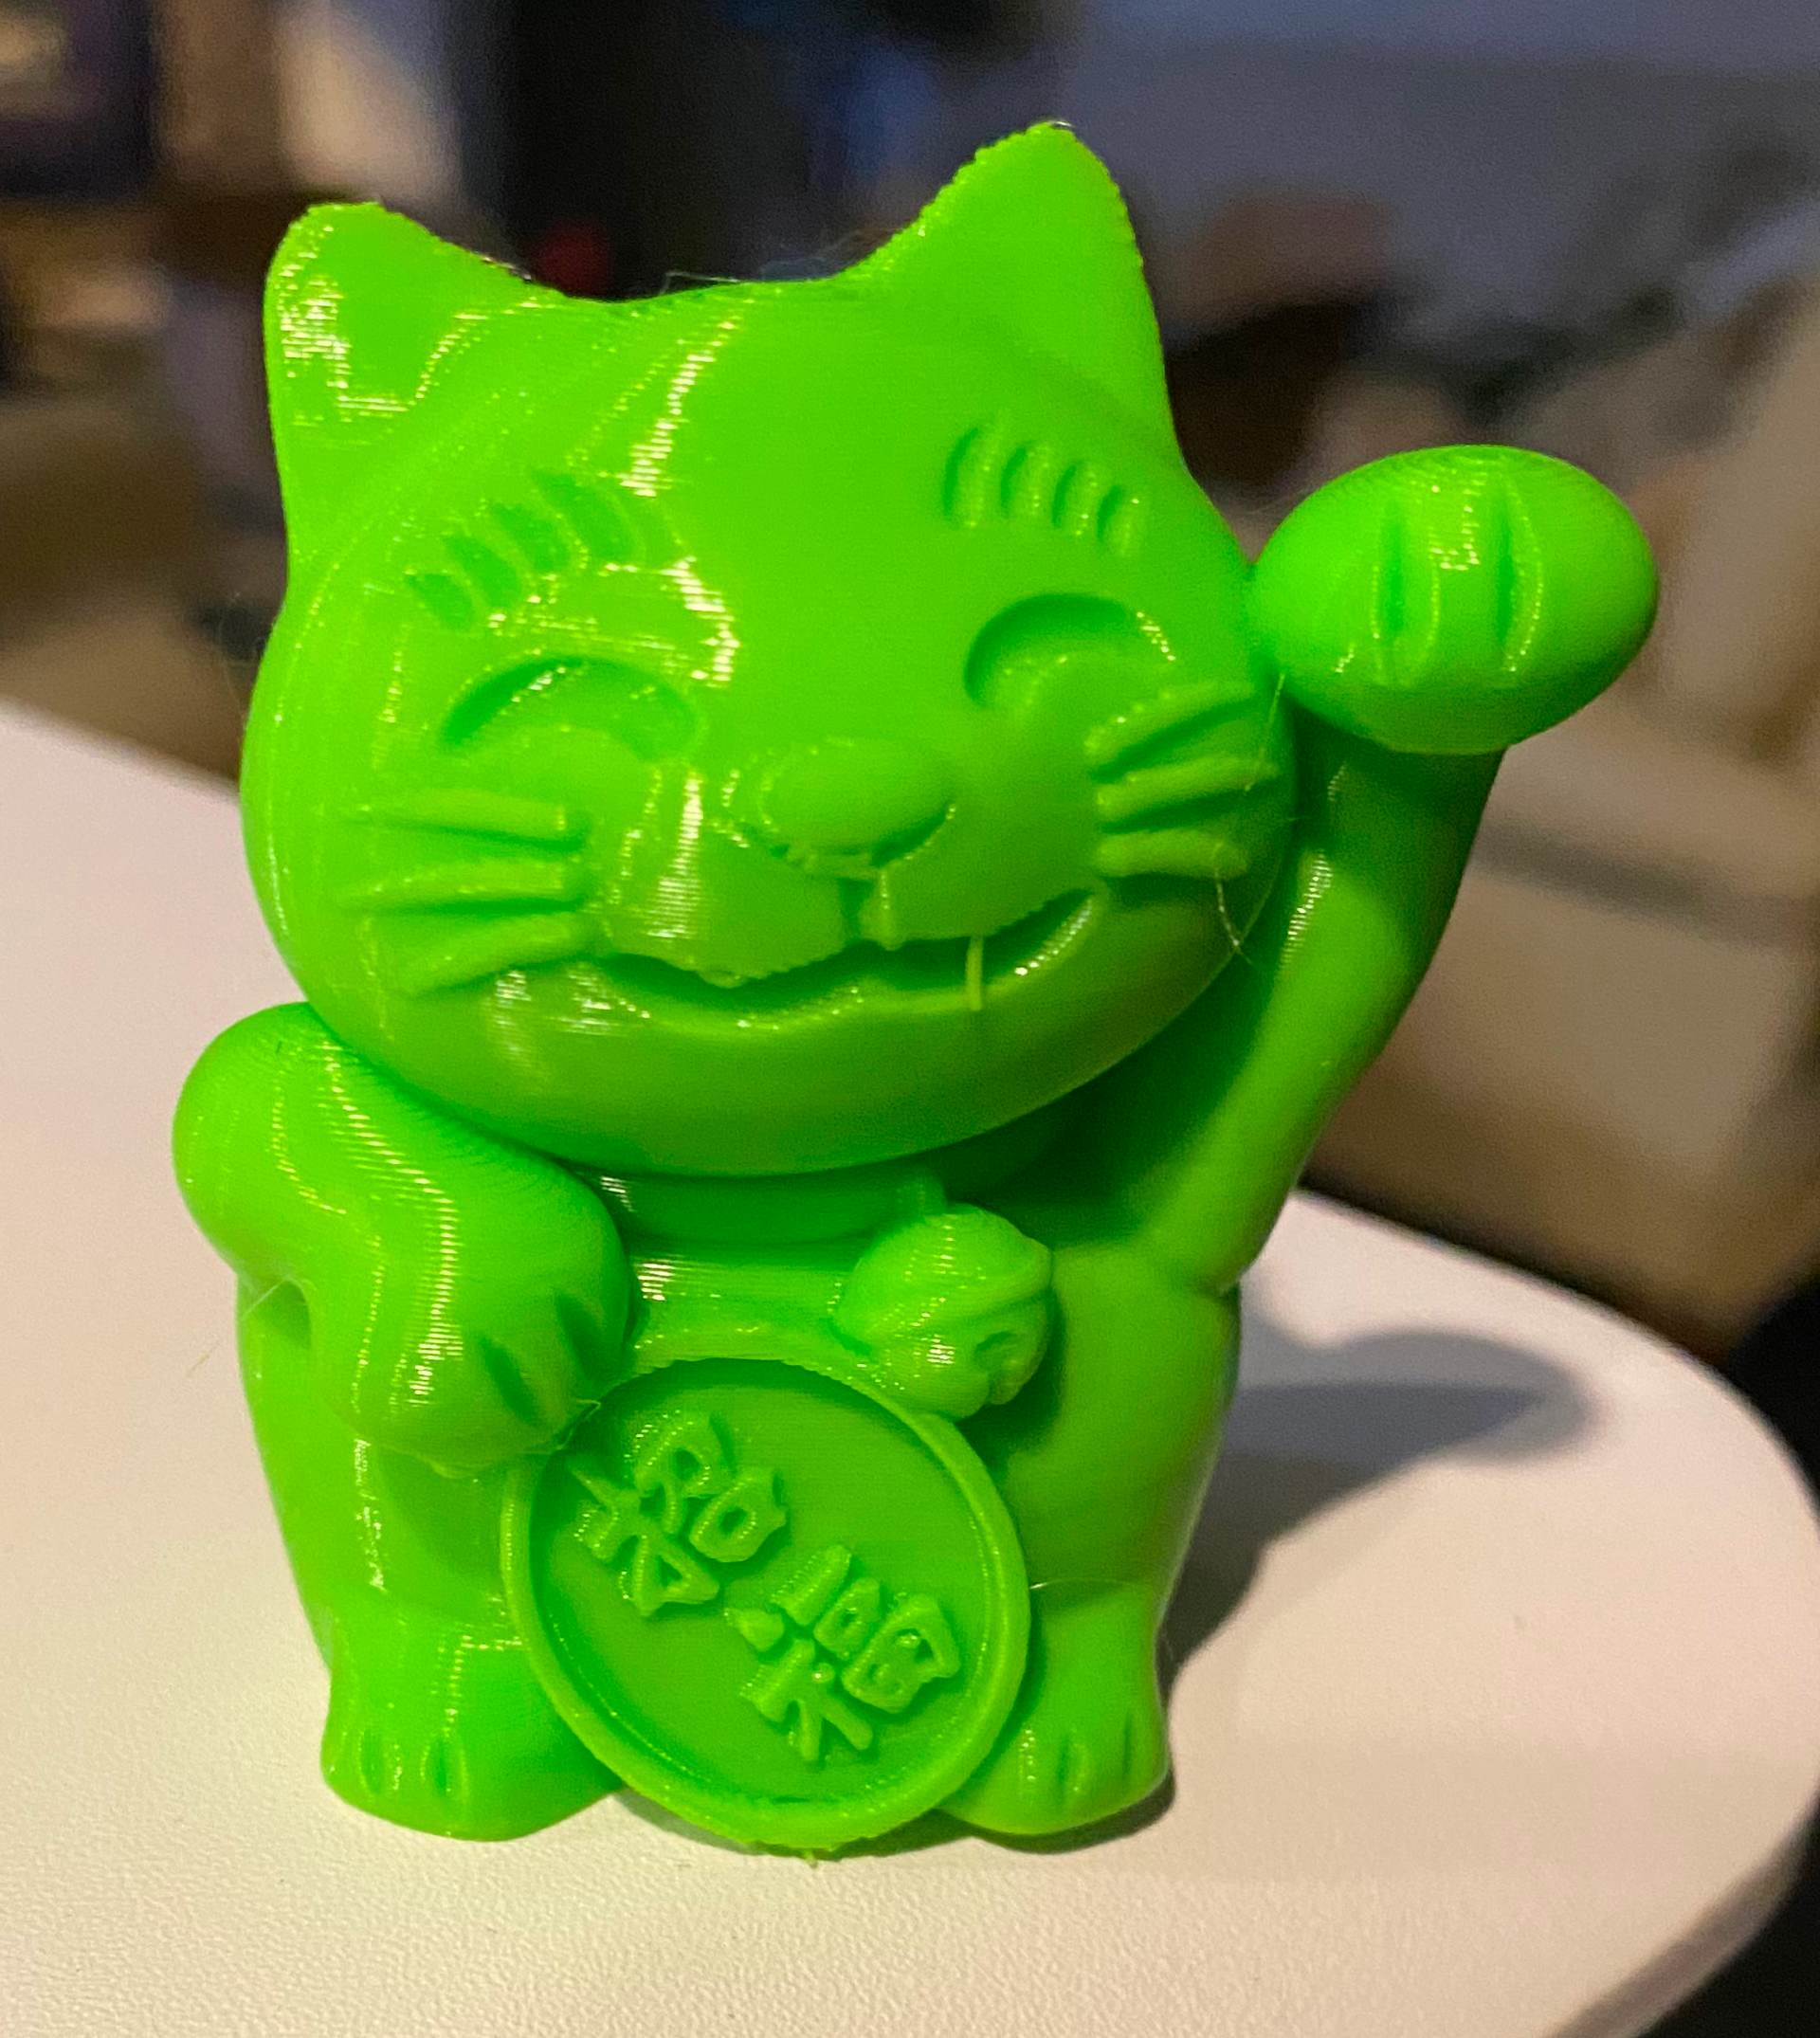
Incidentally, the cat model from last time worked, because the model was included on the printer’s memory card as a GCODE file, obviously with the support structures included.
Cleaning Up
The support structures are hollow and not as strong as the main part of the model, as a result using a combination of breaking them off, cutting them with wire cutters, or prying them out with a screwdriver, I was able to remove them all.

As you can see from the picture, after removing the support structures there are still some rough spots that I cleaned up with some sandpaper. I used a thin hex wrench to support a thin strip of sandpaper to clean up the edges. I wonder if a small wood file might be another way to go.
Summary
It looks like 3D printing is a continuous learning process. Due to the printing time, this is a slow process, but the printer works pretty reliably and doesn’t need any intervention as it chugs along. In the end the yarn bowl came out nicely, and I’m impressed that the 3D printer could print the spiral gap that feeds the yarn.
3D Printing with the Creality Ender-3 V2
Introduction
I received an early Christmas present of a 3D printer, namely a Creality Ender-3 V2. This is a fairly inexpensive open-frame 3D printer. 3D printing is oriented to the DIY crowd, so don’t expect the same ease of assembly and running as you might expect from other consumer electronics products. That being said, I did get it all up and running without any major setbacks.
One thing to keep in mind is that 3D printing is still a long way behind the replicators on Star Trek. When you ask the 3D printer to produce something, it isn’t instantaneous, and in fact they are quite slow, typically taking over four hours to print something. Further, most inexpensive printers print using melted plastic, so when Picard orders “Tea, Earl Grey, Hot”. he may get a plastic lump in the shape of a cup and saucer after waiting five hours, but no tea and no bone china.
Assembly
The assembly isn’t hard, the problem is the terrible user manual. The user manual is only an assembly guide. The pictures aren’t too bad, but some are quite cryptic, and there is a notable lack of text. I guess most DIYers will take it as a challenge. There are lots of YouTube videos on unboxing and assembly of this printer, but it takes quite a bit of scanning to find someone with the same problem I was having. I think a guide to where the cables need to run would have been most helpful. It didn’t mention how to install the tube that guides the filament into its feed nozzle. As a result this came apart the first time I printed and then was quite fiddly to get correct.
Adjustments
The main adjustment is to level the printing bed at the correct distance from the print nozzle when it’s in the home position. The nozzle has to be close enough that the plastic is still melted when it hits the bed, so that it bonds to the bed, i.e. sticks. If it doesn’t stick then it will usually catch on the print nozzle and get dragged around by the print nozzle, wrecking the print. You have to follow the manual quite precisely to get this to work. Even with this it didn’t stick well to the bed. The advice I got from a friend was to cover the bed in painter or masking tape. After covering the bed with painter’s tape and adjusting the bed leveling/nozzle height then everything worked fine.
There are lots of other adjustments, such as the tension on the guide wheels and some temperature settings. I left all these at the default. In the settings on the controller, there are quite a few options that are not documented anywhere.
Operation
The pictures below are printing the cat sample that came on the printer’s memory card. Printing this little guy took four hours, but the result was good. The printer can’t print overhangs, each layer needs to be supported, so you can see some support structures being printed as well to support the printing of the head and the hands. These supports are easy to remove when printing has finished.


Software
The printer comes with something called “Creality Slicer” which will take a standard 3D model produced with a 3D drawing program like Blender and “slice” the model to produce a file that the printer can print. The Creality Slicer is based on the Cura Slicer and seems to work fairly well. There are lots of other slicer programs out there, but so far I haven’t had a chance to check any of them out. The memory card that comes with the printer contains a number of 3D models, that you can slice and then print.
Beside the models that come bundled with the printer, there are tons of places online where you can download all sorts of models that people have created. Thingiverse being one of the main ones.
Of course if you want to design your own objects to print then you need to learn and use 3D modeling software like Blender, which are quite complex.
Summary
The hobby of 3D printing requires a lot of patience. Patience with setting up and adjusting the printer. Patience waiting for the model to print. Patience working with 3D modeling software. That being said, there is something compelling about being able to create something in a drawing or CAD program and then actually print a physical version. The Creality printer seems good for the price, it feels solid and once going seems to be able to print without any attention. The main thing I would like to see is a proper user manual.
