Archive for the ‘assembly language’ Category
Which Assembly Language Book is Right for You
Introduction
I’ve now written four books on Assembly Language programming, three for ARM processors and now one for RISC-V processors. This article explains why there are three books for ARM CPUs and then where people will find RISC-V CPUs.
The Three Instruction Sets for ARM CPUs
The ARM processor started development in 1983 as a 16-bit replacement for the popular 8-bit 6502 used in many popular personal computers such as the Apple II and Commodore PET. This CPU was used in the Acorn computer, mostly sold in the UK. I haven’t written a book on 16-bit ARM Assembly Language, as it is pretty much non-existent in today’s world.
32-Bit ARM
The ARM processor became popular when the 32-bit version was released and Apple chose it as the CPU for the iPod music player. From this start, the ARM processor took over the mobile world being used in most mobile devices. When I wrote “Raspberry Pi Assembly Language Programming”, the Raspberry Pi OS was still a 32-bit operating system, although the CPU in the Raspberry Pi 3 and above was capable of 64-bits. Hence this book is really about 32-bit ARM Assembly Language Programming. Although it does have a chapter on 64-bit Assembly Language, since you could run 64-bit operating systems such as Kali Linux at the time.

64-Bit ARM
After finishing the 32-bit book, I felt a need to write a full 64-bit book. After all, iOS and Android had gone full ARM 64-bit for phones and tablets. Although the Raspberry Pi OS was still 32-bit, the popularity of 64-bit flavors of Linux was growing. The Raspberry Pi 4 finally had enough memory to run 64-bits well when it came out with 4Gig of RAM. So that led to my second book “Programming with 64-Bit ARM Assembly Language” which covers iOS, Android and Raspberry Pi 64-bit ARM Assembly Language Programming.
ARM learned a lot from its experience in the 32-bit world and as a consequence made the 64-bit instruction set quite different than the 32-bit one, addressing a lot of deficiencies and incorporating things that made compilers and performance much better.
Today even the Raspberry Pi OS has finally gone to a full 64-bits, though Raspberry still releases a 32-bit version as well.

32-Bit Thumbs its Nose
ARM holdings tries to make the ARM processor available in all CPU markets. The CPUs used in phones, tablets and Raspberry Pis are fairly high end. ARM also competes in the lower end microcontroller market. These devices are all 32-bit. However, these typically do not run the full 32-bit instruction set, but instead run a reduced version called the Thumb instruction set.
In 2021, Raspberry released their first microcontroller product, the Raspberry Pi Pico. With this they developed their own ARM based microcontroller, the RP2040. This led to my third book “RP2040 Assembly Language Programming”. This covers how to program ARM based microcontrollers in Assembly Language. Raspberry also sells its RP2040 chip to other companies and as a result there are a plethora of RP2040 base microcontrollers on the market today.

RISC-V
Intel/AMD processors dominate the desktop/laptop market and ARM dominates the mobile market. However, both these processors are proprietary and to use their instruction sets requires expensive licensing fees. Enter the RISC-V instruction set, created by professors at Berkeley University, as an open source instruction set that anyone can use free of any licensing fees. Note, that only the ISA is open source, the various hardware implementations of the ISA could be either proprietary or open source.
RISC-V is doing well in the microcontroller market where chips usually cost less than a dollar and built-in licensing fees can make chips uncompetitive. We’re beginning to see RISC-V based SBCs and laptops, although these are all quite low end at this point. I think RISC-V has a good future and with several RISC-V devices on the market to play with, I wrote “RISC-V Assembly Language Programming”.
In the case of ARM, the 32-bit and 64-bit instruction sets are quite different and two books were required. In the case of RISC-V both instruction sets are nearly identical with the main difference being the size of the registers. As a result I cover both 32-bit and 64-bit RISC-V Assembly Language in this one book.

Summary
This was a quick summary of why I’ve written four books on Assembly Language programming. Three for the various flavors of the ARM processor and my new one covering the new RISC-V CPUs.
RISC-V Assembly Language Programming
Introduction
“RISC-V Assembly Language Programming: Unlock the Power of the RISC-V Instruction Set” is my fourth Assembly Language programming book published by Apress, a division of Springer Nature. This book is part of their Maker Innovations Series. My first three books were on the three types of ARM instruction sets, namely 32-bit, 64-bit and thumb (used in microcontrollers). The RISC-V instruction set architecture is more unified, so with this new book, I could cover both 32-bit and 64-bit RISC-V Assembly Language.
Update 2024/04/04: The source code is now in Apress’s github at: https://github.com/Apress/RISC-V-Assembly-Language-Programming
Update 2024/04/03: While waiting for Apress to upload the source code for the book, I placed it here: https://github.com/smist09/riscv-assembly-language/tree/main.
What is RISC-V?
Today’s CPU market is dominated by ARM and Intel. If you want to make your own CPU based on ARM then the royalties can be quite expensive and the terms restrictive on what you are allowed to do. Intel doesn’t like to license their CPU instruction set. There are a number of CPU also-rans such as MIPS that you might be able to license cheaper, but these are getting old and not being updated as much.
RISC-V was developed at Berkeley University. It is an instruction set architecture (ISA) that specifies the RISC-V Assembly Language instruction set and how the instructions are encoded to be executed. There are no royalties on using this architecture, so anyone can implement a RISC-V CPU and manufacture it. Designing and manufacturing a CPU can be expensive and there are a number of companies that have developed CPU designs that you can license and customize for your specific needs. One cool thing is that many people have implemented RISC-V CPUs in Verilog to run on various FPGA boards, something you don’t see in the ARM or Intel world.
Currently RISC-V is doing quite well in the microcontroller market, where CPUs often cost less than a dollar and licensing costs can sink a product. My RISC-V book includes how to program these microcontrollers such as the ESP32-C3 in 32-bit RISC-V Assembly Language.
RISC-V CPUs are starting to enter the desktop/laptop market with products like the StarFive VisionFive II which run 64-bit Debian Linux. My book covers programming these in 64-bit Assembly Language.
The RISC-V specification was released in 2010 and as such is the most modern RISC architecture available. It is an extensible architecture and many useful extensions have been released to support things like GPUs, AI coprocessors and other advanced functionality. When writing RISC-V Assembly Language, it feels much cleaner than either ARM or Intel. It is built on the legacies of all the previous RISC architectures including ARM, Mips, Sparc and Power and developed something quite remarkable.
The RISC-V architecture is still in the early stages and there are many opportunities to provide Assembly Language code to projects like the RISC-V Linux, GCC RISC-V target, bootloaders and firmware for all the new computing boards.
Where to Buy
As the book pushes its way out into the channel, it takes time to appear in all markets. As of today, it appears for sale on Springer Link, but is still pre-order at all the other retailers. Over the coming weeks they will start to change from pre-order to regular order as they receive their shipments. So apologies for anyone keen to buy, whose favorite retailer is still pre-order, but this should sort itself out over the next month. Here are a few links to some bigger retailers:
Summary
Writing this RISC-V Assembly Language Programming book was a lot of fun. I greatly enjoyed writing RISC-V Assembly Language programs and I hope you do as well. I’m sure that as time goes by, we’ll be seeing many more RISC-V CPUs filling all the available niches in the computing world. Before long there will be RISC-V mobile phones, laptops, desktops and even supercomputers.
Simulating RISC-V on a Raspberry Pi
Introduction
Last time, we assembled a small RISC-V program to run on my FPGA RISC-V core running on a Digilent Basys3 development board. To do this we used RARS, which is a quite good Assembler, Debugger, Simulator for RISC-V; in this article I thought I’d point out some other tools available from the official RISC-V github page, including the full GNU C toolchain.
The intent of RISC-V is to be as open source as possible. The main page for the RISC-V Github site contains links to all the RISC-V specifications as well as quite a bit of software including simulators and test tools to test your RISC-V implementation. There is a sister github site for collaborative software such as the GNU RISC-V toolchain which includes a C/C++ compiler, macro assembler and various library and linking tools.
Generally these tools are oriented towards Linux and MacOS and some won’t work in Windows since they require a case sensitive file system. You need to build all these tools yourself, but building them on Ubuntu Linux is fairly straightforward and well documented on the Github sites. I was able to build all these tools on a Raspberry Pi, however it took a full day to do so, and it requires the 64-bit version of the Raspberry Pi OS.

Building the RISC-V Tools
I don’t yet own a real RISC-V processor and my FPGA experiments are nowhere near being able to run Linux. This means I need to compile my RISC-V programs on an Intel or ARM processor, then I can either run the program on a simulator or try it on my FPGA CPU. Building the cross compiler is interesting since it has to first build the compiler executables using the host Intel or ARM GNU compiler and when this is finished use the resulting compiler to compile the C runtime library, so that this is produced in proper RISC-V machine code.
Below I’ll give the commands I used to build and run all the tools on the Raspberry Pi using the 64-bit version of the Raspberry Pi OS. The instructions on the RISCV Github page document the procedures for an Intel version of Linux, but most things work on ARM unmodified.
Install the Prerequisites
These are the recommended packages to install first:
pi@raspberrypi:~ $ sudo apt-get install autoconf automake autotools-dev curl python3 python3-pip libmpc-dev libmpfr-dev libgmp-dev gawk build-essential bison flex texinfo gperf libtool patchutils bc zlib1g-dev libexpat-dev libtinfo5 libncurses5 libncurses5-dev libncursesw5-dev device-tree-compiler git pkg-config
Build the GNU Toolchain
This is the long step where you need to let the make step run overnight.
pi@raspberrypi:~ $ git clone https://github.com/riscv/riscv-gnu-toolchain
pi@raspberrypi:~ $ cd riscv-gnu-toolchain
pi@raspberrypi:~ $ ./configure --prefix=/opt/riscv --enable-multilib --with-arch=rv32i
pi@raspberrypi:~ $ sudo make
pi@raspberrypi:~ $ cd ..
You now have the GNU GCC compiler and build tools. To use them add:
export PATH=$PATH:/opt/riscv/bin
export RISCV=/opt/risc
To the end of your .bashrc file and start a new terminal window so these settings take effect. You can now compile a C program. Here is hello.c being compiled:
pi@raspberrypi:~ $ cat  hello.c
#include  <stdio.h>
void main()
{
    printf("Hello Raspberry Pi World\n");
}
pi@raspberrypi:~ $ riscv32-unknown-elf-gcc hello.c -o hello
pi@raspberrypi:~ $
You can’t run this program quite yet since this program is compiled to RISCV machine code. The unwieldy names of the tools are so the RISC-V versions don’t conflict with the ARM tools and cause havoc.
Build the Spike Simulator
To run the program, we’ll build the Spike simulator which will interpret our RISCV machine code and execute it as if it is running on a real CPU. There is a second library, we’ll build which provides support for some basic operating system calls along with a boot loader to get our simulated CPU up and running. First we build the simulator:
pi@raspberrypi:~ $ git clone https://github.com/riscv/riscv-isa-sim
pi@raspberrypi:~ $ cd riscv-isa-sim
pi@raspberrypi:~/riscv-isa-sim $ mkdir build
pi@raspberrypi:~/riscv-isa-sim $ cd build
pi@raspberrypi:~/riscv-isa-sim/build $ ../configure --prefix=$RISCV --with-isa=rv32i
pi@raspberrypi:~/riscv-isa-sim/build $ make
pi@raspberrypi:~/riscv-isa-sim/build $ sudo make install
pi@raspberrypi:~/riscv-isa-sim/build $ cd ..
pi@raspberrypi:~/riscv-isa-sim $ cd ..
Now we build the component which simulates some Linux system calls and provides a boot loader.
pi@raspberrypi:~ $ git clone https://github.com/riscv/riscv-pk
pi@raspberrypi:~ $ cd riscv-pk/
pi@raspberrypi:~/riscv-pk $ mkdir  build
pi@raspberrypi:~/riscv-pk $ cd  build
pi@raspberrypi:~/riscv-pk/build $ ../configure --prefix=$RISCV --host=riscv32-unknown-elf
pi@raspberrypi:~/riscv-pk/build $ make
pi@raspberrypi:~/riscv-pk/build $ sudo make install
With this we have the simulator built and we can now run our program:
pi@raspberrypi:~ $ spike /opt/riscv/riscv32-unknown-elf/bin/pk hello
bbl loader
Hello Raspberry Pi World
pi@raspberrypi:~ $
The string “bbl loader” is from the Berkeley boot loader and then we get the string that our program printed out.
If you want to see the RISC-V Assembly Language generated by the GCC compiler, you can use the objdump utility to disassemble the hello executable program:
pi@raspberrypi:~ $ riscv32-unknown-elf-objdump -d hello >hello.txt
Then below is a snippet of the main routine that we wrote. You can also browse the startup code and C library code that is contained there as well.
0001018c <main>:
   1018c: ff010113          add sp,sp,-16
   10190: 00112623          sw ra,12(sp)
   10194: 00812423          sw s0,8(sp)
   10198: 01010413          add s0,sp,16
   1019c: 000137b7          lui a5,0x13
   101a0: 66478513          add a0,a5,1636 # 13664 <__modsi3+0x30>
   101a4: 260000ef          jal 10404 <puts>
   101a8: 00000013          nop
   101ac: 00c12083          lw ra,12(sp)
   101b0: 00812403          lw s0,8(sp)
   101b4: 01010113          add sp,sp,16
   101b8: 00008067          ret
Summary
It is pretty cool that you can simulate a RISC-V processor on a Raspberry Pi and do development targeting RISC-V systems. Even though the Raspberry Pi is such an inexpensive system, it is still powerful enough to allow cross platform simulation and development. If you are interested in RISC-V development, but aren’t ready to purchase RISC-V hardware yet, then this is a good way to get started.
Counting on my RISC-V FPGA CPU
Introduction
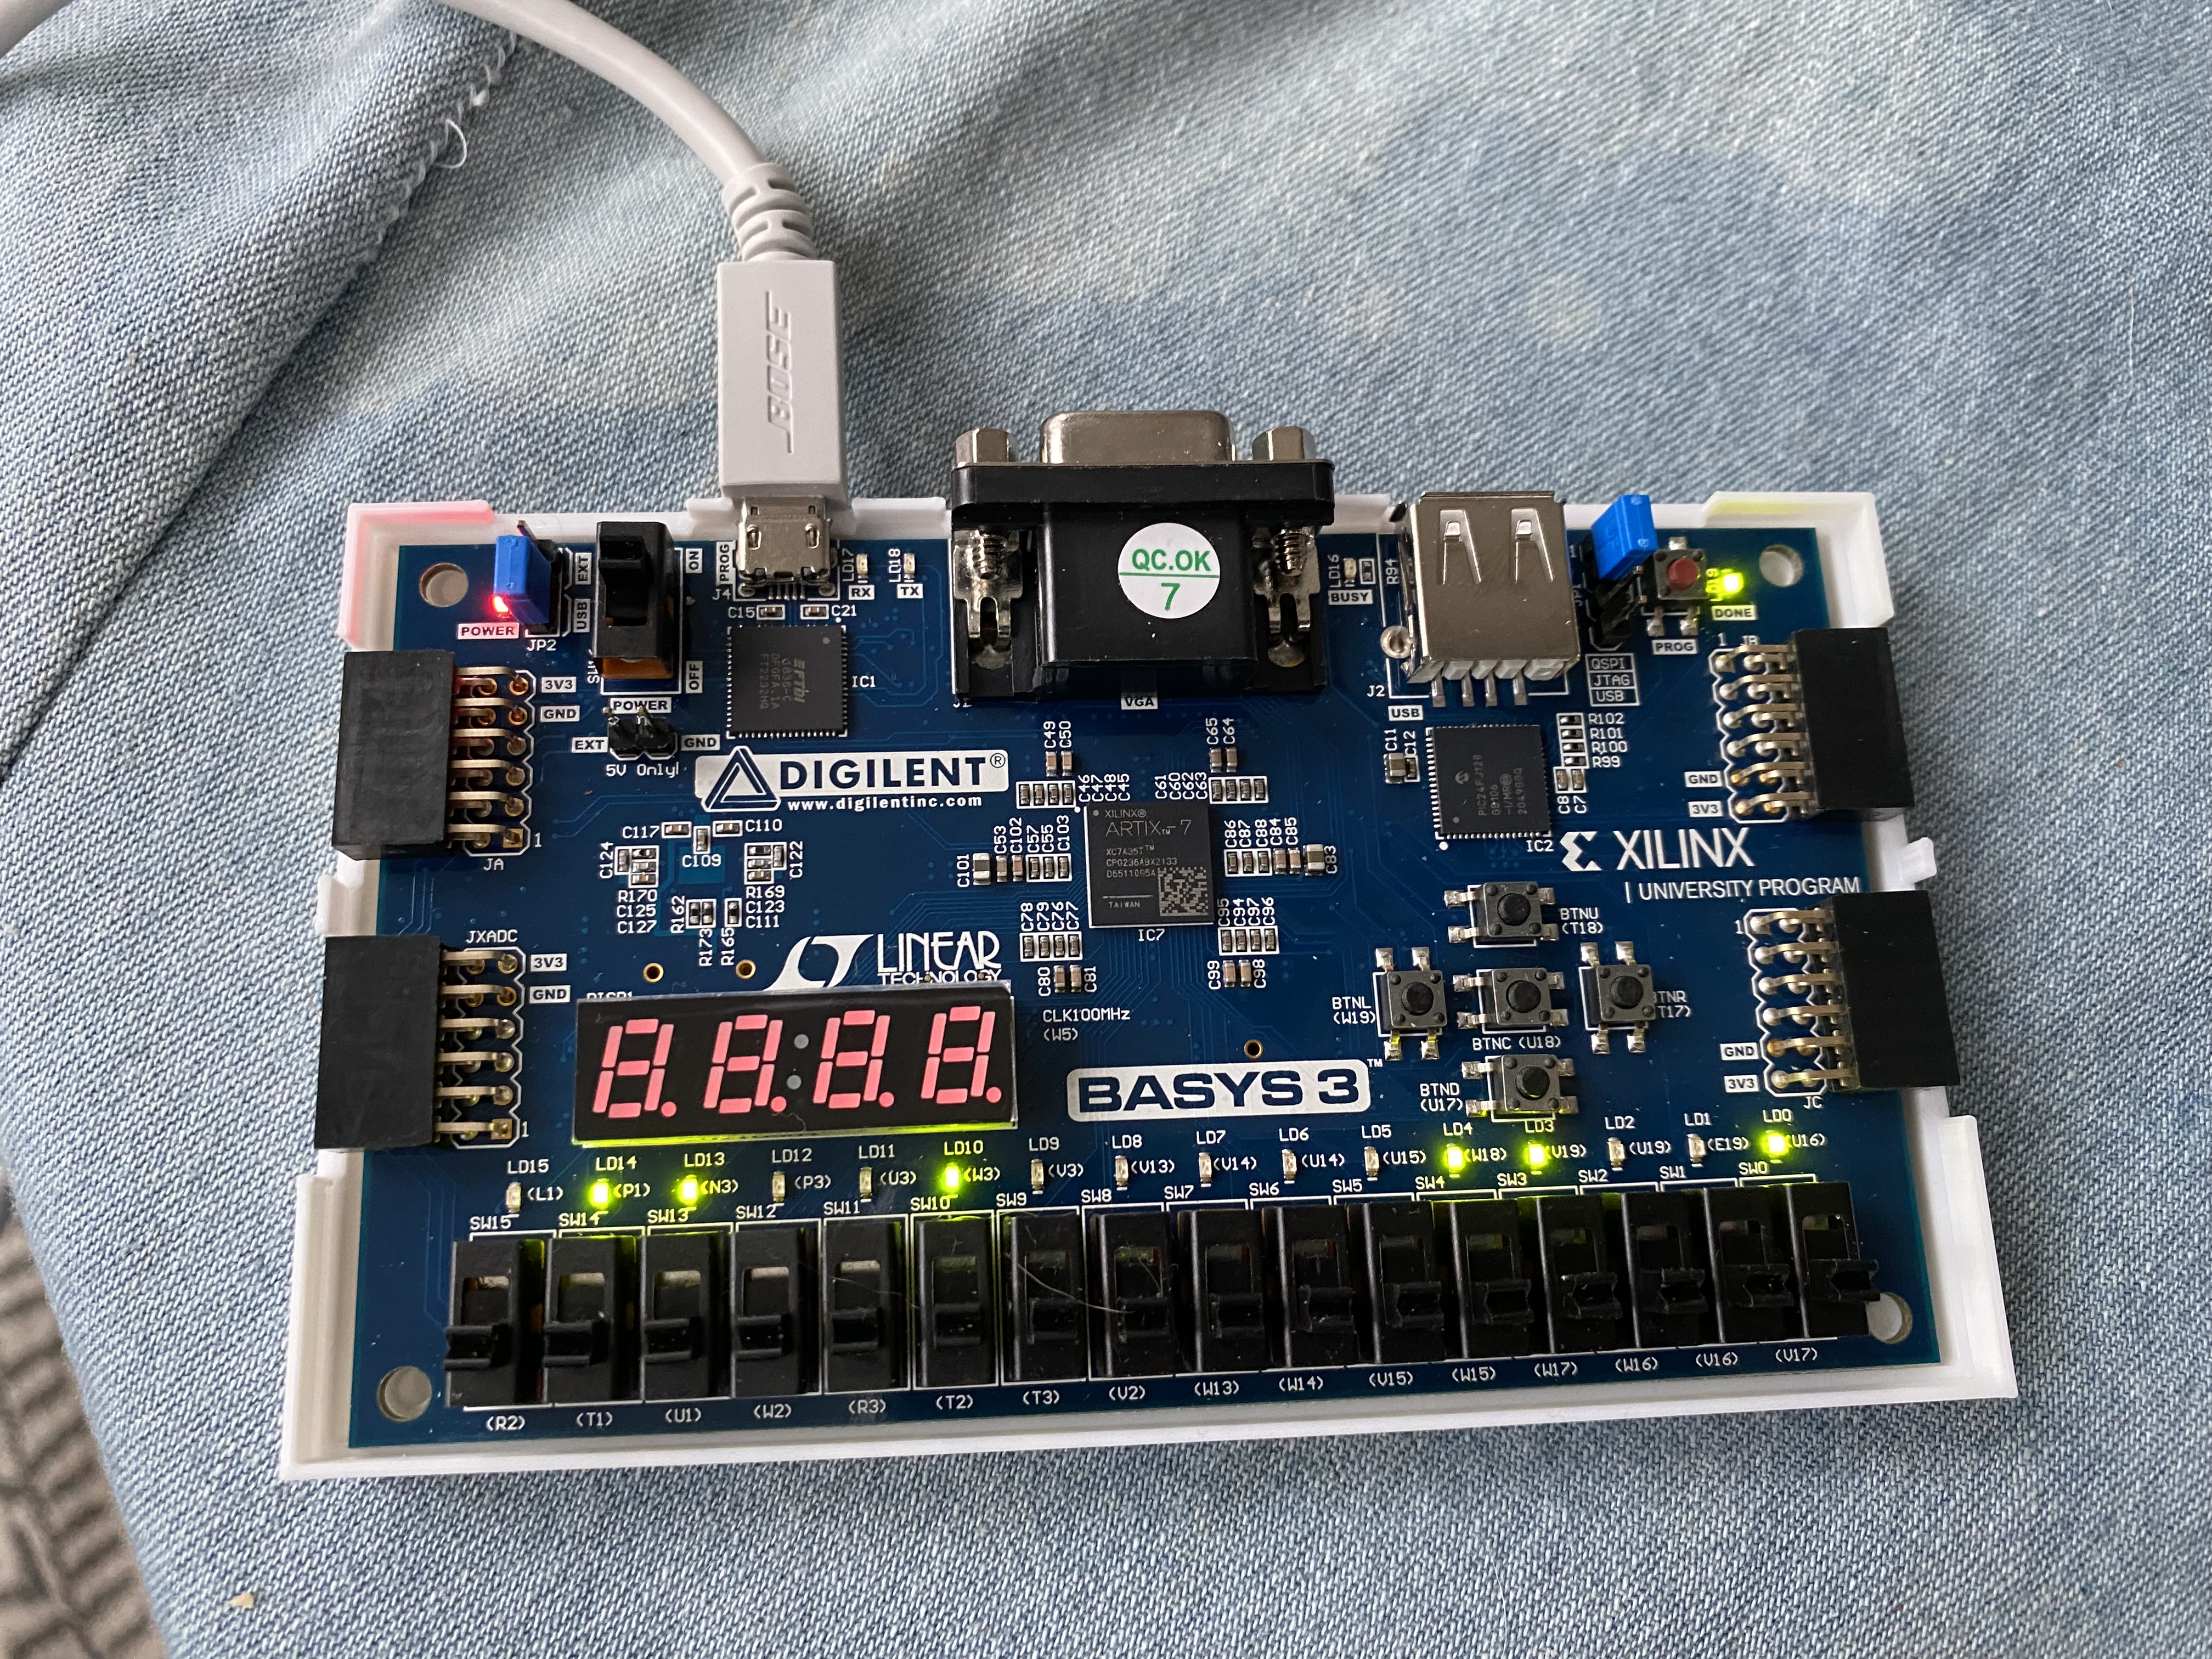
Last time, I talked about getting a minimal RISC-V CPU up and running on my Basys FPGA development board. In this article, we’ll connect up the seven segment displays as memory mapped I/O and write a simple RISC-V Assembly Language program to count on the display.
Connecting the Seven Segment Display
To support the four seven segment displays, I took the code from the book “FPGA Programming for Beginners” by Frank Bruno, and connected it to the RISC-V CPU from the book “Digital Design and Computer Architecture: RISC-V Edition” by Sarah L. Harris and David Harris. This turned out to be quite easy. Just needed to add a case statement in soc.sv where if the address is 0x100 then it goes to the seven segment display routine. I chose the rather low address 0x100 since that fits in an immediate argument saving additional code.
  always @(negedge clk_25)
    begin
        if(MemWrite) begin
            case(DataAdr)
                16'h100: encoded = WriteData;
            endcase
            led[7:0] = WriteData[7:0];
            led[15:8] = DataAdr[7:0];
        end
    end
To test this, I needed to write a RISC-V Assembly Language program, only using the instructions that my mini RISC-V CPU supports.
Writing RISC-V Assembly Language
I wrote the simple program:
# Simple program to count on the 7-segment display
      addi x2, x0, 0     #initialize counter to 0
      addi x3, x0, 0x100 # memory address of seven seg display
main: addi x2, x2, 1     # add 1 to counter
      sw x2, (x3)        # save to the display
      addi x4, x0, 0x7ff # delay loop counter
      addi x6, x0, 9     # ready to shift left 9 bits
      sll x4, x4, x6     # shift left 9 bits
      addi x5, x0, 1     # will subtract from x4
loop: sub x4, x4, x5     # decrement counter
      beq x4, x0, next   # loop done, proceed
      beq x4, x4, loop   # repeat loop
next: beq x2, x2, main   # jump back to loop forever
The first version of this didn’t have the delay loop, so was simpler. With this nice Assembly Language source code, I needed a way to assemble it. I googled and found RARS (Risc-V Assembler and Runtime Simulator). RARS compiled the program fine and I could copy the compiled programs to the instruction memory in the SoC source code.


When I first ran the program, it was way too fast and the seven segment display just showed all eights (all segments lit up). So I added a delay loop, but due to the limited instruction set, I could only loop 0x7ff times, this slowed it down so the high order LED counted. I needed a way to create bigger numbers, so I implemented the SLL (shift logical left) instruction, which was easy to add to the ALU. I could have loaded a larger number from memory or could have written an outer loop to have two nested loops, but chose this instead. With this all done it works fairly well.
Utilization
Below is the utilization report for the hardware resources being used. Notice that with this simple CPU implementation that we are using a small percentage of the available resources. Hence, we have a lot of headroom to keep developing this simple CPU/computer.
+----------------------------+------+-------+------------+-----------+-------+
|          Site Type         | Used | Fixed | Prohibited | Available | Util% |
+----------------------------+------+-------+------------+-----------+-------+
| Slice LUTs*                |  347 |     0 |          0 |     20800 |  1.67 |
|   LUT as Logic             |  299 |     0 |          0 |     20800 |  1.44 |
|   LUT as Memory            |   48 |     0 |          0 |      9600 |  0.50 |
|     LUT as Distributed RAM |   48 |     0 |            |           |       |
|     LUT as Shift Register  |    0 |     0 |            |           |       |
| Slice Registers            |   93 |     0 |          0 |     41600 |  0.22 |
|   Register as Flip Flop    |   93 |     0 |          0 |     41600 |  0.22 |
|   Register as Latch        |    0 |     0 |          0 |     41600 |  0.00 |
| F7 Muxes                   |    2 |     0 |          0 |     16300 |  0.01 |
| F8 Muxes                   |    1 |     0 |          0 |      8150 |  0.01 |
+----------------------------+------+-------+------------+-----------+-------+
Summary
Developing a CPU is a lot of work, but a lot of fun. It’s amazing that with a low cost FPGA development board you can design a CPU and start building a computer around it. This was a small increment in my RISC-V CPU, but nice to see that the tools are quite easy to work with to accomplish my goal.
RISC-V on a Basys 3 FPGA Development Board
Introduction
I’ve been working on learning how to program/configure FPGAs. I got off to a rocky start due to US export regulations, but after that I’ve been making good progress. Two good books I found are:
- “Digital Design and Computer Architecture: RISC-V Edition” by Sarah L. Harris and David Harris.
- “FPGA Programming for Beginners” by Frank Bruno.
The Harris’s RISC-V book is an excellent source on how to create a RISC-V CPU core in a Hardware Definition Language (HDL) giving examples in both System Verilog and VHDL. The Bruno book is great for how to implement simple hardware projects on Digilent FPGA boards based on the Artix-7 FPGA architecture.
This blog post looks at taking a RISC-V core from the Harris’s book and implementing it on a Digilent Basys3 FPGA development board using the information from Bruno’s book.
Getting RISC-V Up and Running
The Harris’s book has a lot of information on designing a RISC-V CPU. This implementation executes one instruction per clock cycle and implements the RISC-V instructions:
- lw, sw – load/save a word from/to memory
- add, sub, and, or, slt, addi, andi, ori, slti – arithmetic/logic ALU instructions
- beq – conditional branch
- jal – jump and link.
These are enough instructions to execute simple programs and really emphasizes the R in RISC (really reduced instruction set).
First, I took the source code from the Harris’s book and along with the testbench and input it into Vivado. There were a couple of typos in the text and some of the code was left as an exercise, however the online book resources contained the complete correct code. With this in hand I was able to run the testbench in the Vivado simulator and have it pass the single automated test.
I was pretty happy at this, I could execute RISC-V instructions and examine the circuit schematic produced.

I then went to run it on the Basys3 board. This didn’t compile, complaining there weren’t enough I/O ports on the board. The reason for this is that the RISC-V core takes as input both the instruction and data memories as input parameters. These were instantiated as part of the testbench, and any input parameters that aren’t created in the circuit are expected to be connected to external ports.
Creating a SoC
My next step was to create a System on a Chip (SoC) module that would instantiate some memory, instantiate the RISC-V core and provide connections to the Digilent board’s I/O ports.
First I added the instruction and data memory to the SoC module and when I got it to compile, I got an error that nothing was produced. This turned out to be because I didn’t have any outputs, the optimizer was able to remove every component resulting in an empty implementation. The easiest way past this was to connect a couple of things to the LEDs on the board, this way I could see the same results as the test in the testbench program, namely that the program ends with DataAdr == 100 and WriteData == 25.
This causes Vivado to actually generate some circuits, however it then complains it can’t find a layout that works at 100MHz. The solution is given in Bruno’s book to include a clock module from the IP section of Vivado. This clock module is free, easily downloaded and incorporated into your project. With this you can configure the clock to a slower speed to allow more to happen in one clock cycle. Configuring the clock to 50MHz allowed Vivado to produce a layout and then generate a bitstream that I could download to the Basys board. This then lit up the LEDs as expected. The source code for the SoC module is at the end of this article.
Where to Next
There is still a long way to go to create a general purpose computer. The Assembly Language program is hard coded into the circuitry of the FPGA. There is very little I/O with only using a switch for reset and then the LEDs to give a limited view of the address bus.
Further the Vivado optimizer can remove a lot of circuitry because not all 32-bits are used in this example and it can execute the program in the optimizer and hard code the result. To start to make this useful it would be nice to:
- Add memory mapped I/O for more devices on the Basys board. Such as outputting numbers to the four seven-segment displays.
- Add more instructions from the RISC-V instruction set.
- Provide a way to download the machine code Assembly Language to the processor as it’s running. I.e. hard code a boot loader rather than the actual program.
- Add support for a VGA monitor, as the Basys does have a VGA video port. Similarly figure out a way to connect a keyboard.
The Basys 3 has rather limited memory, since it only has its distributed memory spread over various LUTs. More expensive boards from Digilent include banks of RAM that could be used to hold more extensive programs. I suspect if I wanted to port a BASIC interpreter, I would need the next Digilent board up in the line. But I have a lot of work to do before getting to that point.
Summary
Creating a small CPU on an FPGA is certainly fun, but it shows the amount of work required to create a CPU and its ecosystem. This is a simple CPU with a few instructions, no pipeline and no caches. But at least it is 32-bit. Implementing some of the RISC-V instruction set, which means I can use the GCC Assembler running on a Raspberry Pi to create the machine code. It is a long way from having what is required to run the Linux Kernel. But for those interested in minimalistic computing this is another alternative to creating custom CPUs that is a bit easier than constructing one out of discrete TTL logic components.
`timescale 1ns/10ps
module soc(
    input wire                         clk,
    input wire                         reset,
    output logic [15:0]    led
);
    logic [31:0] WriteData, DataAdr;
    logic MemWrite;
    logic [31:0] PC, Instr, ReadData;
logic clk_50;
generate
   sys_pll u_sys_pll
    (
     .clk_in1  (clk),
     .clk_out1 (clk_50)
     );
endgenerate
// instantiate processor and memories
    riscvsingle rvsingle( clk_50, reset, PC, Instr, MemWrite,
        DataAdr, WriteData, ReadData);
    socimem imem(PC, Instr);
    socdmem dmem(clk_50, MemWrite, DataAdr, WriteData, ReadData);
   always @(negedge clk)
    begin
        if(MemWrite) begin
            led[7:0] = WriteData[7:0];
            led[15:8] = DataAdr[7:0];
        end
    end
endmodule
module socimem(input logic [31:0] a,
    output logic [31:0] rd);
    logic [31:0] RAM[63:0];
    initial
    begin
    RAM[0]  = 32'h00500113;
    RAM[1]  = 32'h00C00193;
    RAM[2]  = 32'hFF718393;
    RAM[3]  = 32'h0023E233;
    RAM[4]  = 32'h0041F2B3;
    RAM[5]  = 32'h004282B3
    RAM[6]  = 32'h02728863;
    RAM[7]  = 32'h0041A233;
    RAM[8]  = 32'h00020463;
    RAM[9]  = 32'h00000293;
    RAM[10]  = 32'h0023A233;
    RAM[11]  = 32'h005203B3;
    RAM[12]  = 32'h402383B3;
    RAM[13]  = 32'h0471AA23;
    RAM[14]  = 32'h06002103;
    RAM[15]  = 32'h005104B3;
    RAM[16]  = 32'h008001EF;
    RAM[17]  = 32'h00100113;
    RAM[18]  = 32'h00910133;
    RAM[19]  = 32'h0221A023;
    RAM[20]  = 32'h00210063;
    end
    assign rd = RAM[a[31:2]]; // word aligned
endmodule
module socdmem(input logic clk, we,
    input logic [31:0] a, wd,
    output logic [31:0] rd);
    logic [31:0] RAM[63:0];
    assign rd = RAM[a[31:2]]; // word aligned
    always_ff @(posedge clk)
        if (we) RAM[a[31:2]] <= wd;
endmodule
Assembly Language Tutorial Six for MagPi Magazine
Assembly Language Tutorial Six for MagPi Magazine
I’m in the process of writing a series of Assembly Language tutorials for MagPi Magazine. The sixth and final one appeared in issue #121 on page 58.

The PDF version of the magazine is free to download, but MagPi always appreciates any donations.
This article doesn’t look at ARM Assembly Language, instead it looks at the special Assembly Language used by the Raspberry Pi Pico’s Programmable I/O processors. If a CPU needs to handle all the aspects of I/O operations itself, this can take a significant percentage of its processing power. To offload this I/O processing from the CPU, the RP2040 chip includes a set of special PIO coprocessors that can do the I/O processing independently from the CPU. This special Assembly Language is simpler than ARM Assembly Language and there is only room for 32 instructions in the coprocessor, but even so the RP2040’s PIO processor is powerful and can leave the RP2040’s main ARM CPU free to perform more application oriented processing.
Unfortunately this article was written before the Raspberry Pi Pico W was released. The Pico W adds Wifi and Bluetooth to the Raspberry Pi Pico. To do this, Raspberry took over the GPIO pin that connected the on-board LED to the CPU. As a result the program in this article won’t work on a Pico W, only the regular Pico. On the Pico W, the onboard LED is connected to the wireless chip and you have to go through the device driver for this chip to access the LED. There is an example program to do this in the Pico W’s SDK samples.
This tutorial can only give so much detail. If you want more detail, you can always consider my book RP2040 Assembly Language Programming.

Assembly Language Tutorial Four for MagPi Magazine
I’m in the process of writing a series of Assembly Language tutorials for MagPi Magazine. The fourth one appeared in issue #119 on page 50.

The PDF version of the magazine is free to download, but MagPi always appreciates any donations.
This article leads readers through using the Raspberry Pi’s floating point unit (FPU) to perform a calculation. This article uses the 64-bit of Raspberry Pi OS and shows how to write an Assembly Language routine to calculate the distance between two points in two dimensions. This shows how to use the FPU to add, subtract, multiply and perform square roots. There is a C program that uses this Assembly Language distance() routine to calculate the distance between a couple of sets of points. The tutorial shows how to use the gdb debugger to step through the program and examine the data as it is calculated.
If you want more detail, you can always consider my book Programming with 64-Bit ARM Assembly Language.

Assembly Language Tutorial Three for MagPi Magazine
Assembly Language Tutorial Three for MagPi Magazine
I’m in the process of writing a series of Assembly Language tutorials for MagPi Magazine. The third one appeared in issue #118 on page 52.

The PDF version of the magazine is free to download, but MagPi always appreciates any donations.
This article looks at writing Assembly Language code for the Raspberry Pi Pico. The Pico is Raspberry’s entry into the microcontroller market and includes a dual core ARM-M0+ CPU. This CPU runs ARM’s thumb instruction set, a subset of the full ARM 32-bit instruction set. This article shows how to create a project, include Assembly Language source code and then run or debug the program on the Raspberry Pi Pico.
This tutorial can only give so much detail. If you want more detail, you can always consider my book RP2040 Assembly Language Programming.

Assembly Language Tutorial Two for MagPi Magazine
I’m in the process of writing a series of Assembly Language tutorials for MagPi Magazine. The second one appeared in issue # 117 on page 50.

The PDF version of the magazine is free to download, but MagPi always appreciates any donations.
This second article looks at writing Assembly Language for the 64-bit version of Raspberry Pi OS. This tutorial shows how to access memory, use 64-bit registers, use loops, conditional logic and call functions. The completed program prints out the value of a register in both decimal and hexadecimal showing how to convert a binary value to ASCII.
This was a fairly long tutorial but I can only give so much detail. If you want more detail, you can always consider my book Programming with 64-Bit ARM Assembly Language.

Assembly Language Tutorials for MagPi Magazine
I’m in the process of writing a series of Assembly Language tutorials for MagPi Magazine. The first one appeared in issue # 116 on page 46.

The PDF version of the magazine is free to download, but MagPi always appreciates any donations.
This first article was written before Raspberry released the 64-bit version of their operating system and so uses 32-bit ARM Assembly Language, this still has many applications and is a good springboard to using ARM based microcontrollers like the Raspberry Pi Pico.
It was a challenge to write in a tutorial format, but I think it ended up working well. With a four page article, I can only give so much detail, but of course if you want more detail, you can always consider my book Raspberry Pi Assembly Language Programming.

